Mastering Video Transitions - Complete Guide & Tips
Wanting to improve your video editing skills with flawless transitions? Explore the techniques of video transitions with our complete guide. Discover the finest strategies and tools for easily integrating transitions into your films. Let's go on a journey to improve your video productions together!

Part 1. The Best Way to Add Video Transitions
With Tipard Video Converter Ultimate, revolutionize your video editing journey. Seamlessly integrate transitions into your videos with this advanced tool, effortlessly enhancing quality and professionalism. Enjoy smoother editing and achieve remarkable results effortlessly. Follow the steps below.
Step 1Download and install Tipard Video Converter Ultimate on your personal computer. Then, open the software to begin adding transitions to your videos.
Step 2Navigate to the MV tab on the tool's main interface, where you'll discover a + button. Click on it to incorporate your initial video.
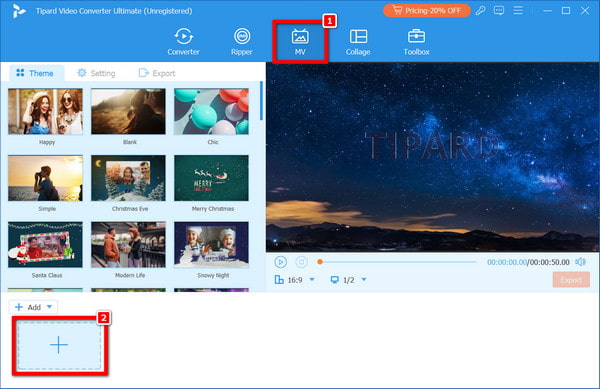
Step 3Next, use the + button next to the first video to add the next video. Repeat the method as needed to incorporate all desired videos.
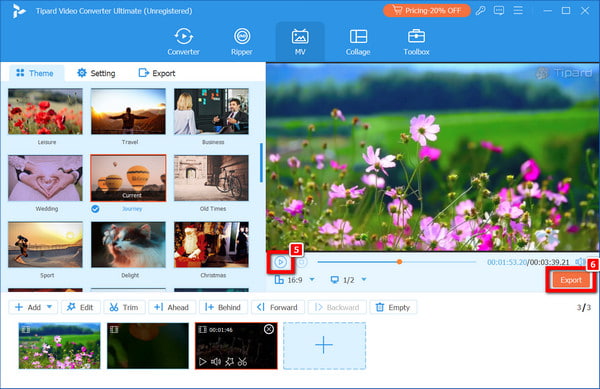
Step 4Once you've added the desired videos, choose the transition style you wish to apply to your video sequence.

Step 5Once you've selected the transition style, you have the option to preview the edited video or the final result. If you're pleased with the outcome, tap the Export button, and the edited video will be automatically saved to your device.
Part 2. How to Add Video Transitions Online
Using an online tool such as Canva makes adding transitions to your films easier. With Canva's Video Editor, you can effortlessly merge your videos by selecting transition effects from a selection. Adjust the time and direction of each transition to meet your project's requirements. Canva allows you to effortlessly enhance your videos and add a professional touch to your storytelling.
Step 1Log in to your Canva account or sign up if you're a new user. Navigate to the Video Editor tool on the Canva homepage.
Step 2Then, start by uploading the video clips you want to edit and add transitions to. You can either upload your clips or choose from Canva's library of free stock videos.
Step 3Position the playhead between two video clips where you want to add a transition. Click on the + icon located between the clips.
Step 4After clicking the + icon, select the option to Add Transition. This action will open the Transitions sidebar.
Step 5In the Transitions sidebar, browse through the available transition effects. Choose the one that best suits your project's style and needs.

Step 6Once you've selected a transition effect, you can customize its duration and direction by clicking on the transition icon. Set the duration and direction according to your preference.
Part 3. How to Add Transitions to Videos on iOS/Android
In iMovie video transitions, you can easily improve your video edits on iOS and Android devices by using smooth transitions. Enhance your storytelling with simple techniques like mixing footage and applying a variety of transition effects. Customize the duration and sound effects of your transitions to fit the design of your project. This user-friendly editing application can help you realize the full potential of your videos.
Step 1Find the iMovie app on your iOS or Android smartphone. It is represented as a purple star with a camera icon in the center. To activate the app, tap on the iMovie icon.
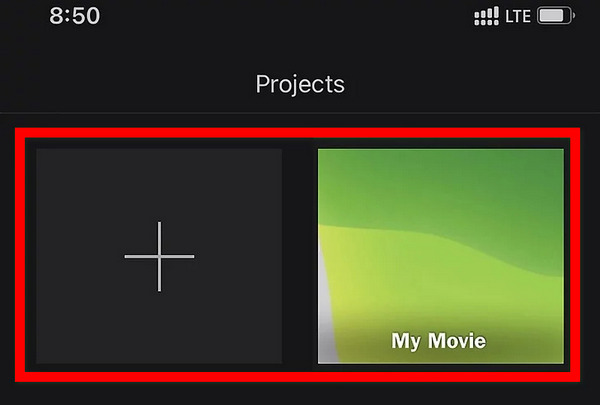
Step 2If you have an existing project, tap to open it. Otherwise, press on the addition + sign to start a new project. To get started, select Movie.
Step 3Hit on the + button in the upper-right corner to add video clips to your project. You can either select videos from your device's library or choose from categories provided within iMovie.

Step 4To add transitions, you'll need at least two videos. Add another clip using the same procedure as step 3. Alternatively, to generate the transition effect split an existing clip into two distinct ones. Drag the timeline to the appropriate split point, then press Split.
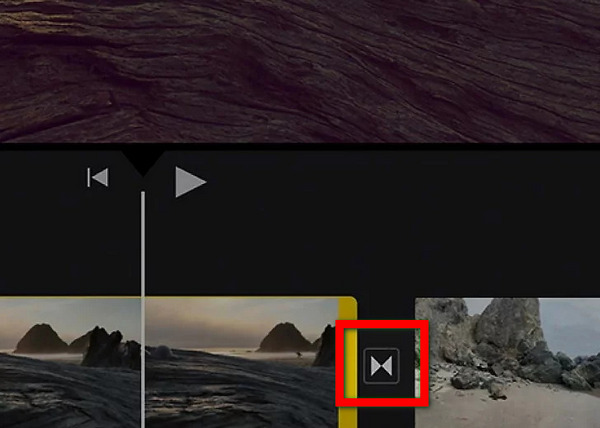
Step 5Tap on the transition icon between the two clips where you want to insert the transition. It resembles two triangles touching in the center and between each clip.
Step 6Pick from the transition choices shown at the bottom of the screen. Options usually include Dissolve, Slide, Wipe, and Fade. Please tap on the desired transition effect to activate it.
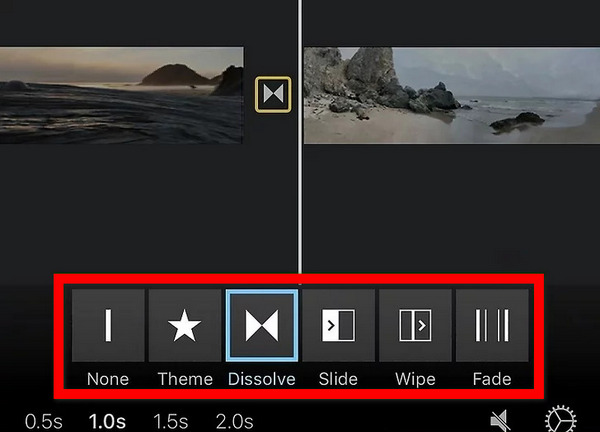
Step 7Tap on the duration above the list of transitions to select how long you want the transition to last. Options typically include 0.5s, 1.0s, 1.5s, and 2.0s.
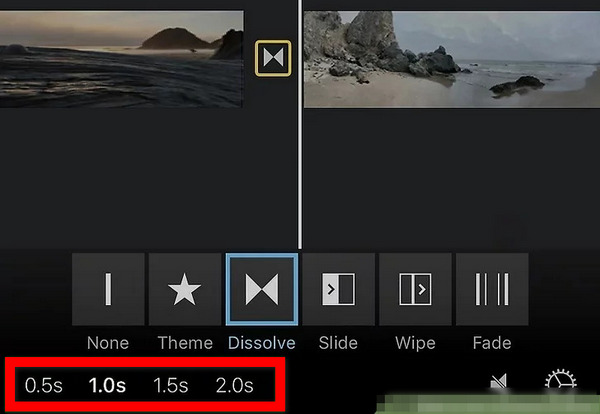
Step 8Transitions do not come with sound effects by default. To add a sound effect to the transition, toggle the Sound FX option next to the duration options on/off.
Further Reading:
Merge Videos Online and Offline With the Top Notching Tools
Ways of Combining GoPro Videos Together on Windows and Mac
Part 4. FAQs About Video Transitions
What are the common video transition types used in professional editing?
Common video transition types, which improve video quality, include cuts, fades, dissolves, wipes, and slides. Cuts are abrupt transitions, while fades gradually transition between clips. Dissolves blend one clip into another, wipes reveal one clip through another shape, and slides move one clip over another.
Do transitions enhance flow and coherence in video projects?
Transitions are vital in strengthening the flow and coherence of video projects. They smooth the transition between scenes or shots, providing a seamless viewing experience for the audience and ensuring continuity throughout the video.
Techniques for applying transitions to highlight specific moments/themes?
Techniques for applying transitions to highlight specific moments or themes include using dramatic transitions like fades or wipes to signify shifts in mood or time and employing subtle transitions like dissolves for seamless continuity between related scenes or ideas.
Contribution of transitions to narrative and storytelling in videos?
Transitions contribute to video narrative and storytelling by bridging scenes or shots, indicating changes in time, location, or mood, and guiding the viewer's focus. They enhance pacing, create visual interest, and reinforce the narrative structure, ultimately enriching the storytelling experience.
Tips for selecting suitable transition effects for different videos?
Consider your video's tone, pacing, and message, including whether you need to rotate a video. Opt for subtle transitions like dissolves for documentaries or serious content while choosing dynamic transitions like wipes or slides for energetic or promotional videos. Match transitions to the overall style and audience preferences for maximum impact.
Conclusion
In conclusion, mastering the art of video transitions effects can significantly enhance the quality and professionalism of your video projects. By seamlessly blending scenes and guiding the viewer's focus, transitions contribute to a cohesive and engaging storytelling experience. Elevate your videos with these essential techniques and tools today!


