Live Photos is among the best features on your iPhone devices. It can add a simple motion to your images, making them entertaining and wonderful to the eyes of viewers. However, there is a drawback when using the file. The file will only be sent as static images when sending it to other users, especially non-iOS users. If you want to send your Live photos effectively, the best solution you can do is to turn them first into a video. Thankfully, this post can teach you how to effectively turn your live photos into a video. So, to learn the whole process, read this tutorial and start learning the steps on how to save live photos as videos.

Part 1. 2 Default Ways to Save Live Photos into a Video Using iPhone
If you want to learn how to make a live photo from a video, then you can also already rely on your Photos application. As we all know, this app can showcase various media files, including images, videos, memories, live photos, and more. But the good part is that you can use this app to turn your live photos into simple videos. With that, you don't have to get any third-party application to achieve the task. What's more, the process of making a video is simple. So, you no longer have to struggle if you are a skilled or non-professional user.
Furthermore, besides turning the live photo into a video, you can also use some functions of the Photos app. You can use the cropping function, adjust the color, and use a basic filter. Now, we can tell that you can even beautify your files by using the app. If you want to learn the default ways of turning live photos into a video, see the effective methods below.
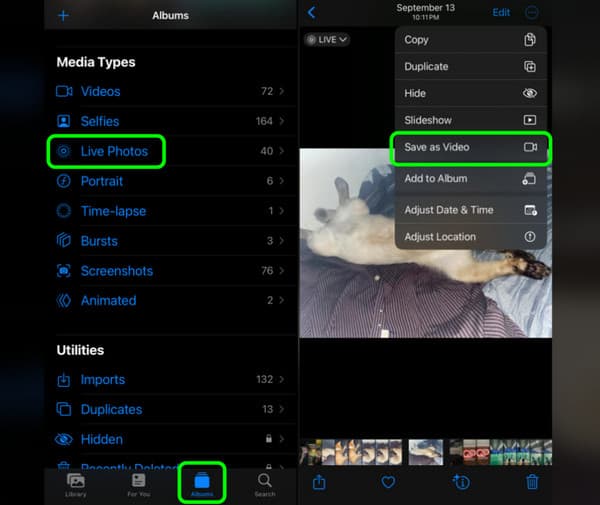
Turn One Live Photo Into a Video
Step 1Launch the Photos application on your iPhone device. After that, navigate to the Albums section.
Step 2Then, scroll down and press the Live Photos option. With that, you will see various live photos from your Photos app.
Step 3Select and press the live photo you want to turn into a video. Afterward, go to the top interface and press the three-dot button beside the Edit function.
Step 4For the last step, press the Save as Video option. Once done, the live photo will become a video. You can now play the file or send it to other users.
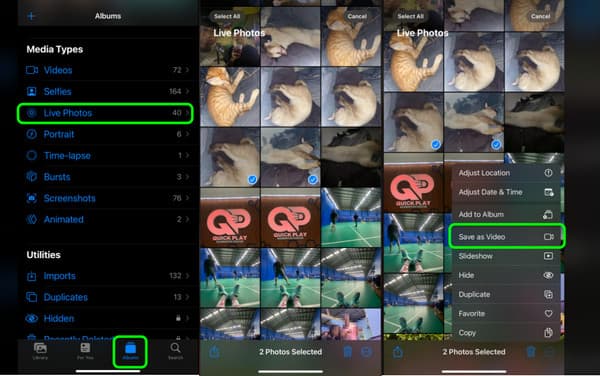
Turn Multiple Live Photos Into a Video
Step 1Run the Photos app on your iPhone. After that, go to the bottom interface and press the Albums section.
Step 2Afterward, press the Select button on the top interface. Then, select all the Live Photos you want to transform into a video.
Step 3For the next step, see the three-dots button below and click it to select the Save as Video button. Once done, your Live photos will turn into a video instantly.
Bonus: Easiest Way to Create Video for Photos
Are you interested in turning your pictures into a single video? That is possible if you have amazing software to use. To create an exceptional video from various images, use Tipard Video Converter Ultimate. This offline video editor can offer the MV feature to help you make a wonderful video. With this feature, you can insert as many photos as you want. Plus, you can arrange the photos in your preferred order. You can even use some functions that can enhance each picture. You can crop the photos, rotate, flip, and add watermarks. It also allows you to insert effects and adjust the image colors, making the software ideal for all users. The good thing here is that you can use numerous ready-to-use themes. It lets you make your content more engaging and perfect, leading to a better viewing experience. Therefore, see the simple instructions below to make an amazing video from your photos.
Step 1Use the Free Download buttons below to access the Tipard Video Converter Ultimate on your Windows and Mac computers. Then, run it to start the video-making procedure.
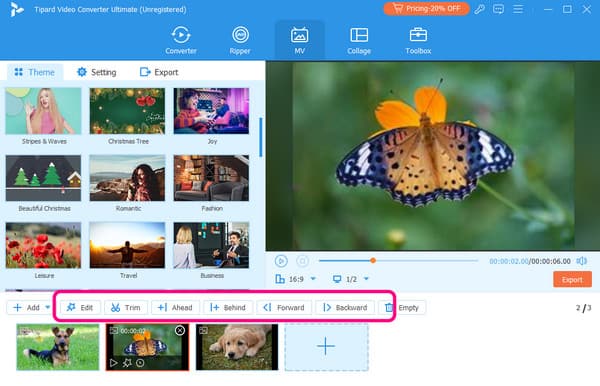
Step 2When the interface already shows up, navigate to the MV feature. Then, click the Plus button below to add all the images you want to turn into a single video.
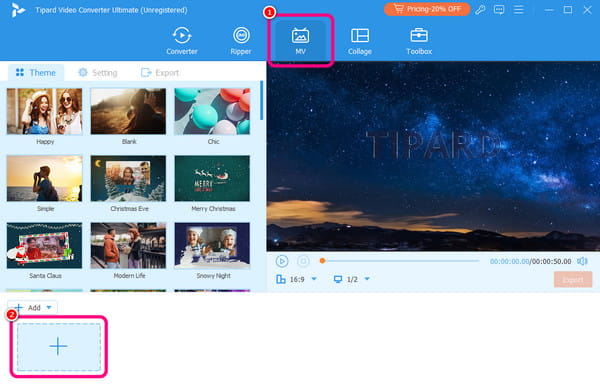
Step 3After you add the photos, you can click and drag them to arrange them based on your preferred order. You can also go to the Theme section to add a theme to your content.
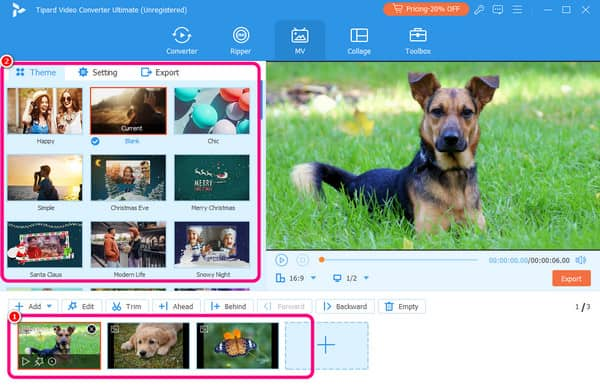
Step 4You can also use some functions to edit and improve your images. You can tick the Edit button to add effects to your content. You can also trim, crop, and add more images.
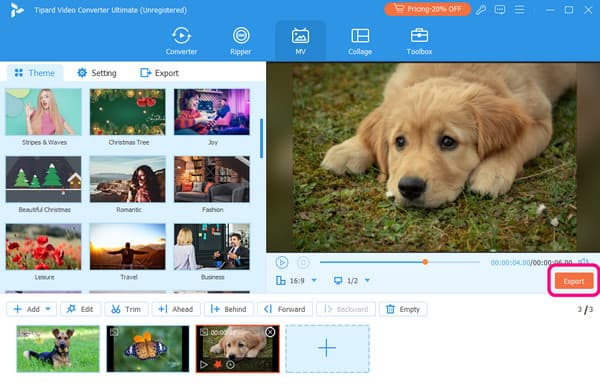
Step 5If you are satisfied with your final output, you can save the final video by hitting the Export button from the interface. Once done, you can start playing your video on your computer.
Part 2. How to Turn Live Photos into a Video on iMovie
The iMovie app is also a perfect video editing software you can rely on when it comes to turning your live photo into a video. With this app, you can effectively send your file to your friends without issues. The app can offer a smooth and simple way of making a video from live photos. You can also edit your content by attaching text, changing the color, cropping video on iMovie, and more. So, to learn how to make a video from live photos, check the simple steps below.
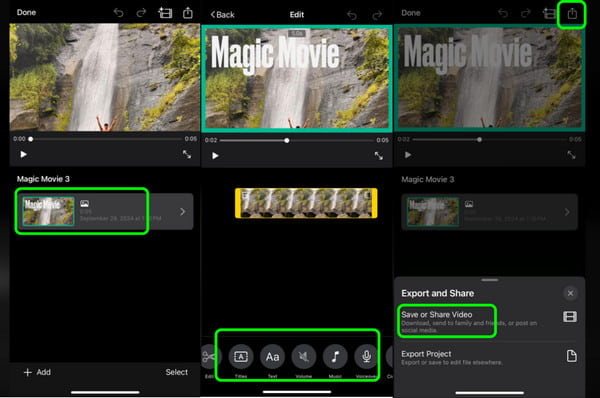
Step 1Run the iMovie app on your iPhone and press the Magic Movie button to add the Live photo you want to turn into a video.
Step 2After that, you can already see the live photo on the interface. You can use various editing functions to enhance your file.
Step 3Then, press the Share button from the top interface and select the Save or Share Video option to save and keep your video to your device.
Part 3. How to Make Live Photos into a Video Using IntoLive
Another helpful application that can turn live photos into video is IntoLive. This third-party application is available on your App Store. You can achieve your task with its main function in a simple procedure. Additionally, the tool lets you play the video many times. You can repeat and play the video up to 3×. With that, you can increase the length of your video easily. So, if you are excited about learning the simple process of making a video from live photos, follow the steps below.
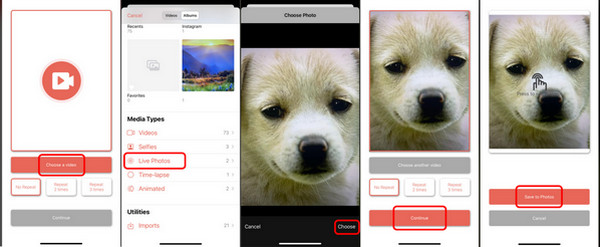
Step 1Install the IntoLive app on your iOS. After you launch it, click the Choose a Video option and navigate to the Live Photos section.
Step 2Once done, press the Choose button to add the live photo to the app's interface.
Step 3Then, you can select if you want to play the video up to 3×. After that, click the Continue button.
Step 4For the final process, press the Save to Photos button to save your video to your Photos application.
Conclusion
You can take part in this post to learn how to make a live photo or video. It provides all the methods you need to transform your live photos into an engaging video. In addition, if you want to make a perfect video from various images, you can use Tipard Video Converter Ultimate. This editing software has the MV feature that lets you add and organize your images to create a single video, making it a powerful video creator.


