Creating training videos has become an effective and efficient method for disseminating useful information and skills and reaching out to your target audience. Training videos have become more popular owing to the growing demand for instructional materials. From searching for the right subject to recording the final video, this guide provides clear steps for those new to video creation and helpful hints for recording and editing, ensuring that your videos are original and visually appealing.

Part 1. Easy Steps to Create Training Videos for Beginners
Making training videos that one can use and apply has been simple. Just follow these four basic steps:
Step 1 Choose a Topic
It might be responsible for training work or teaching more complex tasks. With this goal in mind, the e-learning content will likely be interactive and effective.
Step 2 Write an Outline
Write an outline focusing on what you are about to say. Outlining is beneficial not only for creating customer testimonials or promotional videos; it also helps audiences thematically divide the text or the voice-over of the scenario.
Step 3 Prepare a Script
This way, beginners avoid being unclear or lacking confidence. The more advanced creators may not need to use them. It is also possible to speed up the implementation process by hiring voice-over artists.
Step 4 Record Your Content
The choice is between shooting a video and capturing the screen. For video captures, expensive resources will likely be spent, while screen video capture will be very cheap and easy. ScreenRec and other programs can capture audio and video images of any face babbling.
Part 2. You Can Also Record Training Videos
Tipard Screen Capture is a versatile and efficient tool for creating straightforward training videos with outstanding quality. It lets its users capture their screen activity, audio and even the webcam! Whether a tutorial production, a meeting or a video demo recording, this application strikes the right balance between ease of use and sophisticated options.
- Record and export videos in HD with various supported formats.
- Select both screen and webcam captures and create a personalized educational video.
- Record the screen and insert pictures like drawings, letters or funny emojis.
- Playback and edit recordings in a very simple and quick way.
- Start and stop times are fully automated, and log everything stress-free.

Step 1 Start the Software
For your computer, please download Tipard Screen Capture. Run the program and select the Screen Recorder option from the main user interface.

Step 2 Identify the Area to Record
The size of the recording can be set to Full Screen, or the user can adjust it by dragging the selection box to their preferred dimensions.

Step 3 Settings Modifications
The need may arise to turn the Webcam, System Sound and Microphone on and off. The system sounds, and microphone should both be turned on for training videos.
Step 4 Recording the Demonstration
Press the REC button to commence capturing the video. Perform your training demonstration since this software runs on the screen and is in audio recording mode.

Step 5 Stop and Save
Click the red square to stop recording. Preview the video, trim unnecessary parts, and click Save to store it on your computer.
Part 3. Best Training Video Editor
When crafting training videos, the right tools are essential to create engaging and professional content. Below are some of the best training video editors, with introductions, pros, and cons for each tool to help you choose the right one for your needs.
1. Tipard Video Converter Ultimate
Tipard Video Converter Ultimate is an all-in-one tool for creating and editing training videos. It combines powerful video conversion capabilities with intuitive editing tools, making it ideal for educators and content creators. Whether you need to edit, convert, or enhance videos, Tipard ensures efficient workflows and professional-quality outputs.
- Crop, clip, merge, rotate, and add watermarks or subtitles to training videos.
- Upscale video resolution, adjust brightness and contrast and remove noise.
- Create personalized training videos with transitions, filters, and music themes.
- Combine multiple videos and images into engaging split-screen content.
- Convert to over 500 formats, ensuring compatibility across devices and platforms.

Step 1 Import Media
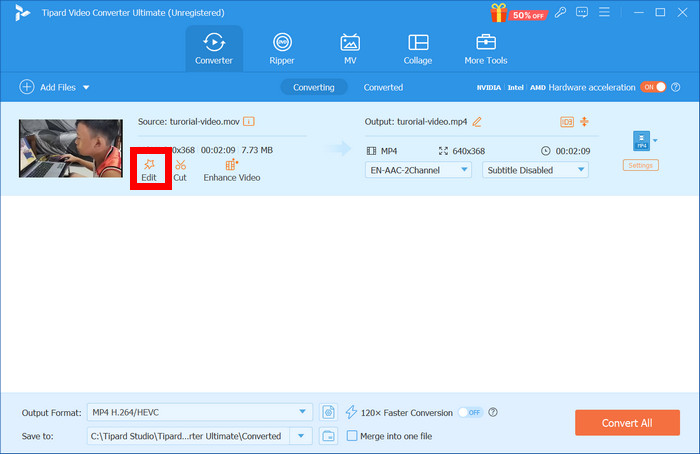
Get and install, then run the Tipard Video Converter Ultimate on the computer. Click Add Files to upload the training videos or Load Disc for the DVD content.
Step 2 Edit Video Footage
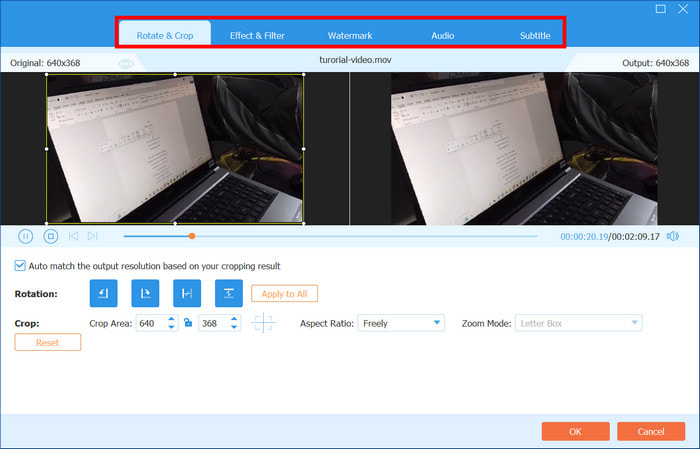
To edit videos, click the Edit button in the toolbar. Trim or Rotate videos to adjust the framing. Place Watermarks images to mark ownership of the video and edit Audio Tracks and Subtitles.

Step 3 Improve Quality
You are now set to use the enhanced tool to increase the resolution, remove noise, and fine-tune the focus and clarity of the video. Work with filters or brighten and contrast video effects. Select from the following tabs to customize your editing preferences: Crop & Rotate, Effect & Filter, Watermark, Audio, and Subtitle, each offering tailored tools for precise adjustments.

Step 4 Export Your Training Video
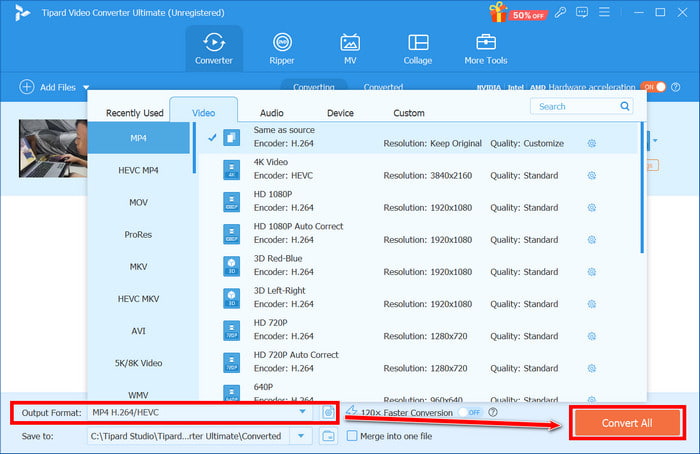
Finally, once satisfied with the editing, choose the preferred Output Format or device preset. Also, you can select the resolution, encoder, and bitrate if required. To render the final output quickly, Click Convert All to finish rendering.

2. Adobe Premiere Pro
This central place of Adobe Premiere Pro in the video editing industry makes its use crucial in creating YouTube training and other training videos. Due to its non-linear editing system allows fast positioning of clips in the preferred position with advanced editing features for experts, such as easy management of audio and video in Premiere for professional-quality output.

- Complex timeline and color correction editing interface.
- Close cooperation with Adobe Creative Cloud apps.
- Different formats can be used at the same time.
- The perfect and efficient organizational working system, even in groups.
- Good support of VR video and audio editing.
- Steep learning curve for beginners.
3. TechSmith Camtasia
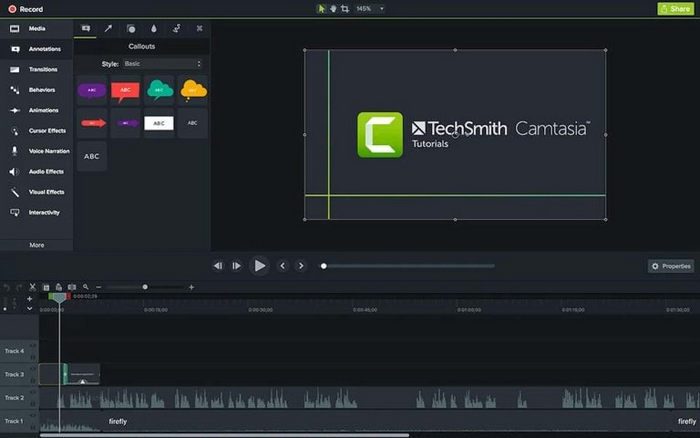
TechSmith Camtasia is among the best software with the ability to screen capture and edit video content, including various tutorials, presentations and training videos. Its simple interface makes it suitable for teachers, trainers, and students.

- Has a screen recording feature with inbuilt advanced video editing features.
- It has a Powerpoint integration, which is beneficial for those attempting to create video presentations.
Allows for in-depth work on video projects with multitrack editing, enabling users to edit video contrast.
- Videos can be easily published on YouTube, Vimeo, etc.
- The free version of this program is highly limited to 720p, and the output comes with watermarks.
- Very high cost of a lifetime license.
Conclusion
Determining the appropriate technology and methods to record training videos properly is necessary. The importance of pre-production stages, such as planning, scripting, and later editing, must be emphasized. Do so confidently that your training content will be vibrant, interesting, concise and meaningful to the target audience with the resources presented in this guide.


