Compress WAV Files Easily With These Simple and Easy Steps
WAV, short for Waveform Audio File Format, is an audio file container saved in WAVE format. This file format is the standard audio format used for storing waveform data. It is among the most standard and common audio file formats found on the internet. Moreover, it keeps audio recordings with different sampling and rates and is usually saved in a 44.1 kHz, 16-bit, stereo format, a standard format that CD audios use. However, some WAV files are huge, which will be difficult if you want to upload them on different platforms. Today, we will teach you the easiest methods to compress WAV files on your Mac or PC.

Part 1. Two Ways to Compress WAV Files on Mac
1. Using Tipard Video Converter Ultimate (Mac Version)
Tipard Video Converter Ultimate is the most powerful audio compressor you can use on your Mac device. This outstanding audio compressor enables you to adjust your audio's size, format, channel, sample rate, and bitrate to compress the size of your audio file. Additionally, beginners prefer using this tool because it has an easy-to-use interface. What's even fantastic about this application is that it supports all audio formats, such as WAV, MP3, WMA, AAC, FLAC, and more. Moreover, it can compress your files while maintaining their quality. Also, it contains many advanced editing features, including an audio compressor, video compressor, video merger, video reverser, and more from the Toolbox. Many platforms also support Tipard Video Converter Ultimate, like Windows, Mac, and Linux.
How to compress WAV files using Tipard Video Converter Ultimate:
Step 1On your Mac device, download Tipard Video Converter Ultimate by clicking the Download button below.
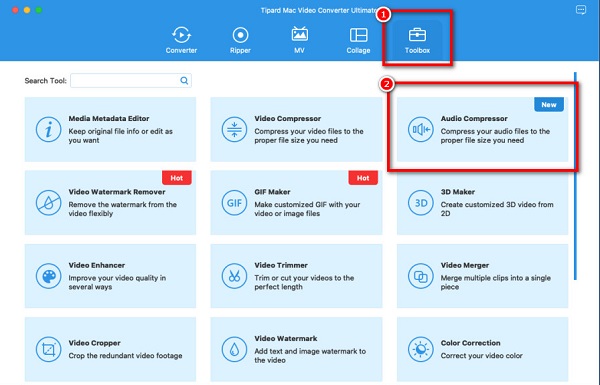
Step 2Then, on the main software interface, go to the Toolbox panel and select the Audio Compressor feature.
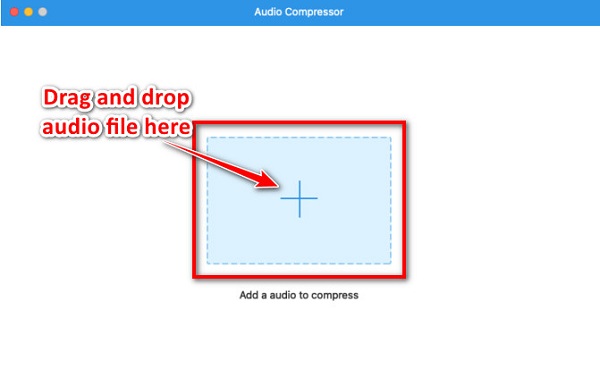
Step 3Next, tick the plus (+) sign button to upload the audio you like to compress. You can also drag and drop your audio file from your computer folders.
Step 4And on the next interface, you can adjust your audio's size, format, channel, and sample rate to compress your audio. But in this tutorial, we will reduce the size of your video by clicking the up/down arrow button beside size or by holding and dragging the slider to the left.
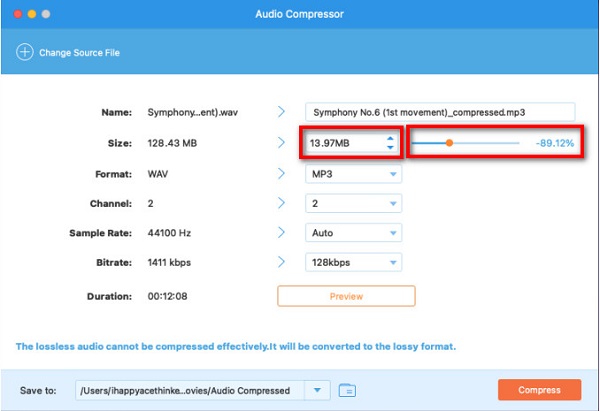
Step 5Lastly, when you are done adjusting your audio's size, click the Compress button to reduce the size of your video. And in just a second, your WAV file is compressed.
Easy, isn't it? Following those simple steps allows you to compress your WAV file size losslessly.
2. Audacity
When searching for an audio compressor, you must consider the other features that it has. Luckily, a software application is available on your Windows computer to compress your WAV file. Audacity is also among the most magnificent audio compressors you can use to reduce the size of your WAV file. In addition, Audacity also has other features. If you want to record, or add metadata to your file, Audacity will help you with that. And if you want to screen capture a frame, you can also do it with Audacity. Furthermore, you can download it for free on your Windows or Mac device. Therefore, follow the steps below to learn how to compress a WAV file in Audacity.
How to compress a WAV file using Audacity:
Step 1Download Audacity on your computer, then follow the installation process. And on the main user interface, go to the File menu, then click the Open button to browse the audio file you want to compress.
Step 2After uploading the WAV file, press CTRL + A on your keyboard to select the audio track you added. When the track is highlighted, click Effect > Compressor.
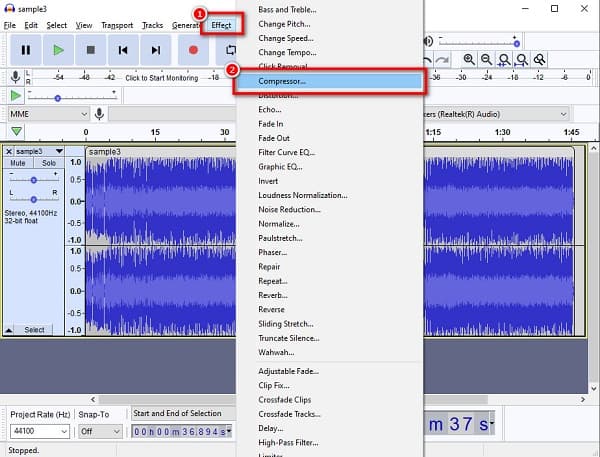
Step 3Then, you will see the compression settings where you can adjust the Threshold, Noisefloor, Ratio, Attack, and Release Time of your audio file. Adjust these settings to what you prefer.
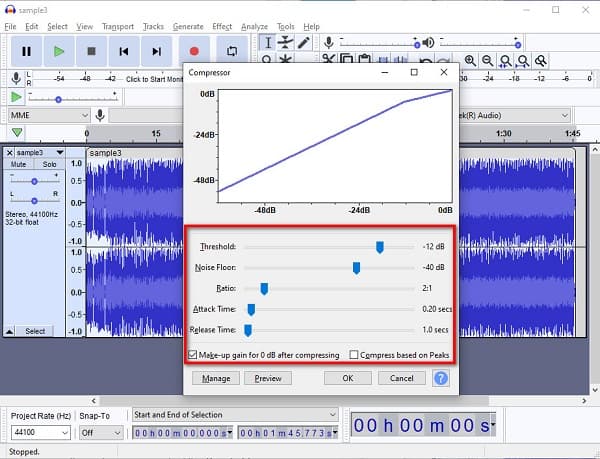
Step 4Finally, go to File, then click Export to save your compressed audio file. You can also change the output format that you want for your file.
Part 2. How to Compress WAV Online
To save space on your device, you can use an online application to compress audio files. In addition, it is more convenient to use online audio compression to compress your audio files because it is not necessary to download any software on your device. So, we will present the best online audio compression and discuss how to compress WAV files online.
FreeConvert is an online audio compressor that you can access on almost all web browsers, like Google, Firefox, and Safari. This audio compressor allows you to compress your WAV file by selecting the compression level you want for your audio. You can select between low, medium, and strong. Moreover, it supports almost all audio formats, such as WAV, MP3, AAV, and others. It also has a simple user interface, making it a user-friendly application. However, since it is an online application, it contains many pesky ads that might be disturbing to you. Nonetheless, it is still a convenient tool for compressing your WAV files.
How to resize WAV file online using FreeConvert:
Step 1Open your browser and search FreeConvert.com Audio Compressor on the search box. Then on the main user interface, click the Choose Files button.
Step 2And then, click the gear icon button to go to the compression settings. Then, click the drop-down arrow to select the compression level you prefer. And then, click Apply Settings to save the changes.
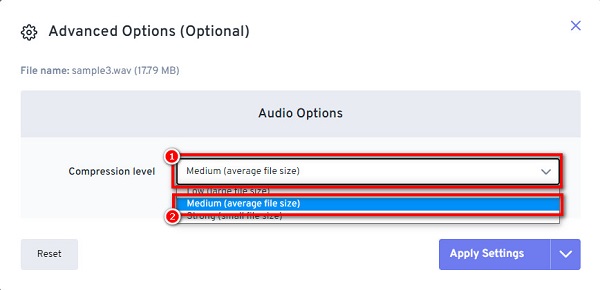
Step 3Finally, click the Compress Now button at the bottom-right corner of the interface to compress your WAV file.
Part 3. FAQs about How to Compress WAV Files
Can you compress WAV without losing quality?
Yes. Although many applications compress files and ruin their quality, there is also software that can compress WAV files losslessly.
Why is the WAV file so big?
WAV files are uncompressed audio formats that are similar to most CDs. That is why a ripped WAV file almost sounds like that from a CD sound.
Can I compress an audio file in VLC?
Yes. VLC Media Player is an application you can use to play any video and audio file formats. What's more, you can use it to compress your WAV file. To compress an audio file using VLC, go to Menu > Media > Convert/Save. Then in the File section, import the audio you want to compress, then click the Convert/Save button. And on the Profile, select Audio-MP3 and the sample rate you want for your video. Finally, click Save > Browse > Start to compress your audio.
Conclusion
And that's all! As easy as 1-2-3, you can easily compress WAV files using the most outstanding offline and online tools. But if you use a Mac device and want to compress your WAV easily, use Tipard Video Converter UItimate, which has many advanced editing features.


