
Are you among those who often wonder how to upload a DVD to YouTube? Do you want to upload personal memories or rare clips? Well, uploading a DVD is only possible if you have the Right Tools and Techniques. This guide will take you through the process of ripping DVDs to formats acceptable by YouTube, how to upload the video, and important tips that every uploader should know to ensure a hassle-free upload. Everything from legal issues to video quality to metadata optimization and all in between is crucial to understanding to ensure that your video upload is straightforward and professional. Why don't we start by converting your DVD content into quality videos suitable for YouTube?

Part 1. How to Rip DVD to YouTube Format
Rip a DVD to YouTube format to share your favorite movies, clips, or personal DVDs on the platform. Tipard DVD Ripper is a very versatile tool for this purpose. It processes very fast and supports more than 500 formats. Its advanced editing features ensure that your videos are ready for upload in no time.
- Converts DVDs to MP4, AVI, FLV, MOV, and other YouTube-compatible formats.
- Enables adding watermarks, cropping, and adjusting effects for optimized uploads.
- Preserves video and audio quality for professional-looking results.
- Adjust resolution to meet the requirements of YouTube, like 1080p or 4K.

Step 1 Get Tipard DVD Ripper
Download and install Tipard DVD Ripper on your device to commence.
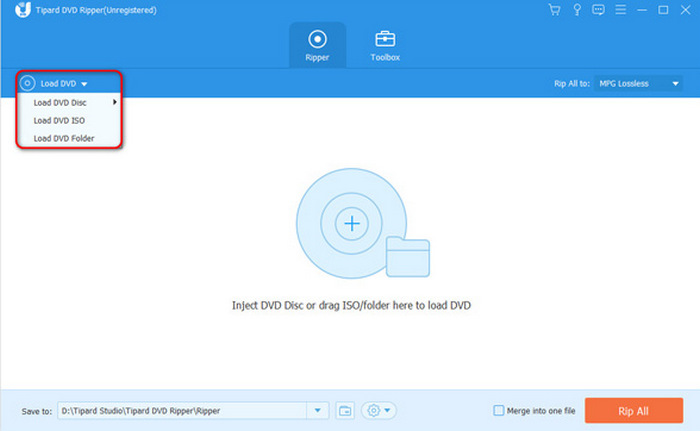
Step 2 Load Your DVD
Once you have downloaded the app, click the Load DVD option on the panel to import and add DVDs, ISO files, or other folders.
Step 3 Select Format
To upload your files on YouTube, you have the option to select formats like MP4 or AVI, which can be done by clicking on the options tab on the right side of the screen, resolving to a fairly impressive ratio as a standard to adjust the width easier, for instance, 1080p.

Step 4 Change Setting
Change bitrate or frame rates along with audio settings by moving the setting switch recorded on YouTube after you rip DVD content for optimal results.
Step 5 Begin the Ripping Process
All the formatting metals can be converted to the desired output format. To do the ripping process, click the Rip All button and convert your entire DVD with a click through this fast and advanced acceleration.

Part 2. How to Upload DVD Video to YouTube
Now that you have converted your DVD to a format that YouTube allows, the next step is to upload the copy DVD onto the massive platform. Here is a simple guide to have your video up and rolling.
Step 1 Prepare Video
Make sure the converted file is in an acceptable format: MP4, MOV, AVI and that the maximum file size, duration, maximum resolution, and aspect ratio conform to YouTube standards of 128 GB or 12 hours.
Step 2 Link With Your YouTube Account
Open YouTube on your app or browser, as you should have access to it. If not, log in to your Google account using YouTube.
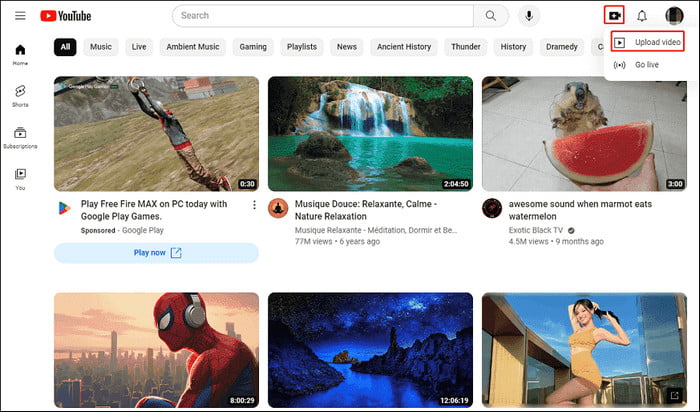
Step 3 Start Uploading Video
After logging into your account, you can view the Create button in the upper right corner; click on it, and afterward, click on Upload Video. Drag and drop the file you want to upload, or click Select Files and search for it on your PC.
Step 4 Provide Necessary Video Information
Add any necessary details, such as the title, description, and relevant tags, that assist users in locating your video. To ensure a polished finish, utilize a unique thumbnail as well.
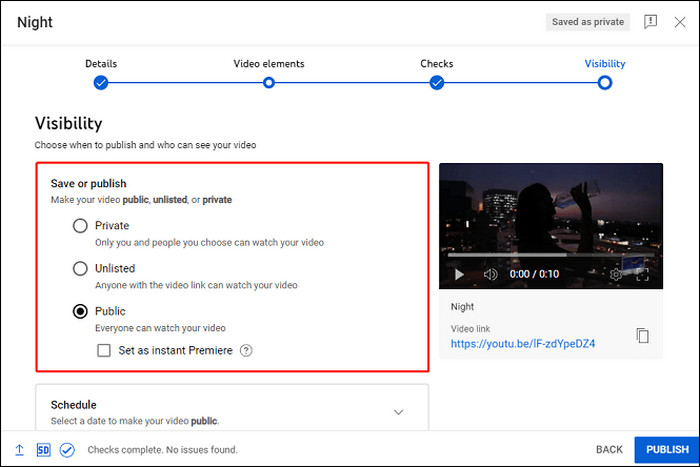
Step 5 Save Video Settings
Select the video visibility setting, either Public, Unlisted, or Private. Indicate if the video is child-friendly or not.
Step 6 Go Live on Video
After uploading the video, to make the video live, you will need to click the Next button as you go through the advertisement setting, end screen, and subtitle options. Then, ready, click the Publish button.
Part 3. Tips for a Successful DVD to YouTube Uploading
Following is a detailed breakdown of the essentials that guarantee an extremely smooth upload of your DVD content to YouTube:
1. Legal Matters
• Ownership: You must own the rights to the material or have a license that permits you to publish the material.
• Do Not Violate Copyright: Taking down content uploaded by others violates that person's copyright, which may result in strikes or bans.
• Watch Out For The Content ID Tool: Try to always check before uploading videos on Youtube's Content ID system for copyright issues.
2. Video Duration
• Time Limit: the maximum cap for every YouTube video is 12 hours and 128 GB in size, whichever comes first.
• Cut Unwanted Sections: To keep the interest, get a video editor and cut off any unwanted sections of the footage that would make the viewing experience less entertaining.
3. Video Quality
| Resolution | Description | Recommended Bitrate | Use Case |
|---|---|---|---|
| 720p (HD) | Minimum modern standard | 5 Mbps (at 30fps) | Suitable for quick uploads with smaller file sizes. |
| 1080p (Full HD) | Polished and professional | 8 Mbps (at 30fps), 12 Mbps (at 60fps) | Ideal for most content creators seeking quality. |
| 2160p (4K) | Ultra-high definition | 35-45 Mbps | Best for showcasing visually rich or cinematic content. |
4. File Size and Format
• Recommended Format: MP4 (H.264 codec) for compatibility and efficient compression.
• Compression Tools: Use software like Tipard DVD Ripper to reduce file size while maintaining quality.
5. Aspect Ratio and Frame Rate
| Factor | Recommendation | Reason |
|---|---|---|
| Aspect Ratio | 16:9 | Matches YouTube's default player. |
| Frame Rate | 30fps or 60fps | Ensures smooth playback. |
6. Metadata Systems Improvement
• Title: Always write a title that includes searching queries relevant to the video and appeals to the viewers' interest
• Description: Provide video snippets with video-relevant calls to action or video links.
• Tags: Apply keywords likely to increase visibility when looking for something in a search engine.
7. Audio Quality
• Stereo Sound: This audio should have stereo, 48kHz as a minimum recording frequency for clarity.
• Captions: Add time-coded time-coded subtitles to make them clearer to more people.
Quick Reference Table
| Factor | Recommendation | Reason |
|---|---|---|
| Legal Compliance | Obtain rights or permissions | Avoid strikes or bans |
| Max Length | ≤ 12 hours or ≤ 128GB | Meet YouTube's limits |
| Resolution | 720p, 1080p, or 4K | Professional appearance |
| Format | MP4 (H.264 codec) | Compatibility and quality |
| Aspect Ratio | 16:9 | Avoids black bars |
| Frame Rate | 30fps or 60fps | Smooth viewing experience |
| Audio Quality | Stereo, 48kHz sample rate | Clear sound |
| Metadata | Optimized title, description, tags | Better visibility and engagement |
Conclusion
Remember that uploading a DVD to YouTube entirely depends on the tools and techniques available to a person. The reason is that by simply converting a DVD into a compatible format and optimizing the quality, YouTube's upload requirements can be followed, and YouTube content can be shared more easily than ever.
More Reading
-
 How To Upload A Video to YouTube With The Easiest Way
by Lily Stark on 2021-01-22
-
 How to Mount an ISO File on Windows, Mac, and Linux Effectively
by Lily Stark on 2024-02-25/p>
-
 Best Way to Convert DVD to Android for Accessible Playback
by Lily Stark on 2023-10-09
-
 How to Import DVD Movies to iTunes for Playback Freely
by Lily Stark on 2024-11-21