
Ripping audio from DVDs allows you to preserve and enjoy audio tracks from your favorite movies or concerts in popular formats like MP3, WAV, or FLAC. This guide explores the best methods with step-by-step instructions for seamless extraction.

Part 1. Using Tipard DVD Ripper
Tipard DVD Ripper can be in the same sentence as exceptional because it allows you to rip audio tracks off of your DVDs and then save them onto popular audio formats such as MP3, WAV, M4A, etc. This application has a straightforward interface complemented with ripping and editing capabilities, which makes it a great tool for beginning to rip audio from DVDs suitable for different devices.
- Rip audio off DVDs and save them as MP3, WAV, and M4A formats.
- Set audio parameters, including bitrate, sample rate, and channels.
- Uses advanced speed acceleration technology.
- Rip multiple audio tracks from different DVDs simultaneously, invariably saving time.

Step 1 Download and Install
Start downloading and installing the Tipard DVD Ripper software on your computer.
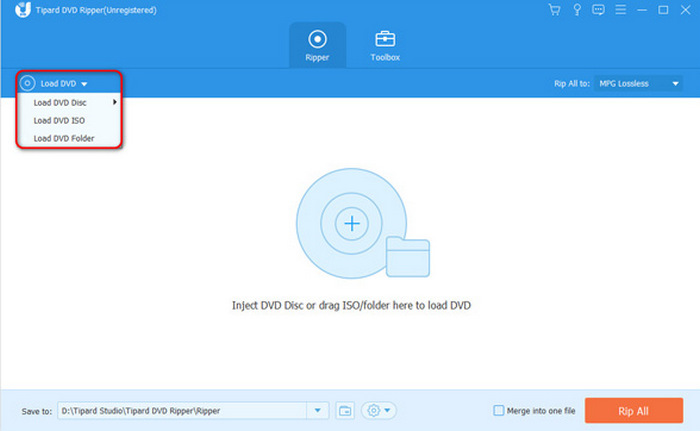
Step 2 Getting the DVD Ready
Next, click the Load DVD button available on the main interface. You can choose a DVD, an ISO file or a DVD folder from which you want to extract the content.
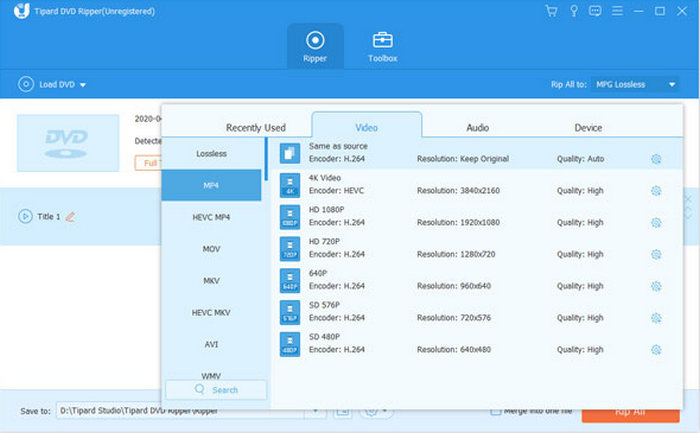
Step 3 Pick the Audio Format
Finally, choose the audio you want to extract from the DVD. After selecting an audio format from the list, click the Configure button for settings.
Step 4 Setting Preferences
Tipard DVD Ripper lets you set the output parameters before ripping the audio. You can adjust the audio bitrate or sample rate to suit your needs.
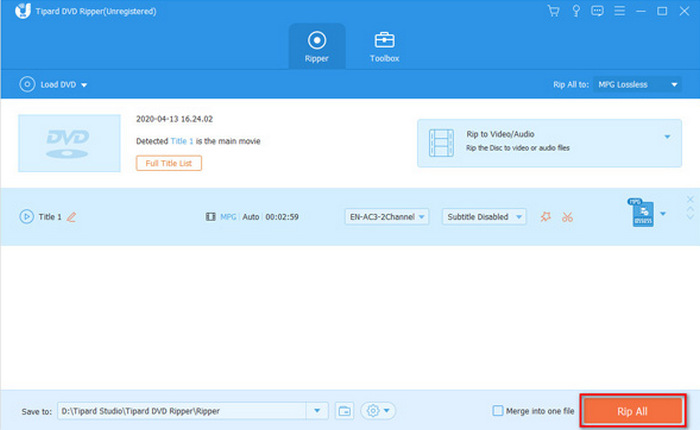
Step 5 Commence the Extraction Process
The very last process is to initiate the ripping of the audio content by pressing the Rip All button on your screen.
Part 2. Using HandBrake
HandBrake is a widely used open-source application that converts DVD storage and videos to digital format. However, if you want to create an audio file from a DVD without the video, you first have to rip the DVD into a video format, a feature HandBrake does not provide.
Step 1 Go to its official website and grab a copy of the compatible application with your platform. Install it, and then insert a DVD into a DVD drive.
Step 2 Open it, and the software should be able to see the DVD you mounted. If it does not, click on Folder and import the DVD files yourself.
Step 3 Go to the Range option within the metadata. Mark the chapters, seconds or frames to select the parts from which you want to rip audio. If you are operating on all of the DVDs, ignore this step.
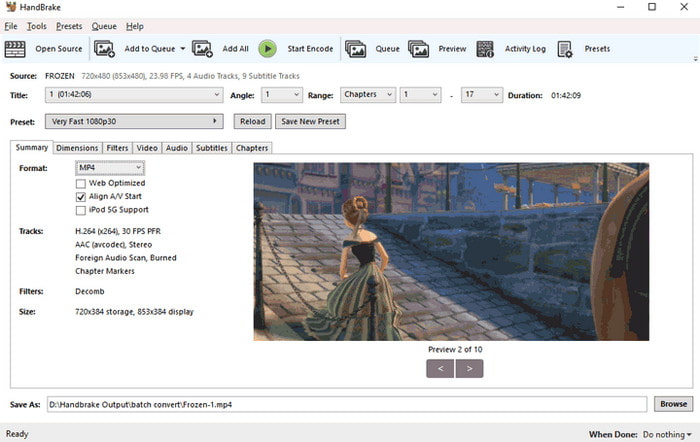
Step 4 Initiate the process by selecting Preset, and then you will select a profile that best meets your needs. For example, when speed is a factor, then Very Fast 1080p.
Step 5 Once prepared, you can start ripping the DVD by clicking the Start Encode button and, upon completion, the Thumbs up. An MP4 file will be located in the directories that you have specified.
Step 6 Use a separate tool such as VLC Media Player or VideoProc Converter to extract audio from the ripped video.
- Open the tool and import the video.
- Choose an audio format like MP3 or FLAC.
- Start the conversion to get your audio file.
Part 3. Using VLC
An alternative way is through the widely known multimedia player called VLC. It's worth mentioning that VLC can playback only non-encrypted DVDs. For commercial DVDs with protection, consider the alternative tools mentioned earlier.
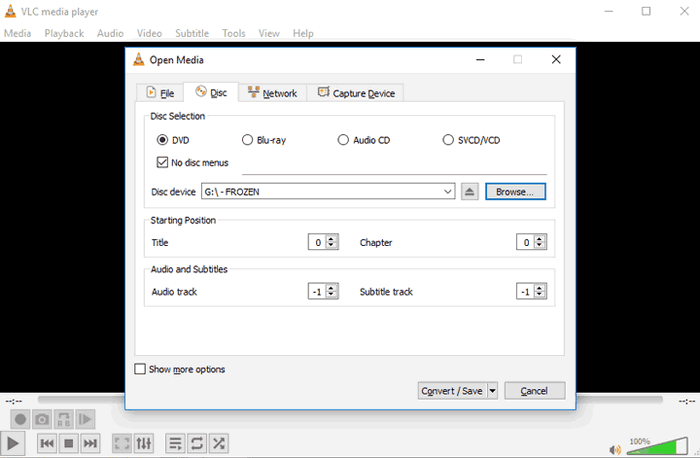
Step 1 You are required to insert the DVD into the computer's drive. Now, go to the official VLC website and download the latest version of the VLC player.
Step 2 Start the VLC application and click on the top menu of Media. Press Convert/Save, the second in the main taskbar.
Step 3 Next, click on the Discs tab in the Open Media window. Make sure to set the disc type as DVD. Select the other options to process formats, such as Blu-ray, Audio CD and SVCD/VCD.
Step 4 Turning off the DVD menu requires that you check the No Disk Menu option. Ripping everything is left as the default option starting position settings, or certain parts can be taken by configuring the title and chapter fields.
Step 5 When finished, click Convert/Save and select one of the available presets, such as Audio > MP3, Audio > OGG or Audio > FLAC. For expert users, create a New Preset to edit codec, encapsulation or other parameters as needed.
Step 6 Click Browse to select a destination folder for the extracted audio file. Press Start to begin ripping the audio from the DVD. VLC will save the extracted audio in your chosen format.
Part 4. Using DVD Audio Extractor
Last on the list is the DVD Audio Extractor, an audio ripping tool dedicated to extracting audio tracks from Blu-ray, DVD-Audio, and DVD-Video discs. Certainly, the interface is old-fashioned, but this software is rather easy to use, and key features can be picked up in less than half an hour.
Step 1 Use the author's official site as a DVD audio extractor. Select the proper installer depending on your OS. Install the program by following the installation guide.
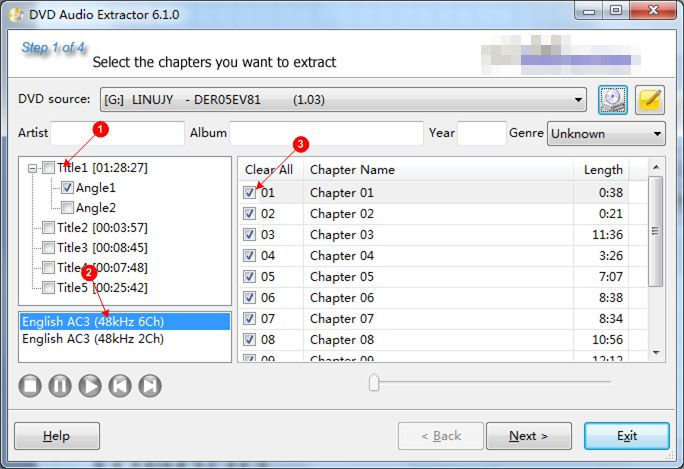
Step 2 Load the disc into the drive of your personal computer. Start DVD Audio Extractor, which should automatically recognize and show the content of the DVD.
Step 3 By default, the software selects the first title and all its chapters. Click on specific titles or chapters you wish to rip. There is even the possibility of selecting the angle that you want to use if your DVD has content with multiple angles.
Step 4 Click Next, and the output settings will be displayed. Choose the audio you require. For instance, MP3, OGG, FLAC, and WAV files are audio files. Change the sample rate and audio channels if necessary. Designate the output folder to save the audio files.
Step 5 Click Next, which will lead you to the export page. Start by clicking the Start button to rip the audio that you want.
Part 5. What to Consider Before Ripping DVD Audio
Considerations such as the legal environment, supported formats, device compatibility, and quality settings should be considered before ripping any audio off a DVD. This ensures proper audio handling and allows one to consider the legal environment.
1. Copyright Protection of DVDs: Because many DVDs are copy-protected, you will need a DVD writer and appropriate software to avoid copyright breaches, but only if such a copy is allowed in your country.
2. Copyright Protection Laws: Research the rules concerning all U.S. laws and rules, and more importantly, around scanned copies of Pirated content.
3. Compression Protocols: Make sure you have enough memory available, i.e., space for uncompressed lossless representations, which are bound to take more storage than their compressed versions.
4. Quality of Ripped Audio: Always remember to check all the settings, such as the sample rate and bitrate, and set them to the highest level for best results.
5. Device and Media Player Support: It is important to remember that your target device and media player needs to support the audio file format.
6. Region Coding on DVDs: Note that some DVDs are meant to be used only in some of the world. Some will only work in certain countries, so ensure your software is compatible with the DVD region.
7. Audio in Different Languages: Always check to see if multiple audiobooks are embedded within a DVD so that the one you choose is the version you require.
8. Chapter Selection: Choose specific chapters or segments of the DVD if you only need a particular portion of the audio. This saves time and storage space.
9. Software Updates: Use updated ripping software to handle newer DVD encryption technologies and ensure compatibility with modern formats and systems.
Conclusion
Extracting sound from DVDs is simple with tools like Tipard DVD Ripper, VLC, and DVD Audio Extractor. Choose the method that suits your needs, considering factors like encryption, audio format, and quality for the best listening experience on any device.
More Reading
-

-
 Top 7 Audio Extractors to Utilize Online and Offline
by Lily Stark on 2024-10-28
-
 Effortlessly Extract Audio from MP4 - Best Tools and Methods
by Lily Stark on 2024-09-24
-
 An Exceptional Method to Rip Blu-ray Audio from Blu-ray Disc
by Kenny Kevin on 2024-07-25