Audio Compression Tutorial to Downsize Audio Files Effectively
People store audio files on their devices to have a copy and stream them when the internet is unavailable. You will not have to worry whether the signal is okay because your music files are locally downloaded. However, you struggle with deleting a single track on your playlist. That is where audio compression comes into play. We want to keep you all music tracks while decreasing the consumption of your device's space storage. To learn how to achieve this, we have prepared the methods you may employ below. Check them out.

Part 1: Compress Audio Files While Keeping the Original Quality
When an audio file is compressed, its quality is degraded, meaning these two are directly proportional. When audio quality increases, the same is true for its file size. On the other hand, we can mitigate such risk by using a dedicated tool for this kind of need. This tool is called Tipard Video Converter Ultimate. The program grants you full control of your audio file properties, including format, sample rate, and bitrate, contributing factors to an audio size. Now, if your audio file is too big, the tool can downsize it up to more than 50% so as to maintain the quality. In other words, you get to downsize the audio while keeping the original quality of your precious audio files. To help you navigate this tool, look at the steps below.
Step 1Get the program and launch
To start, click the Free Download buttons below to download the tool's installer. Then, follow the walkthrough to install the app on your computer and launch it.
Step 2Access the Audio Compression tool
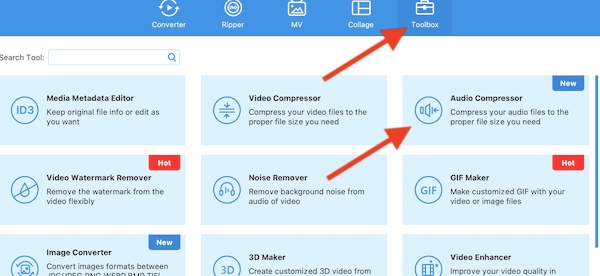
Once the app is launched, go to the Toolbox tab in the main interface. After that, click on the Audio Compression option.
Step 3Add an audio file to compress
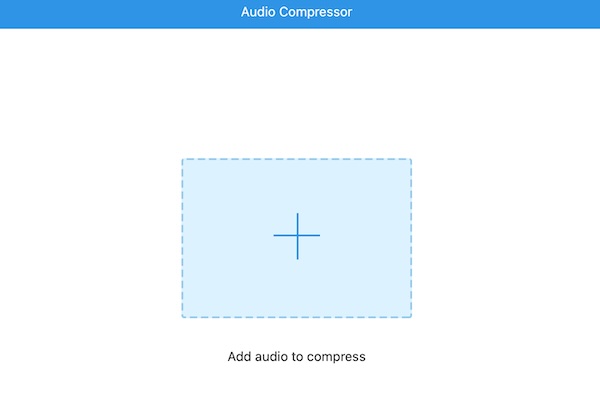
Upon accessing the Audio Compression tool, you will see the big plus button that represents the upload button. Click on it and locate the audio file you wish to downsize. Next, the tool will automatically show the properties of the uploaded audio files.
Step 4Adjust the settings
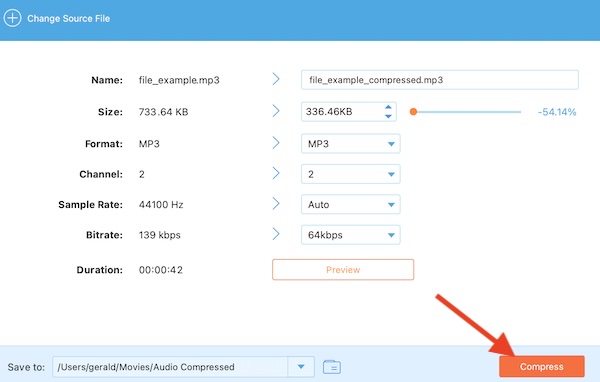
You can toggle the slider to compress the audio files and decide how much you want to compress. In addition, you may edit the channel, format, sample rate, and bitrate. Tick the Preview button to listen to the latest quality. Once you are satisfied, click the Compress button to initiate the compression process.
Further Reading:
Top 7 Best MP3 Compressors on Windows, Mac, and Online
How to Use the Best Audio Trimmer Apps to Trim Audio Files
Part 2: How to Compress Audio Files in Audacity
Audacity is an audio editing software that enables you to edit, manipulate, and compress audio files. Users can perform and enjoy its features like applying reverb, cutting, pasting, copying audio segments, and mixing multiple tracks in a comprehensive track. Check the audio file compression tutorial for Audacity using the instructions below.
Step 1Download the program
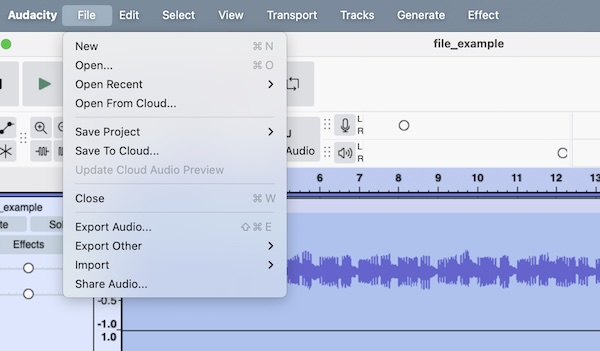
If you haven't already, download and install Audacity from its official website. Launch the app on your computer and load the audio file by going to File > Open and selecting the audio file you wish to compress.
Step 2Select the track
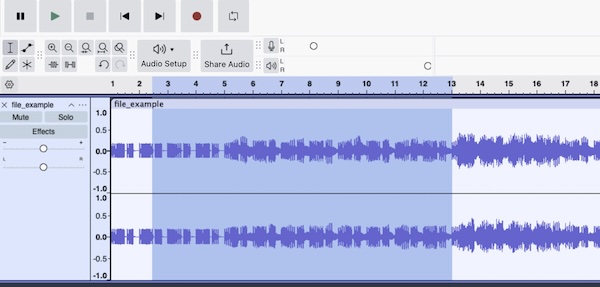
To ensure the entire track is selected, click on the left panel or press Ctrl + A. The track information of the audio files is displayed here.
Step 3Compress the audio file
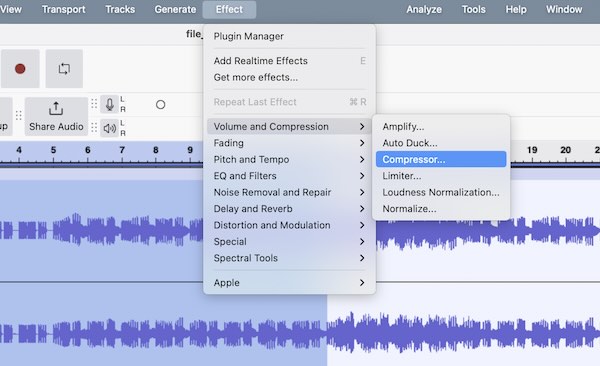
Now, go to Effect > Compressor. You can access options like Threshold, Noise Floor, Ratio, Attack Time, Release Time, Compress Based on Peaks, and many more from this window. After that, tweak the settings according to your preference and hit the Apply button once satisfied.
Step 4Export the compressed audio file
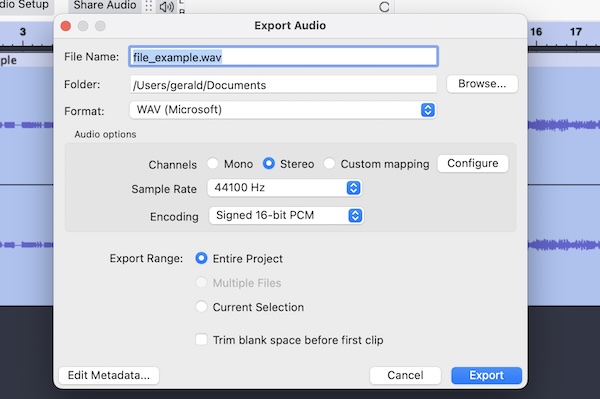
You may export the audio file when you are happy with the compressed file. Access File > Export and choose your desired format. Finally, click the Save button.
Part 3: 3 Audio Compression Methods Online
1. MP3Smaller
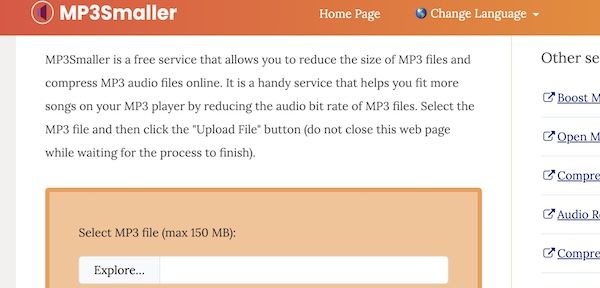
If you are looking for a free online tool for compressing MP3 files, MP3Smaller is the way to go. Using this tool, you will not notice a significant loss of quality after compressing your audio files. The tool is perfect for those who want a straightforward approach.
Step 1Visit the MP3Smaller website and upload the MP3 file you wish to compress. Tick the Browse button and select your desired MP3 file from your computer.
Step 2Next, choose the compression level from the dropdown menu. You can lower the bitrate to make your audio file size smaller.
Step 3Click the Upload File to start the compression process and download the compressed file. A link should appear after the compression process, and you should click to download the file.
2. Convertio
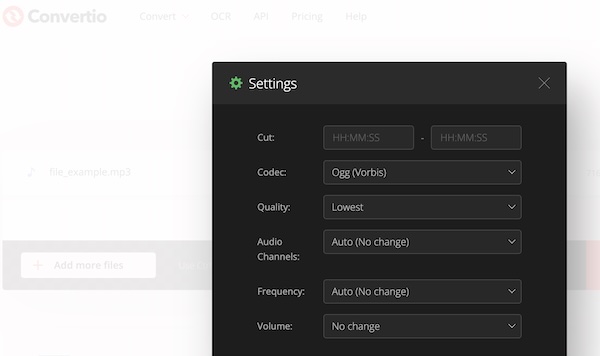
Another online tool that supports audio compression with a wide range of formats is Convertio. It comes with customization options, allowing you to adjust sample rate, bitrate, and file format. Check out the steps below to learn how it works.
Step 1On your browser, visit the official Convertio page and upload your audio file by ticking the Choose Files button. Now, locate and select the audio file you wish to compress.
Step 2Now, adjust the compression settings by clicking the settings menu next to the output format. You can tweak the sample rate, bitrate, and other options to compress the file.
Step 3This time, click the Convert button to start the compression process. Once you are happy with the file, click the Download button to save the final output.
3. Clideo Audio Compressor
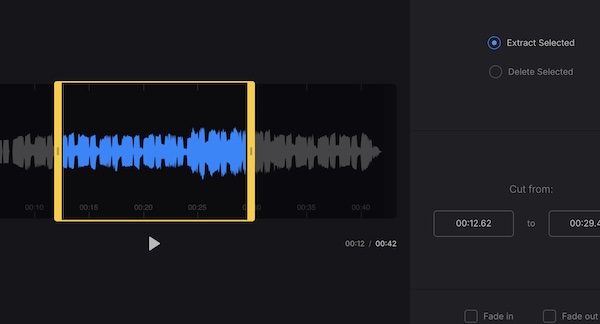
With Cldeo Audio Compressor, you can compress audio files directly in the browser. The utility supports various audio formats, like MP3, OGG, and more. The interface is simple in that it will only take you under a minute to process your audio files.
Step 1Go to the Clideo Audio Compressor's website using any browser on your computer. Tick the Choose file button to load your audio file from your device. You may also upload your files from cloud services such as Dropbox and Google Drive.
Step 2If the audio file is uploaded, the compression process will start automatically. You do not need to adjust the settings. All it takes is for you to upload your file.
Step 3Finally, preview the file after compression. Once you are happy with the result, click the Download button to save the compressed audio.
Conclusion
There you have it! That is how you compress audio files. If you want to maximize the full potential of a desktop app, choose the first and second options. On the other hand, choose the latter if you do not want to download any app on your computer.


