This OpenShot Video Editor review will provide information on this important tool for free video editing. It can also be helpful for those who are looking for more advanced editing features. See how it compares and what the best option to expand your video editing abilities is, including Tipard Video Converter Ultimate.
Part 1. OpenShot Video Editor Review
OpenShot Video Editor is a legal application that is easy to use and handle when editing videos. It works on Linux, macOS and Windows operating systems and offers such functions as cross-platform usability, no limitations on the number of tracks, animation keyframing, 3D animation and plenty of video effects. Video cuts and trim, layer usage, and visual effects were added to complete the overall video projects.
Main Features:
- Cross-Platform: This software is available for Linux, Mac, and Windows; hence, users of different systems will have it.
- Keyframe Animations: This feature enables handy animations like fade in and out, slide in and out, bounce in and other response actions.
- 3D Animations: This feature allows for rendering 3D animated titles and effects such as lens flares or flying 3D text inside a blender.
- Video Effects: The effects can also enable the users to reduce, brighten, use the chroma key and perform background masking.
- Audio Waveforms: Audio can be easily visualized and even edited alongside time information enclosed in waveforms that also have effects such as fading.
Prices: OpenShot Software is free and open-source software licensed under the GNU GPL version 3.0.
Platform: OpenShot runs on Linux, macOS and Windows Operating Systems.
- Free OpenShot.
- Unlimited video, audio, and photo tracks.
- A basic and easy drag-and-drop interface, suitable for newbies.
- No watermark is imposed on the content that is exported.
- Over 70 languages are included, thus available worldwide.
- When it comes to large video files, there are lots of stability problems (for example, 4K).
- No sophisticated tools are available for pro users.
Troubleshooting:
- Audio-Video Sync Issues: If the audio and video tracks appear out of sync, you may try exporting again, this time using a different frame rate. However, manually stretching or listening to the timeline can also be used to re-sync the tracks.
- Choppy Playback: Proxies can be utilized for smoother editing by lowering the novelty of the video during the designing process. After the last cut, however, a more intense resolution was utilized during the exporting apparatus.
- Export Errors: Whenever a data export command is issued and the process fails, check the codec settings cause there may be some incompatible videos. Reinst
Part 2. OpenShot Video Editor Download and Tutorial
This guide provides the steps required to begin the OpenShot Video Editor to do quick video creation, editing, and sharing of clips with high-definition quality. The uses of the software are outlined in the steps below to master the art of professional video creation within a short time:
Step 1Therefore, open your web browser and visit the OpenShot Video Editor website. This is where you will access the installer for your operating system.
Step 2While on the download page, pick the version that is compatible with your operating system. To initiate the downloading stage, hit the blue button labeled Download.
Step 3Immediately after downloading, go to Downloads Folder and find the installer file. Install OpenShot on your computer since you have downloaded the installation file by double-clicking on the file and following the installation wizard.
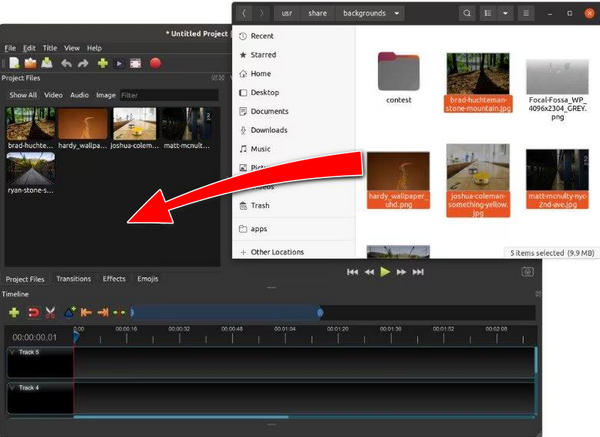
Step 4Once it loads, import media files by dragging videos, pictures and audio files into the Media Library area of the application interface.
Step 5Bring in those imported media files and arrange them on the timeline in the order you want them to play. Organizing and editing of video content will take place here.
Step 6Combine the video clips to lessen the shock when a viewer sees or hears a dramatic change in scene and sound. OpenShot will then automatically add a transition effect at the junction of two meeting clips.
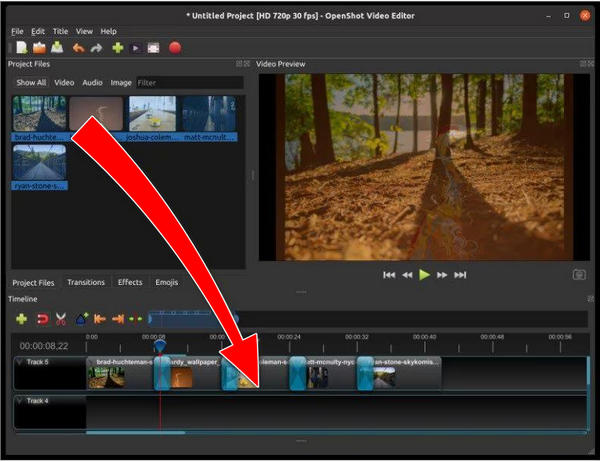
Step 7Import audio files and drag them to an audio track on the timeline. Adjust the length and positioning of the audio to fit your video project.
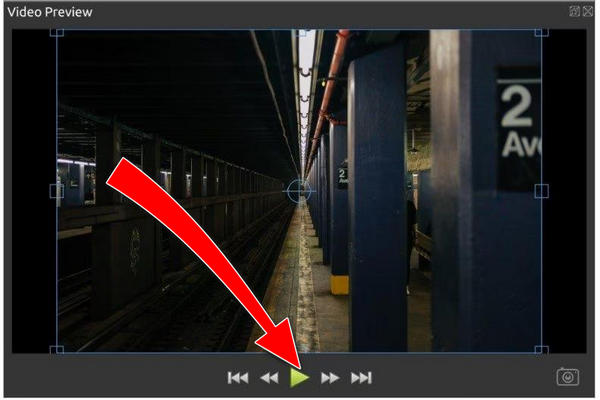
Step 8Use the Play button in the preview window to review your video. Make any necessary adjustments to ensure your video looks and sounds just right.
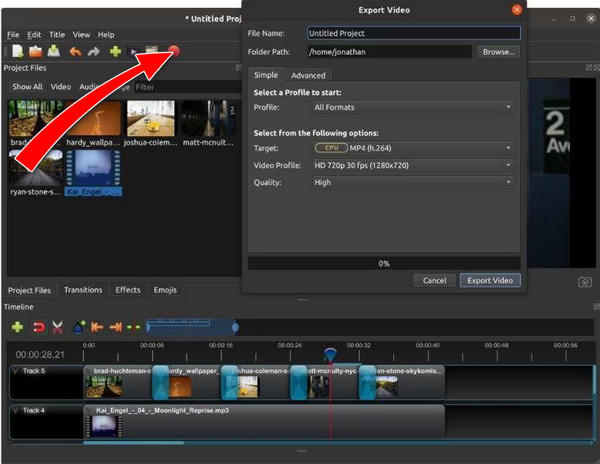
Step 9Once you’re happy with your project, click the Export Video button, choose your desired file format, and save your finished video.
Part 3. 2 Excellent OpenShot Video Editor Alternatives
If you want to try something other than OpenShot Video Editor, here are some alternatives; in particular, I recommend Tipard Video Converter Ultimate as the best option for complete features and ease of use.
Tipard Video Converter Ultimate
When you want something more than what OpenShot can offer, the Tipard Video Converter Ultimate would be the best option. It has powerful tools for converting, editing, and enhancing videos, which makes it the perfect application for users who want comprehensive and superior video editing tools.
Main Features:
- Supports multiple formats: Over 500 formats, including 8K 4K HD videos, are supported for conversion.
- Ripping and Copying of DVDs: Convert DVDs to digital form or back up DVDs to ISO or folders.
- Edits in Creative Ways: Cut, flip, watermarks, filters, effects and resize video.
- MV Maker: Work with themes and background music to make your music video.
- Video Enhancer: Improve film quality, modify the brightness and the contrast, and decrease the noise.
How to Use:
Step 1First, download and install Tipard Video Converter Ultimate on your PC.
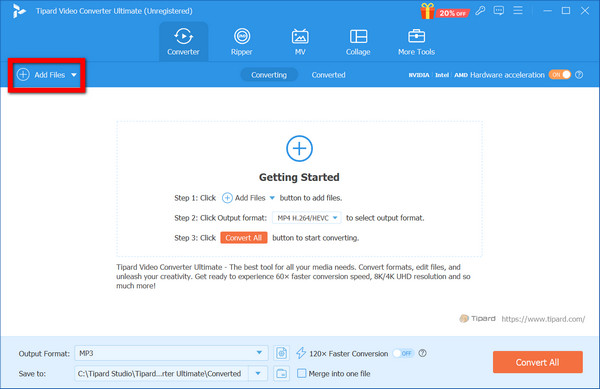
Step 2After that, you will be given the tool interface. Click Add Files to add the media.
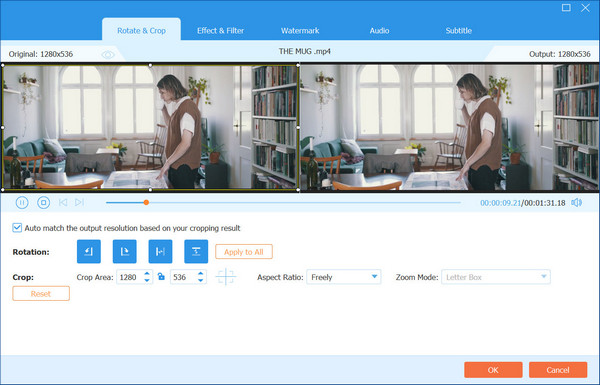
Step 3When doing that, the video can be imported by clicking the Edit button, leading to editing tools. If you want to improve your video and add cropping, rotation, and video filters, use these options here.
Step 4The user can also launch the MV Maker, and a theme can be selected.
Step 5On the edit page, once you have edited your video, select the preferred output format by clicking the MP3 button, which has a drop-down. Choose Video and select from the format that is displayed.
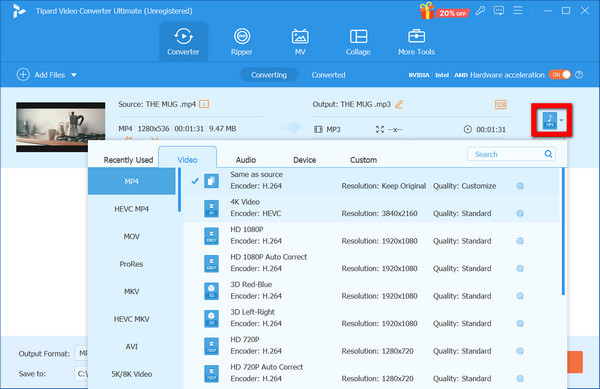
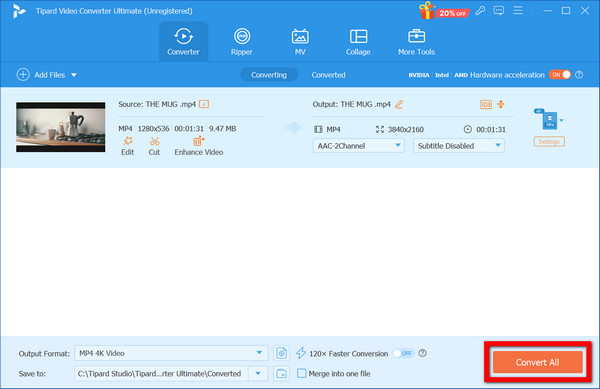
Step 6Finally, click Convert All to finalize, and the video will be saved on the device automatically.
DaVinci Resolve
This tool is an equally powerful option to OpenShot and, unlike the latter, resolves in high-quality video work, especially animation and color correction.
Main Features:
- Multi-camera Editing: Sync and edit MP4 video and various camera footage sequentially.
- Audio Postproduction: Contains a complete package of the audio editing tools.
- Collaborative tools: Allow several individuals to collaborate on the same project simultaneously.
How to Use:
Step 1Visit the official website to download and install DaVinci Resolve.
Step 2Launch DaVinci Resolve and create a fresh project. Then, import your media files into the media pool for the new project.
Step 3Pull your video media to the timeline, and the audio will be available at the bottom. Drag and drop media files when you want to remove the clips. Use the tools of cutting, trimming, and flaunting different effects to edit your media files.
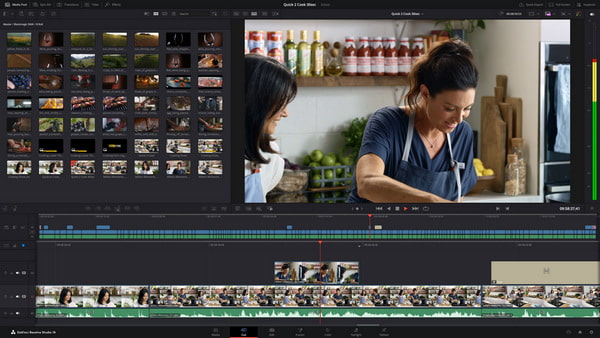
Step 4Go to the section on color grading and correct color and lights. Add special effects when it is necessary.
Step 5Go to the Deliver page. Choose your export settings and click Add to Render Queue. Start the rendering process.
Conclusion
To conclude, this OpenShot Video Editor tutorial has presented the main characteristics of the program, its installation, and common problems and solutions that can be faced while using this application. There is no doubt that many people would find OpenShot to be their code editor of choice. However, additional features can be acquired with other programs, such as Tipard Video Converter Ultimate, which also offers better flexibility. Apply the tool that suits you best, depending on your video editing expectations.


