Shaky footage can ruin every video you have captured; knowing how to stabilize the video is a game-changer, especially if you want smooth and immersive storytelling. With the right techniques and tools, you can transform the unsteady footage you have saved into polished and cinematic visuals that hold your viewer’s attention. If you are considering using a stabilizer to fix the problem, here are the methods you need to do.

Part 1. How to Stabilize Video on Windows and Mac with the Best Video Stabilizer
Suppose you need software to stabilize videos and perform other video editing and conversion. In that case, go for the Tipard Video Converter Ultimate, which works for Windows and Mac. Its graphic user interfaces enable users to easily stabilize a video with just a few clicks and eliminate the annoying camera shakes while maintaining excellent video quality.
Apart from stabilization, Tipard provides versatile features that include conversion, improvement, splitting, joining, and adding effects to videos. This format is designed to support nearly all types of video and provide compatibility with nearly all media files. Because of this, the software is perfect for new and professional video editors, with fast processing and high-quality output. How to stabilize the video with the Tipard? Here is a tutorial you will need to follow.
Step 1Download the editor on your Windows or Mac by clicking the button here. Then, install the package you have downloaded and launch it afterward to use it.
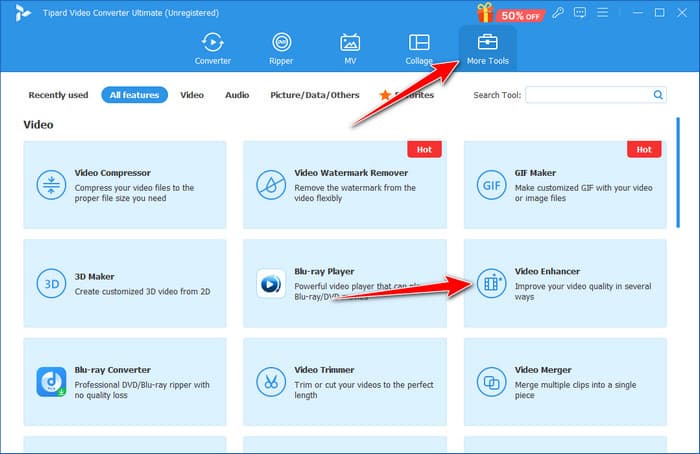
Step 2Proceed to More Tools, find the Video Enhancer feature, and click it.

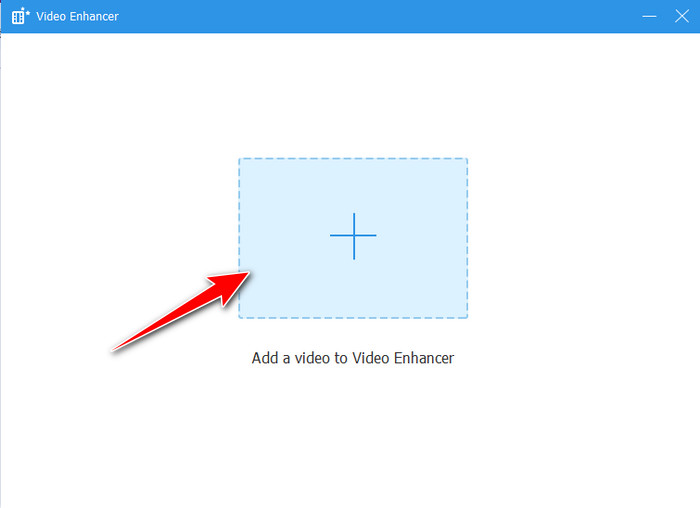
Step 3After that, click the plus button to upload the video you want to be stabilized here.

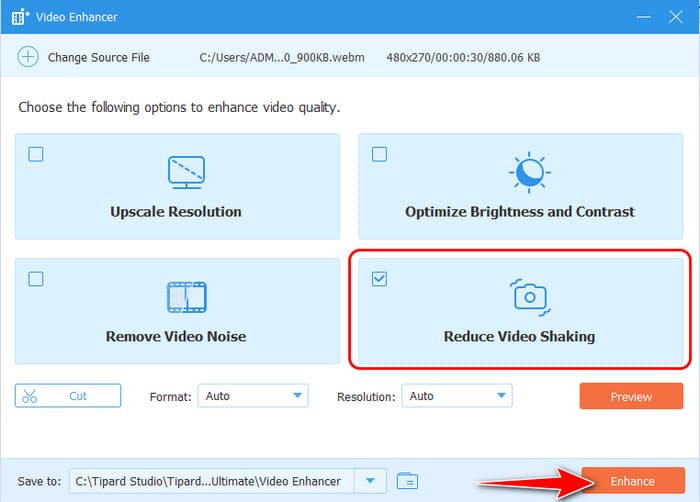
Step 4Now that the video is uploaded activate Reduce Video Shakiness to stabilize the video automatically. Other options like upscaling, optimizing lights, and removing video noises can make your video look professional. Then, click the Enhance button to start the process.

Part 2. How to Stabilize iPhone Video with Stabcam
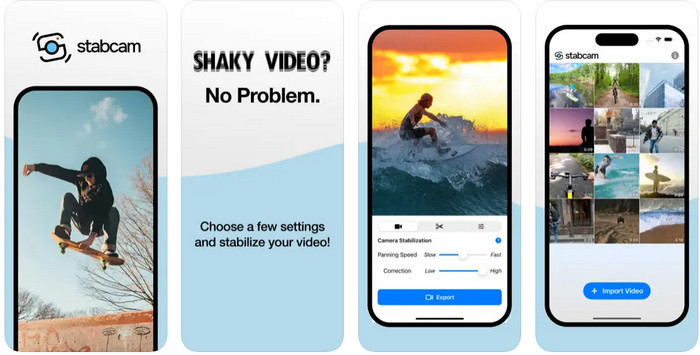
How to stabilize video on iPhone? Stabcam is a rather effective application that delivers excellent stabilization to iPhones and allows for getting rid of shakes and excessive movement on videos shot with iPhones. The app utilizes complex motion analysis algorithms to determine and fix alignments while retaining the stability of the video while recording without losing quality.

It is easy to use, suggesting anyone can capture moments in the videos irrespective of their skill level, from casual events to shooting scenes professionally. The real-time photographer is also available in Stabcam to preview the film, and there are options for intensity of stabilization. Whether a person has a vlog, traveling, or action camera videos, this handy Stabcam app will take your unsteady video into that sleek, smooth video. Learn how stabilized video on iPhone works using this app.
Step 1After downloading the app, tap the Import Video button and pick the footage you want to stabilize.
Step 2Now that you have uploaded the video to this app change the Camera Stabilization setting by moving the slider.
Step 3When you finish the stabilization, click Export, and it will be saved to your iOS. With that, you can use the stabilizer video on your iPhone.
Part 3. Video Stabilization on Android with Google Photos
Google Photos has an incredibly powerful, free, built-in tool for Android that makes video stabilization a breeze. Built on a machine learning algorithm, the application identifies and eliminates shakiness while recording and displays a stable playback result. It would suit end users who seek quality results without installing other application software or engaging in complicated procedures.

All you have to do is take your video and upload it to Google Photos. Select the stabilization setting, and it will work for you. It is fast and maintains the best quality to improve the flow when watching the picture. Whether taking pictures of events or filming something for Google Photos sharing on social networks, video stabilization mode is easy to implement and works well. To teach how to stabilize phone video on Android, follow the steps below.
Step 1Open Google Photos on your device or computer, log in, and select the video you want to stabilize from your library.
Step 2Tap the Edit or pencil icon option, locate the stabilization feature, and activate it. Google Photos will analyze and process the video to reduce shaky motion.
Step 3Preview the stabilized video, and if satisfied, save it to your library or share it directly from the app. Aside from stabilizing your image, you can also use Google Photo Movie Maker to create an eye-catching movie that will surely entertain viewers.
Part 4. How Does Video Stabilization Work?
Video stabilization is a processing approach to minimize the effect of undesired camera motion or oscillation to keep the video steady. Even if you are shooting videos with a professional camera or smartphone, some motion is always present; that is where video stabilization kicks in.
1. Optical Stabilization or OIS:
Optical stabilization is the physical operation of the camera lens or the Sensor that corrects the shake. Whenever there is motion via tilting or slight shaking of the hands, the lens or sensor automatically corrects this through camera movement or by changing its angle in real-time to capture the image or video. This method is very much successful in reducing blur due to the motion of the camera. It is used in most professional DSLRs, digital, and even recent smartphones. OIS is most useful when using low light or zooming because it guarantees a sharp image while minimizing distortion.
2. Digital Stabilization:
This concept is different because digital stabilization works on the recorded video instead of during the recording. It goes through the video shot by shot to identify undesired movements and, if necessary, erase them later, recomposing the picture. This technique is very helpful today, especially with post-production editing apps, such as Premiere Pro. You can remove a slight jitter and stabilize the video in Premiere.
The major advantage of digital stabilization is its flexibility and the fact that it can be applied relatively simply; however, it normally means a loss of definition of somewhere between 5 and 10 percent because of cropping. This trade-off makes it ideal for increasing the quality of the footage as and when the need arises, but it is not so when the highest possible resolution of a video stream must be maintained.
3. Gyroscopic Stabilization:
Gyroscopic stabilization involves a stabilization platform that, through sensors, detects motion and balances it, usually coupled with devices such as gimbals. These tools move the camera based on the detected movement, such as walking, running, and the like,e so that what is produced is smooth and cinematic. While OIS is an internal process, gyroscopic stabilization mechanically translates the camera or the gimbal to get things right. This method is very good when used for shooting actions or moving around while filming, in which stability is paramount for high-quality results. This setup is one of a kind for filmmakers and vloggers who make lots of motions and transitions in their clips.
Conclusion
Finally, you have learned how to stabilize iPhone videos using the Stabcam app that you can download from the App Store. However, Google Photos can work if you are an Android user. You must edit that on your PC with the Tipard tool for professional stabilization.


