Effective Procedure to Improve Video Quality in Windows Movie Maker
Do you love watching videos and movie films from your computer's file folder? However, you cannot avoid that sometimes. Your videos are blurry and do not possess high quality. Thus, you might need to enhance your videos using a great video editor program. That is why this post will help you achieve it using Windows Movie Maker and will introduce its function, reliability, and primary features. And for you to completely meet your goal, this article will provide steps on how to improve the quality of video in Windows Movie Maker.
Moreover, it will give you more information on recovering videos using another video editor software. So this post presents you an alternative to Windows Movie Maker, none other than the Tipard Video Converter Ultimate. That is why do not miss reading this post because it will surely solve your issues. Please keep reading it until the conclusion part.

Part 1. How to Improve Quality of Video in Windows Movie Maker
Windows Movie Maker is a video editing program perfectly compatible with Windows computers. As a result, this program enables you to create new videos or movie files according to your style. Moreover, it allows you to enhance and improve the quality of your video files. The software has an intuitive interface where users can efficiently maneuver and find its functions. Windows Movie Maker provides Tools such as Video Editing Tools, Video Converters, Easy Movie Maker, and many more. With that, you can freely enhance your videos using some excellent features. That is why we also present you the steps on how to improve quality of video in Windows Movie Maker to meet your concerns completely. But first, you can analyze the software's various main features below
Step 1Launch Windows Movie Maker and go to Video Editing Tools
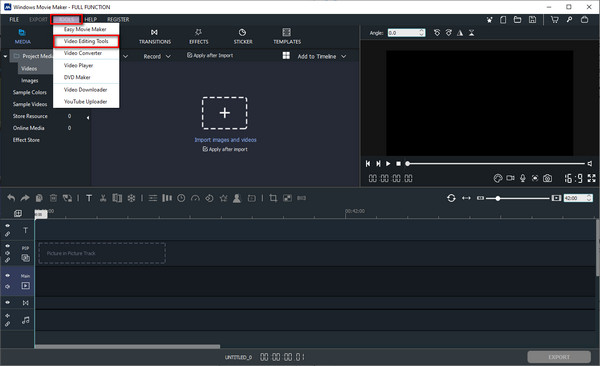
To start, kindly open Windows Movie Maker to see the main interface. After that, click the Tools button above the interface. After clicking the button select the Video Editing Tools.
Step 2Add or Drag a Video File
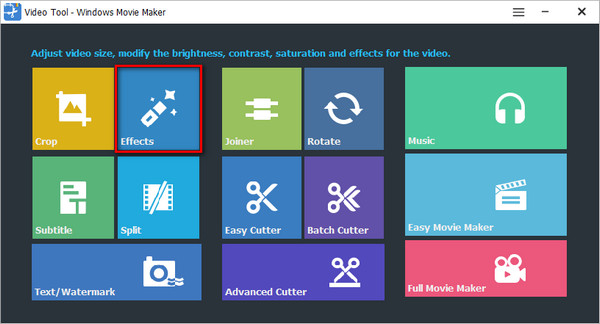
Upon selecting the Video Editing Tools feature, another window will pop up on your screen. Here, you can see various options for editing your video files. Then go directly to the Effects option.
Step 3Upload a Video File
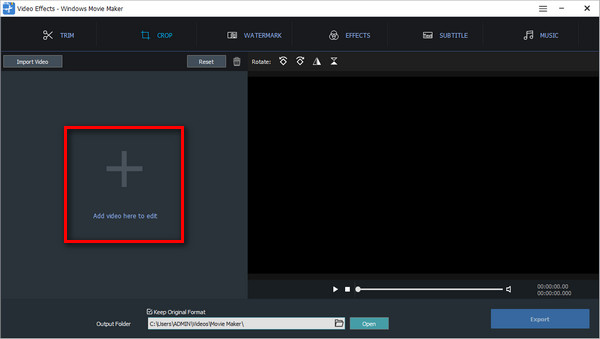
After clicking the Effects option, you will see another window to add a video file that you want or need to edit. Just click the + Add Video Here to Edit button to import a video file.
Step 4Adjust Video Quality
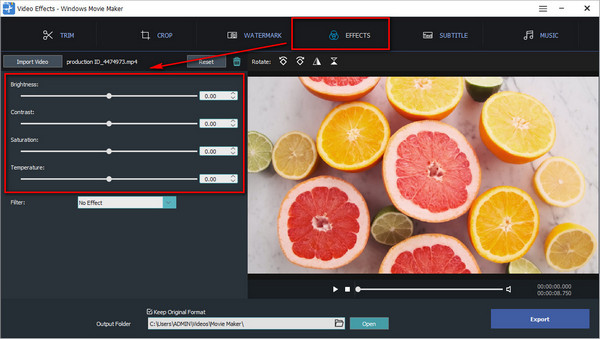
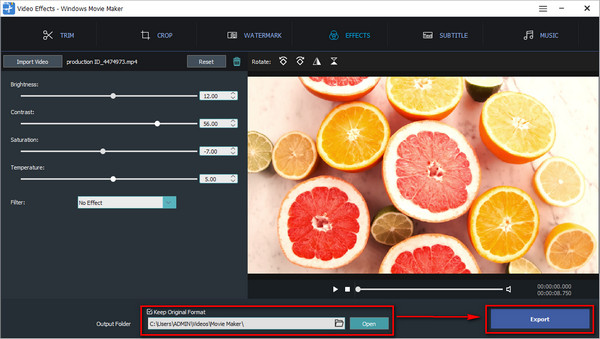
You will see various adjusting parameters when you add a video file after clicking the Effects section above the interface.
Step 5Apply Modifications and Export New Video Output
After doing all the procedures above, you can move the slider to adjust your video's brightness, contrast, saturation, and temperature. If you now see an improvement in the quality of your video. Proceed to the Output folder section to choose a file location, then hit the Export button to start saving your video. Finally, you can watch the high-quality video.
Part 2. Best Windows Movie Maker Alternative to Enhance Video Quality
Let us now find out the most effective alternative to Windows Movie Maker.
Tipard Video Converter Ultimate can support Mac and Windows computers. That is why you do not have to look for any other software in the market because Tipard Video Converter Ultimate can satisfy your video editing intentions. Why? Because it provides a Toolbox that offers a Video Enhancer tool that lets you improve the quality of your videos. Within just a few ticks, your videos will automatically improve. And to find out its best features, please refer to the list below. This post will also guide and preset you with steps on how to improve video quality.
Primary Features of the Tipard Video Converter Ultimate:
- 1. It enables you to upscale resolutions.
- 2. It has adjusting parameters such as brightness, contrast, saturation, and temperature.
- 3. It can convert video files into popular file formats.
- 4. It enables you to convert videos to 8K/5K/4K/HD videos.
- 5. It has a GPU acceleration.
- 6. It is easy and safe to use.
Step 1Get Tipard Video Converter Ultimate and open the Toolbox
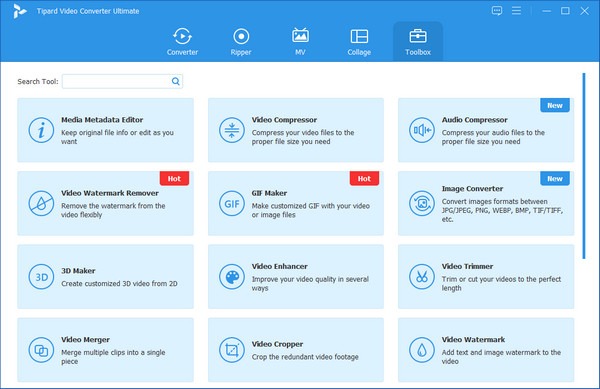
First, search Tipard Video Converter Ultimate and visit the main page. After that, click the download button and choose the Mac version. Then, you can now install the software on your computer and launch it to see the main interface. After that, click the Toolbox and select the Video Enhancer feature.
Step 2Upload a Video File that needs to Improve
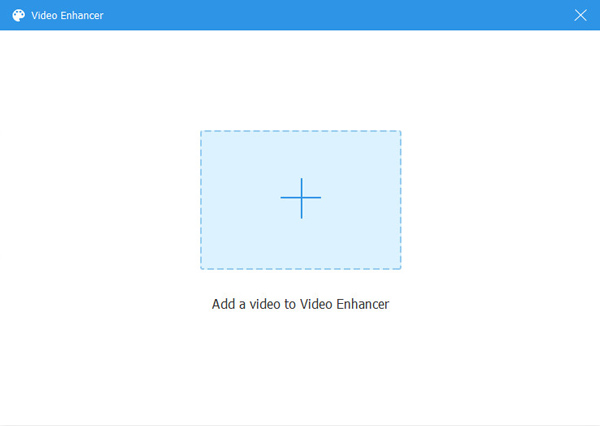
When you click the Video Enhancer section, the software will quickly present you with a new screen with a big plus + symbol at the center of the interface. Then, click the + icon to upload a video file you want to enhance.
Step 3Click all the options to Improve Video Quality
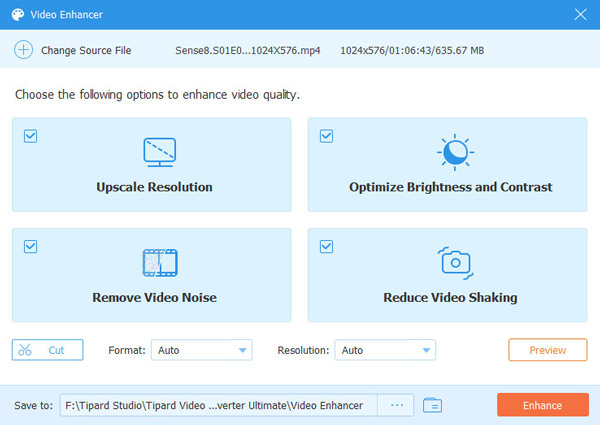
Upon adding a video file, you will encounter the different choices to improve the quality of your video file. Thus, click all the options, and it will automatically apply modifications.
Step 4Watch the Result and Save the Video
After all the modifications, you can click the Preview button to watch the result. When the video is pleasing to your eyes, go to the Save to button to search a file location for the video file, then click the Enhance.
Step 5Watch the Video file
When you save the new video result, you can now seamlessly play your high-quality video using the Tipard Blu-ray Player.
Extended Reading:
Top 5 AI Video Enhancer Applications for Windows 10/8/7 and Mac
5 Steps on How to Remove Blur from Video Easily
Part 3. FAQs of How to Improve Quality of Video in Windows Movie Maker
Can Windows Movie Maker affect the video quality?
Yes, this software can eliminate the quality of your videos when you do a preview while editing. But the good thing about it is that you can have the original quality of your video if you save it correctly.
Can you convert videos to HD videos using Windows Movie Maker?
Definitely, yes. Windows Movie Maker supports and can create HD videos because the program features advanced technology and the creation of high-definition videos.
Can I alter the screen resolution in Windows 10?
Good thing, yes. And to do this, click the Start button then select the Settings icon. After that, click the System option and go directly to Advanced display settings. After doing so, hit the Menu button below Resolution and select the possibility that you want. Finally, click the Apply button.
Conclusion
After reading all the procedures on how to improve video quality in Windows Movie Maker, we hope that you will finally meet your goal. However, suppose it is not enough for you. In that case, you can use the Tipard Video Converter Ultimate as the best alternative to Windows Movie Maker. That is why do not forget to send this information to your friends. And if you have another concern, please do contact us immediately.


