
Color correction is fine-tuning the colors in your video to achieve a desired look or correct any inconsistencies. While it may sound technical, it is not since the process in Premiere Pro can be straightforward and rewarding, even for beginners.
In the upcoming sections, we'll explore how to perform color correction in Premiere Pro manually, introduce an alternative tool for those seeking additional options, and provide valuable tips to enhance your color correction skills. These insights will empower you to bring your videos to life with vibrant and captivating colors.
Part 1: How to Do Color Correction in Premiere Manually & Automatically
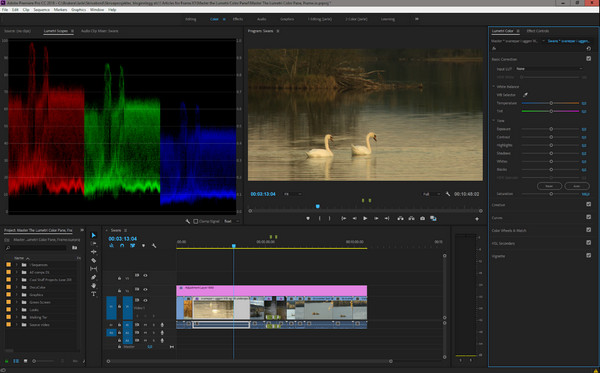
Premiere Pro provides a robust manual video color correction toolkit through its Lumetri Color panel, allowing users to meticulously alter and enhance the colors in their videos. This panel empowers video editors and colorists to fully control the color correction process, ensuring each frame is precisely tuned to achieve the desired visual impact. The manual color correction process involves intuitive steps within the Lumetri Color panel, allowing users to fine-tune in editing video contrast, exposure, and color balance.
Next information will teach you how to color correct in Premiere Pro and do it manually:
Step 1 Create a new project or sequence based on your footage's settings. Go to the Color workspace by selecting it from the workspace bar at the top of the screen. Find the Lumetri Color panel on the right side. If it's not visible, go to Window, then Lumetri Color.
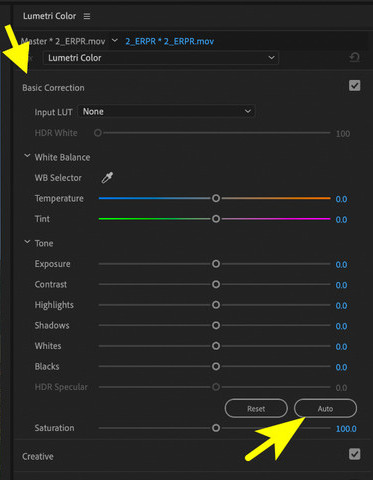
Step 2 In the Lumetri Color panel, find the Basic Correction section. Use the sliders for Exposure, Contrast, Highlights, Shadows, Whites, and Blacks to make initial adjustments.
Step 3 Scroll down in the Lumetri Color panel to find the Color Wheels & Match section.
Adjust the color wheels for Shadows, Midtones, and Highlights to fine-tune the color balance. Go to the Curves section, use the RGB curve for overall contrast adjustments, and use individual color channels for precise color correction.
Step 4 Navigate to the Basic Correction section and tweak the Saturation and Vibrance sliders to control the color intensity. Go to the HSL Secondary section to isolate and adjust specific colors within your footage and export the final product when done.
Bonus: Use the Auto Color Correction in Premiere Pro
Step 1 Premiere Pro's Auto Color Correction feature provides a quick and timely way to enhance the overall look of your video without delving into manual adjustments. It's a great starting point, especially for users looking to achieve balanced colors with minimal effort.
Highlight the video clip in your timeline to which you want to apply auto color correction. Navigate to the Color workspace by selecting it from the workspace bar at the top of the screen. Open the Lumetri Color panel to Window, then Lumetri Color if it's not already visible.
Step 2 In the Lumetri Color panel, locate the Auto button in the Basic Correction section. Click it to let Premiere Pro analyze and automatically adjust the color parameters for the selected clip.
Step 3 Once satisfied with the results, save your project and proceed to export your video.
Part 2: Best Premiere Pro Alternative to Color Correct a Video Effectively & Easier
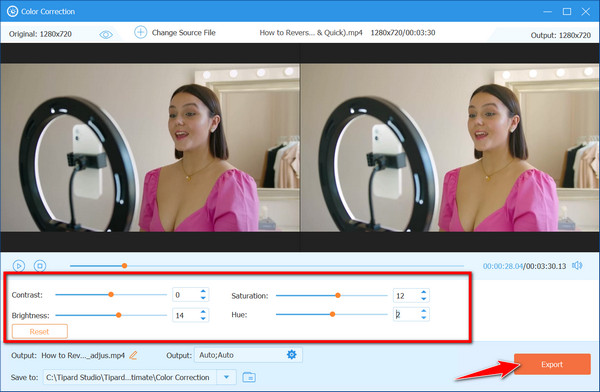
For beginners in video editing or those working with low-end PCs, the extensive color correction on Premiere Pro can be overwhelming and resource-intensive. Use Tipard Video Converter Ultimate, a user-friendly solution that streamlines the color correction process on your PC without requiring advanced expertise or high-end specifications. Not only that, but this app offers a well-rounded interface and a bountiful of editing features that you will surely enjoy the most. To give a quick tutorial on using this, follow the steps below, and it will only take a minute or two.
Step 1 Download the latest version of the app by clicking the download button below. Install it and launch the program to use it on Windows or Mac.
Step 2 Now that the app is running go to the Toolbox and find the Color Correction feature.
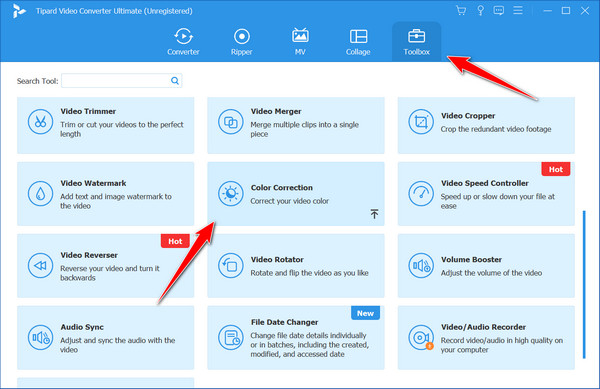
Step 3 Click the + button, find the video file you want to edit, and click Open to upload it.
Step 4 Adjust the preset Contrast, Brightness, Saturation, and Hue of the video to color correct it by dragging the slider or adding the value on each. After that, tick the Export button to save the final output on your local drive.
Part 3: 5 Important Tips for Color Correction in Premiere
Here are the Premiere Pro color correction preset tips you will need to understand to make the video even better and more effective at all times.
1. Reference and Consistency
When engaging in color correction within Premiere Pro, establish a reference point using a well-exposed and color-balanced image from your footage. It is a benchmark for consistency throughout your project, ensuring the color grading maintains a uniform and professional look. Consistency is vital when working with diverse clips or scenes, allowing for a seamless visual experience.
2. Shot Matching
Achieving shot continuity is paramount in video editing. To create a cohesive flow, carefully match colors between different clips. Premiere Pro offers tools and features that facilitate this process, helping smooth transitions and avoid distracting color discrepancies between shots. Paying attention to shot matching enhances the overall visual narrative and viewer engagement.
3. Use Scopes for Precision
Take advantage of Premiere Pro's waveform and vector scopes for precise color correction. These tools offer visual representations of color information, identifying imbalances and ensuring that blacks and whites are appropriately set. By incorporating these scopes into your workflow, you can achieve accurate color correction, meet industry standards, and optimize the viewing experience on various screens.
4. Non-Destructive Editing with Adjustment Layers
Opt for non-destructive color correction by utilizing adjustment layers in Premiere Pro. Instead of applying corrections directly to individual clips, leverage adjustment layers to simultaneously make changes across multiple clips. This approach preserves the original footage, providing flexibility for experimentation and allowing you to revert changes quickly. Adjustment layers enhance efficiency while maintaining the integrity of your editing process.
5. Monitor Calibration
Regularly calibrate your monitor to ensure accurate color representation during the editing process. A properly calibrated monitor is indispensable for making informed decisions about color adjustments. By routinely calibrating your monitor, you guarantee that the colors in your video are accurately reflected, creating a consistent visual experience across different devices and viewing environments.
Part 4: FAQs about Color Correction in Premiere
Why is color correction important in video editing?
Color correction is important because it makes your videos look better. It fixes color issues, ensures consistency, and helps create a specific mood, making your videos more professional and engaging.
Can I undo color corrections in Premiere Pro?
Yes, you can undo color corrections in Premiere Pro. The editing process is safe, and you can go back to the original by using the Undo command. Alternatively, press Ctrl + Z on Windows, Command + Z on Mac, or through the Edit menu.
How do I match colors between different clips?
Match colors by adjusting white balance and exposure and using color correction tools in Premiere Pro. Consistent lighting during filming also helps achieve a uniform look across different clips.
How can I ensure my colors look consistent across different devices?
To ensure consistent colors, regularly calibrate your monitor. Export videos in a standard color space like Rec. 709, and check them on multiple screens. Professional color grading monitors can be helpful for critical color work.
What is the difference between hue and saturation?
Adjusting hue changes the actual color itself, while tweaking saturation controls the intensity of the color by making it vibrant or muted when the color appears in your video. This is the common knowledge about the difference between hue and saturation.
Conclusion
Now, you have complete knowledge about color correction on the Premiere manually and automatically with the tutorial listed. If you are having trouble using it, we suggest you use the user-friendly alternative, the Tipard Video Converter Ultimate.
More Reading
-
 How to Stabilize Video in Premiere - Full Guide with Detail
by Lily Stark on 2024-12-12
-
 How to Add Media to Premiere Pro: Beginners’ Complete Guide
by Lily Stark on 2023-10-19
-
-