
You might have asked yourself what the best option is when you want to rip DVDs to iPads without straining the quality of the films or programs you love. With physical DVDs becoming outdated and iPads serving many purposes, including being an entertainment hub, there is a definite demand for a proper way to transfer data. This course will take you through tools and procedures for ripping DVDs in the most suitable format for your iPad. Bins farewell to puffed-up DVD players and signify enjoyable entertainment in the palm of their hands! Let's get started.

Part 1. How to Rip DVD to iPad Format with Tipard DVD Ripper
Tipard DVD Ripper is a good choice, especially if you need to rip DVD-to-iPad on Mac and Windows. This software eases this by providing the DVDs in formats that can be played on iPads, thus making the video quality high. You can use it on both Mac and Windows. And it is easy to use even if you are not very fluent in computers. It is quite simple to copy your DVDs and have them prepared for your iPad. Because of this, you do not have to worry about the format of the DVD.
In addition to these functionalities, this ripper offers other features, including batch conversion and is flexible in its settings, allowing you to decide on the output format. This way, you can pick the right format for your iPad and change settings, including clipping or cropping the videos if required. In just a few steps, you can rip DVDs and sync them on your iPad for perfect entertainment to watch movies, series, and much more.
Step 1 Downloading the software is the first thing you must do, so click the appropriate download button below. After that, install the package and follow the WinRaR setup, which you must do before launching and using it.
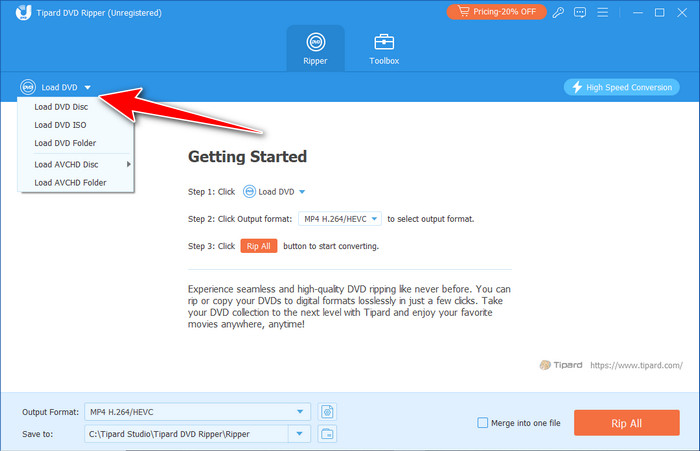
Step 2 Now that you have installed and run the app on your system, click the Load DVD button on the upper left of the interface. Then, find the location of the DVD you want to convert into an iPad format and click Open to proceed.
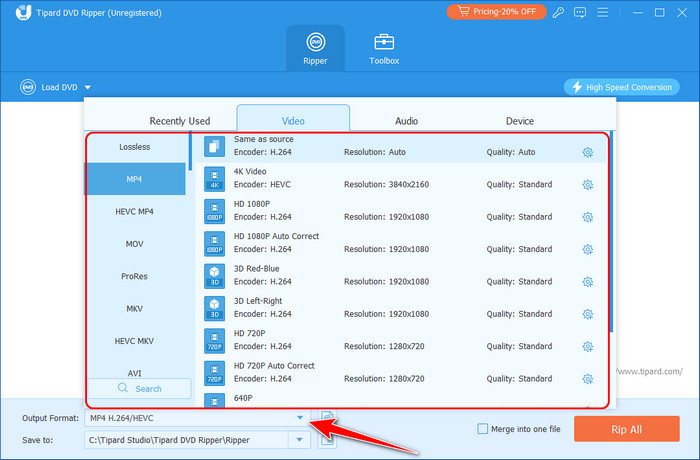
Step 3 When you do that step, click the Output Format next and choose the iPad format you want to use, such as MOV. Choose the settings you want for your chosen format and click it.
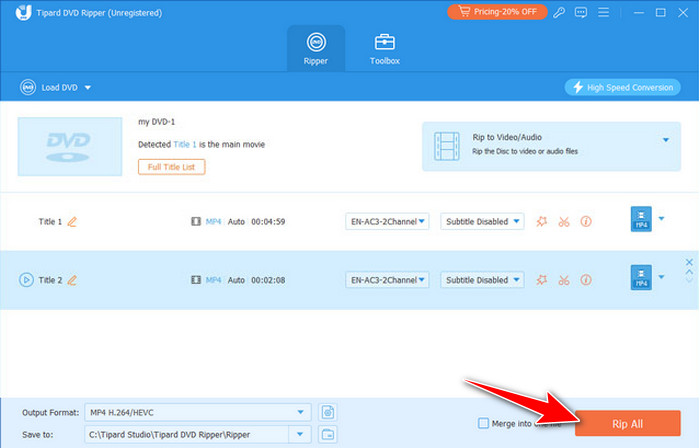
Step 4 Decide the location where the file will be saved, and click the Rip All button to convert the DVD into iPad format. After a few seconds, you can play the video on your PC with the best video player for all formats, then transfer it to an iPad for later.
Part 2. How to Transfer DVD Movies to iPad After Ripping [via iTunes]
When you rip a DVD to an iPad for free, you can use this to transfer the ripped file to an iPad; iTunes is one of the most reliable tools for easily transferring ripped DVD movies to iPads. Its interface looks simple but well-known; users can transfer their converted DVD files to the library by dragging and dropping them. However, once the movies are in your iTunes library, syncing to the iPad is incredibly simple. Choosing the movies and applying the Sync Movies option lets you transfer them quickly, and then you may watch the films on DVDs on the go without much trouble.
However, as mentioned before, iTunes has great strengths in terms of simplicity and sturdiness, while at the same time, it may look a tad dated for some users who are used to more updated software. Synching can take some time, especially with large files, and the overall look and feel of the application have remained largely static in the last few years. As long as the user uses an older version of macOS or Windows, iTunes can still be an efficient tool for managing and transferring media. As for syncing DVD movies to iPads, it works well, so people can use it if they do not mind using a conventional instrument.
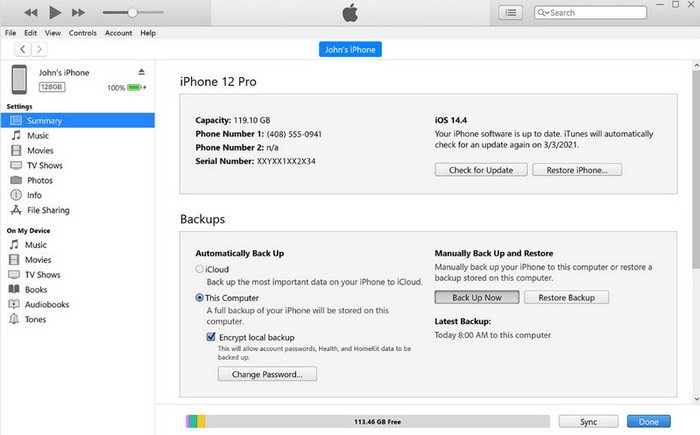
Step 1 Open iTunes and import the converted DVD movie into the iTunes Library, then connect your iPad to the computer before you proceed to the next steps.
Step 2 When connected, an iPad account icon should appear under the Device tab. Click that tab and go to the Movies option.
Step 3 Tick the Sync Movies, pick the DVD movies you have imported on the iTunes Library, and press the Sync button. Check the synced video to the iPad and play it with your portable video player.
Suppose instances occur when iTunes can't recognize your iPad. In that case, you must troubleshoot the problem because transferring to an iPad will become impossible if the app does not recognize it.
Part 3: Essential Tips for a Seamless DVD to iPad Transfer
1. Check Storage Space on Your iPad
Ensure your iPad has enough free space to store the DVD files before beginning the transfer process. Movies in the DVD format are massive, ranging from 2GB to 5GB, so it is advisable to uninstall an application or clear a folder for disposal. You can check available space by following the general and iPad Storage settings. It will be important not to sync any errors or interruptions during the data transfer process.
2. Use the Right File Format
Always confirm that the files you wish to burn into the DVD are in iPad-compatible formats, for instance, MOV or MP4. As for the format, you can choose among many available iPads in Tipard DVD Ripper, but if you use other software, just check twice. Here, we have high compatibility formats such as MP4, guaranteeing your movies will play well on your device.
3. Check for iTunes & Software Updates
Therefore, always update iTunes and your iPad software to avoid syncing problems. iPod firmware is usually released with bug fixes and performance improvements; iTunes and your iPad should be updated to recent versions. This will allow your devices to work in unison, and you won't encounter avoidable downtimes or compatibility issues.
4. Use a Fast USB Connection
When copying your ripped DVD files, make sure only to use a good and fast USB connection. A bad cable or a cable that is slow in transmitting signals may lead to what may be called a breakdown in synchronization or a complete exchange breakdown that may result in a corrupted transfer. To get the highest speed and stability, use the cable connection, directly linking an iPad to the computer instead of syncing via Wi-Fi, which is discredited for low speed and instability.
5. Organize Your iTunes Library
Maintaining order in your iTunes will help you and your iPod manage your DVD movies for syncing proficiency. If you have a big library, organize the DVDs into playlists or albums appropriate for DVD movies. You can also assign individual genres or titles to your movies to sort them easier. Thus, when the moment comes for you to sync your iPad, you will not spend a lot of time looking for certain movies, and you will have a professional touch each time.
Conclusion
To rip a DVD to an iPad on a Mac, you can rely on the power of Tipard DVD Ripper because it features a way to rip your DVD safely and is compatible with any iPad version. If you want to transfer it afterward, use the tutorial we have for iTunes and learn more about the tricks to make the transfer run smoothly on the last part. We hope that you enjoy reading this article and learning a lot here.
More Reading
-
 Videos Not Playing on iPad: Efficient Solutions to Fix
by Kenny Kevin on 2024-06-03
-
 Top DVD Player Applications - Features, Comparisons & More
by Kenny Kevin on 2024-07-24
-
 DVD to MKV - How to Rip DVD to MKV with the Best Quality
by Kenny Kevin on 2024-11-22
-
 7 Ways to Rip DVD to Computer - Convert DVD to Digital
by Kenny Kevin on 2024-11-08