How to Add Audio/Video Files to Windows Movie Maker: Thorough Instructions
Although Microsoft stopped supporting the Windows Movie Maker in 2017, many Windows desktop users can still use it if they want to. Way back in the years when it was still on the trend, it was the best video editor for all. It is why it is not surprising at all to know that many continue to trust it and utilize it for their video and audio files. If you are one of those who are curious about this software and are planning to learn some basic techniques to use Windows Movie Maker for your video and audio editing tasks, then here are the basics about importing video files or adding music to Windows Movie Maker.

Part 1. Importance of Proper Media Import
The media importation done properly is an important aspect of creating projects. This is true in the realm of filmmaking, graphic design, photography, or any other endeavors for multimedia. This import process brings external media property, such as videos, audio clips, images, and other digital content that are good for editing, manipulation, or incorporation. In addition, here are the listed reasons why the proper importation is highly important.
- • To maintain the media file quality.
- • To maintain the consistency of the file’s color, aspect ratio, resolution, and others. A proper importation will make them intact.
- • To make the workflow organized and efficient.
The resonated facts above are also purely applied when you use the Windows Movie Maker, as long as the software supports the media files you are to import.
Part 2. How to Import Individual Media Files to Windows Movie Maker
How to Import Video to Windows Movie Maker
Windows Movie Maker supports WMV, AVI, MP4, MOV, FLV, ASF, 3GP, and DV-AVI. Make sure the videos you want to import are in the said formats.
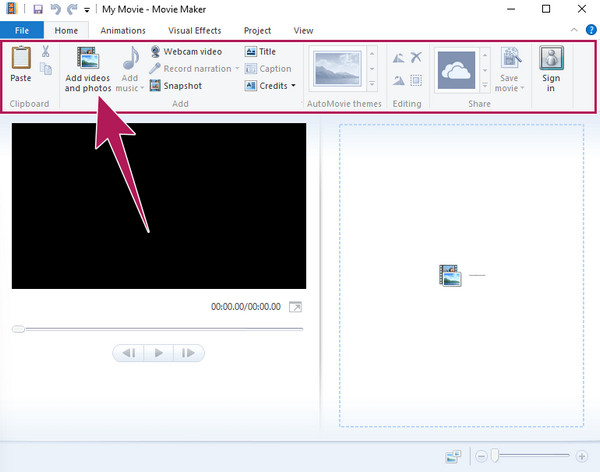
Step 1Launch the Windows Movie Maker on your desktop to get to its interface.
Step 2Next, go to the Home tab and hit the Add Videos and Photos option.
Step 3Choose the media file to upload from your local drive, then click the Open button.
How to Add Audio File to Windows Movie Maker
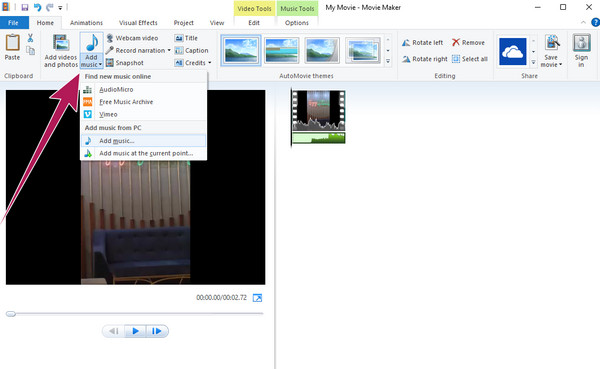
Unfortunately, Windows Movie Maker will not allow you to upload a single audio file directly. If you want to add an audio file, you must upload a video or a photo first. It denotes that the audio file accepted for import must be merged into a video or a photo file. Nevertheless, Windows Movie Maker supports the following audio formats: WMA, MP3, WAV, AIFF, M4A, AAC, OGG, and FLAC.
Step 1Hit the Add Videos and Photos option on the File tab window, and upload the needed file for merging.
Step 2Once the file is uploaded, the Add Music option will be available. Now, this is how to add MP3 to Windows Movie Maker. You must click the Add Music button and choose where you want to get the music file, either online or from your PC.
Step 3Suppose you chase to get it from your PC. Choose the file and hit the Open button if that's the case.
Note: Apart from the tip on importing media files in Windows Movie Maker, there are more tricks you can learn to get a better hang of this video editor.
Extended Reading:
How to Convert Windows Movie Maker Files to MP4 Easily
Best Way to Improve Video Quality in Windows Movie Maker
How to Reverse Video in Windows Movie Maker [Complete Guide]
Part 3. How to Import Multiple Files on Windows Movie Maker
Suppose you want to upload multiple media files on Windows Movie Maker. You will just need to do the same steps above, but with an additional single step to include a batch importation. The complete steps will help you through.
How to Import Bulk MP4 to Windows Movie Maker
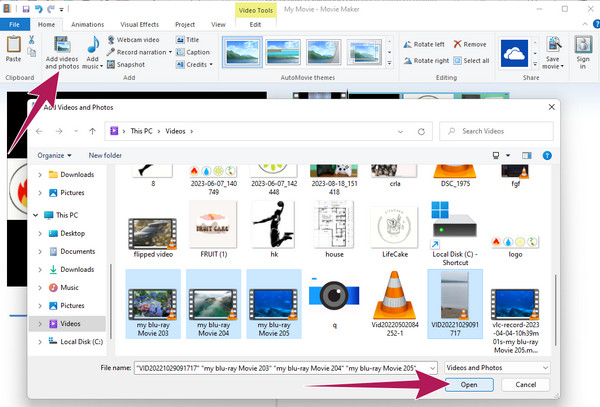
Step 1Open the movie maker, and click on the Add Videos and Photos button.
Step 2Once you reach your local folder, click and hold the CTRL key and click all the MP4 files you want to upload. Note that you can also create a new folder for the files and then upload the folder instead.
Step 3Do not forget to click the Open button to bring your selected multiple files to the movie maker.
Part 4. The New Best Movie Maker for Both Windows & Mac
Since Windows Movie Maker has ceased to update, we’ve devised a plan to introduce you to the newest best movie maker that has taken the crown from WMM: the Tipard Video Converter Ultimate. It is the ultimate video converter with an incredible movie maker as part of its grand features. To add are the powerful tools that can beautify your video and audio of all types. It's a good thing that it offers a video enhancer tool that you can use to remove the noise, optimize brightness and contrast, upscale the resolution, and reduce the shaky effect on your videos.
Meanwhile, its wonderful MV maker tool will provide you with numerous delightful themes. Along with this delight are the presets that will help you customize your movie according to your desired format, resolution, quality, framerate, audio track, filters, watermark, orientation, and many more. Want to see how Tipard Video Converter Ultimate works? See the steps below, then.
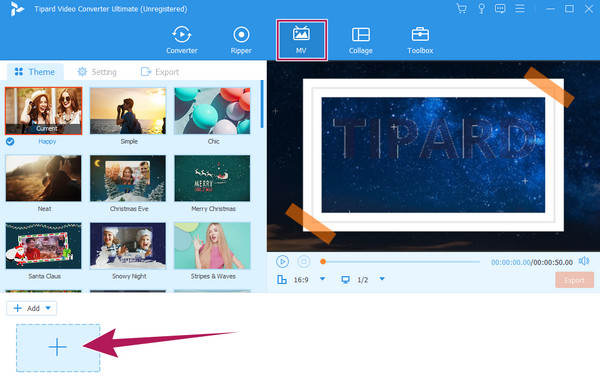
Step 1Begin the work by installing the movie maker. Then, on its main interface, go to the MV tab menu. By clicking the Add button, you can add the footage you want to use for your movie.
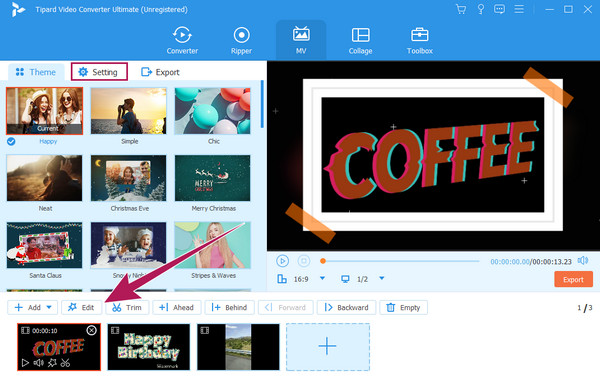
Step 2Next is to choose your desired Theme to use. Then, if you want to add filters and make some customizations, click the Edit button. Otherwise, proceed to the Setting menu.
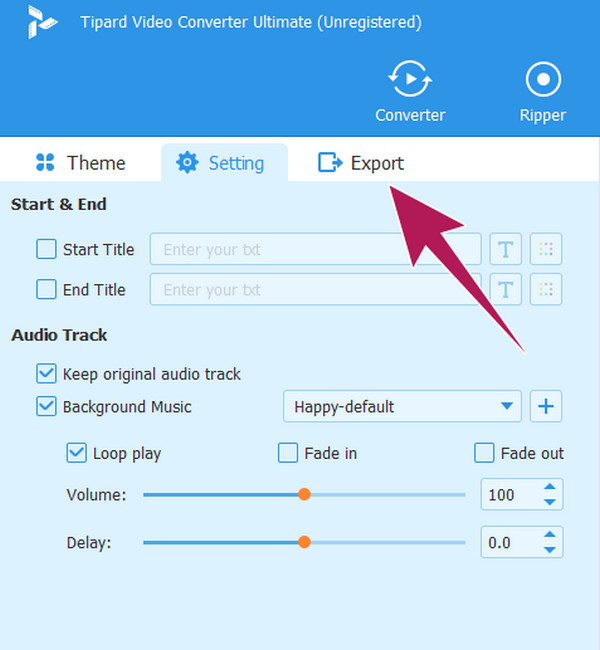
Step 3On the Setting menu, do what presets you want for your options. After arranging for your desired set-up, proceed to the Export menu.
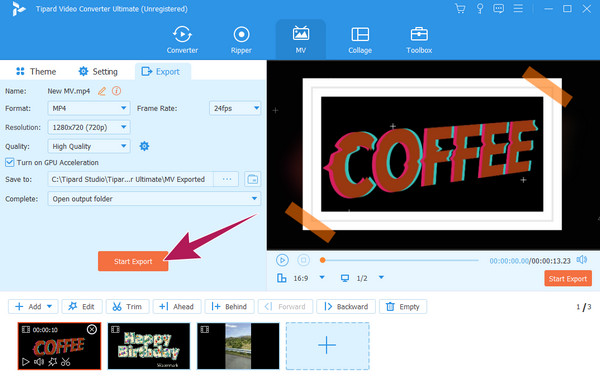
Step 4Upon reaching the Export window, you may make some technical modifications to your output. Then, hit the Start Export button to save and export your newly created movie.
Part 5. FAQs About Windows Movie Maker
Why was Windows Movie Maker discontinued?
There are several factors why it was discontinued, like outdated technology, competition, and Microsoft's focus on other products.
Does Windows Movie Maker still exist?
Yes, it still exists on some Windows desktops, although it stopped producing updates in 2017.
Is Windows Movie Maker better than iMovie?
Comparing the two movie makers depends on your needs as a user. Aside from their specific caters to platforms, they also have their advantages. However, since iMovie hasn’t stopped updating, it is safe to say that it is now considered a more powerful movie maker than the Windows Movie Maker.
Conclusion
This article showed you how to add music and video to Windows Movie Maker. Hence, if your desktop still contains the software, you can expand its utilization in addition to what you have learned here. However, please do not expect it to give you some of the latest and advanced tools. But you can use the Tipard Video Converter Ultimate if you want some advanced features and functions for movie making.


