
Do you know that feeling when you have a stack of DVDs and do not know how to put them in the right order or when you get anxious about the appearance of the discs and what happens to them? It may sound like a great pipe dream, but storing DVDs in the cloud is the way of the future regarding media storage. Getting your movie or TV show collection into the cloud can help you free up a lot of space at home, safeguard precious memories, and offer convenient access to your most-watched content. Think about the convenience of streaming your library to play any device without the problem of discs.

Part 1. How to Rip DVDs Compatible to Any Cloud Storage
Converting DVDs to digital files is the first process of storing your DVDs in the cloud, and Tipard DVD Ripper is perfect for this purpose. It is compatible with most cloud platforms because it supports over 500 formats, including MP4, MKV and AVI. It is optimized for fast ripping; thus, it takes a short time to rip DVDs. Its video and audio quality is great. Of course, to enhance productivity, it comes with batch mod,e so you can convert as many DVDs as you want simultaneously.
Also, Tipard DVD Ripper has the function of trimming videos, adding subtitles, and setting the exporting quality, which will help convert files to the necessary format for uploading online. Experienced users and digital archives thanks to a not-so-complex interface. Thanks to a not-so-complex interface
Step 1 Here, click the download button to get the newest version of the ripper on your Windows or Mac, install the app and do the quick setup it requires. That, proceed to the next steps.
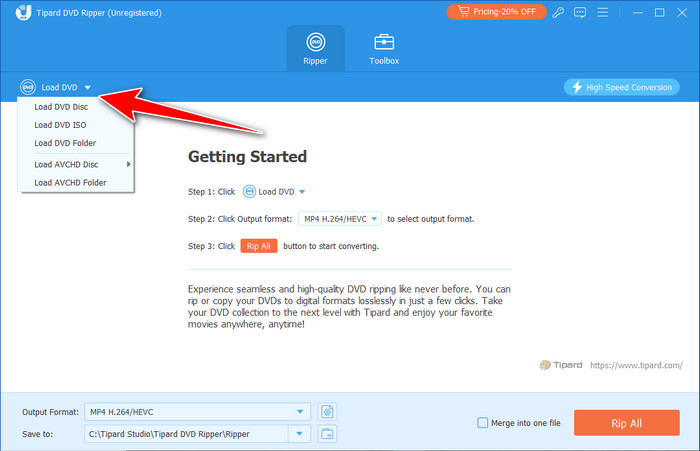
Step 2 Put the disc on your computer's disc tray and load it up, then click the Load DVD button to find where the disc is located. Choose the disc that you have loaded and import it here.
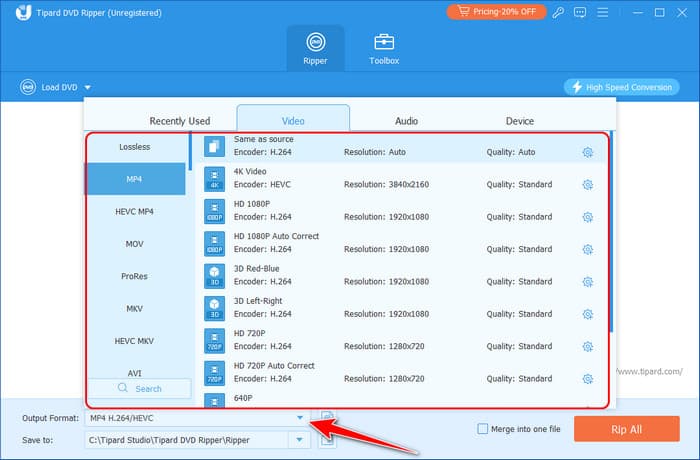
Step 3 For the output format, choose the video format supported by your cloud, but if you need to know which one to use, we suggest you pick MP4 or MOV because these are the most common formats supported by cloud services.
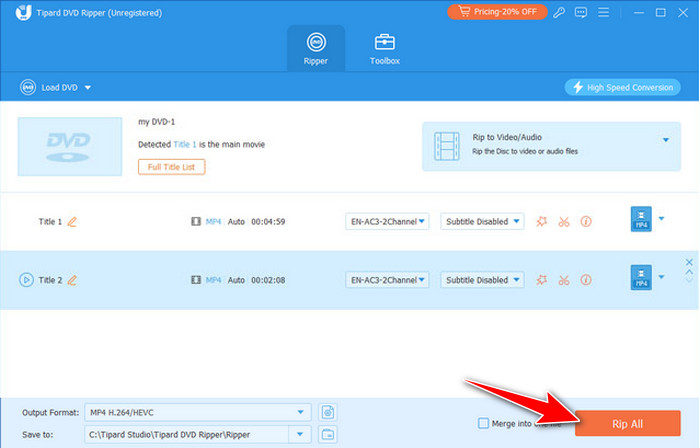
Step 4 Finally, hit the Rip All button so the DVD can be processed. When ripping is done, proceed to the next part, wherein you will upload now the DVD content to the cloud storage.
Part 2. Best Digital Format to Use to Upload DVD Content on Cloud Services
Choosing the compatible format you need is crucial when sharing files with others through cloud storage platforms. Here are the best formats to consider if you want to store DVD movies:
MP4:
As one of the most widely used video formats, MP4 is an optimal video quality and file size measure. Its convenient compressing feature makes it ideal for streaming and sharing because it does this without compromising video or audio quality. MP4 has full support from all the devices, for it has no compatibility issues when playing videos.
MKV:
MKV is an adaptable format that supports multiple audio tracks, subtitles, and information about the track in one file. Its advantage is paramount for archiving DVD features such as commentary or other language tracks. Unlike MP4, however, modern media players support MKV very well, making it an ideal format for users who want to keep their DVDs as is.
AVI:
AVI is an old but still widely used video format, primarily because of its compatibility with older programs and hardware. Compared to MP4 format, the format provides a lower compression rate and, thus, larger file sizes. However, it's a proven format for archival if original quality matters more than disk space is taken up.
MOV:
MOV is a format created by Apple for use in QuickTime and is very friendly to Mac OS and iOS devices. It offers good video quality, many audio tracks, and subtitles, which makes it suitable for use. Professional editing and playback on Apple devices use the MOV files; however, other systems may need the addition of codecs or conversion.
Part 3. How to Upload Ripped DVD Files to the Cloud [3 Cloud Services]
Storing DVDs in the cloud is very simple now that you have ripped them into a digitalized format. Choose which of the available services you use or want to use:
1. Google Drive
Google Drive is on every device, providing 15 GB of free storage and built-in connection to other Google apps such as DOCS, Sheets, and Photos. It is an outstanding tool for personal and professional use if you're looking for a practical option for creating folders and sharing files that can be accessed with a link.

Step 1 Open your browser and log in to your Google Drive account.
Step 2 Click the the + button to see what are the things you can upload here. Then, select Upload a File, find the ripped DVD content you want to save and click Open.
Step 3 Wait until the uploading process is done, and you will see where the file is on your drive.
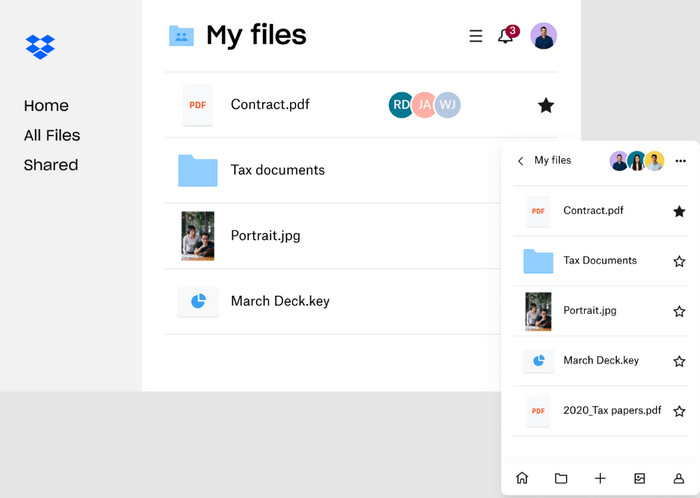
2. Dropbox
Dropbox is an easy-to-use cloud storage solution that has become popular for easy file sharing and collaboration. This is for you if you are looking for an iCloud for Android. You get only 2 GB of free space, which is great for a small personal library or sharing files with friends. Alles kann einfach in Dropbox gezogen oder kopiert werden, synchronisiert wird, und Files können auch offline angezeigt werden. It is securely designed for sharing files through passwords, expiring links, etc.
Step 1 Go to the Dropbox homepage and enter your currently logged-in user details. If you don't, click on the Signup button and provide relevant details to have an account created.
Step 2 Select Upload from the toolbar on the home page or the + sign on the home page if you are on the mobile application. To upload a file, select the Files option.
Step 3 Navigate your ripped DVD files on the device, click on them, and then click on the Open button to upload them. Just upload the files; as you know, they will be available on all devices logged into the same Dropbox account.
3. iCloud
iCloud is Apple's cloud storage service with 5 GB of storage space provided for free and outstanding synchronization with macOS and iOS gadgets. It is ideal for users in the Apple environment since the Files app and iCloud help users locate their files instantly or through iCloud Drive. To optimize your videos, iCloud permits users to share their data across devices, and your videos will be available as needed. It also presents choices of family members' and friends' access and cooperation.

Step 1 Go to the iCloud website using any web browser and input your Apple ID and password. Instead, go to the Files app on an iOS device and get a quick link to iCloud Drive.
Step 2 To access your iCloud storage, click on the iCloud Drive icon. If from the Files app, tap Browse and choose iCloud Drive.
Step 3 Next, click on a button labeled with the cloud and an arrow pointing upwards to Upload, select your ripped DVD files on your device and upload. Your files will be accessible on all your Apple devices once they are done using the same Apple ID. In that same method, you can save documents on iCloud as well.
Conclusion
To store DVD movies in the cloud, you will need to help first using the Tipard DVD Ripper we have introduced here, and after that, you can now upload it to the cloud service you want to use to keep or preserve the DVD in a digital form.
More Reading
-
 How to Find a Great DVD Storage to Store DVD Forever
by Lily Stark on 2017-03-14
-
 What is GoPro Cloud and How to Upload Videos to It
by Kenny Kevin on 2023-08-18
-
 CloudConvert: A Detailed CloudConvert Review and Alternative
by Lily Stark on 2023-07-02
-
 Top 7 Audio Extractors to Utilize Online and Offline
by Lily Stark on 2024-10-28