
Were you looking for a new way to convert DVD to MOV on Mac to preserve memories, digitalize it, or prepare video files for seamless editing and integration on Apple but do not know where to start? DVD became a thing of the past because the technology evolved, but there is a way to preserve its content across Apple devices, making it future-proof, and that is where MOV file comes into play. To give you a straightforward idea of how to do it, you better follow the guide that we have here.

Part 1. What DVD to MOV Converter to Choose - 3 Best Options Available
Due to piracy and protection of intellectual property rights, DVDs have built-in copy protection features. These technologies include all the simplest restraints through to highly developed encryptions, all intended to tackle different threats. Below are the most common types of DVD copy protections:
1. Tipard DVD Ripper
Tipard DVD Ripper is a program that converts DVDs to MOV on Mac videos. It is efficient and easy to use and has a well-crafted user interface. The application is compatible with over 500 output formats and features the MOV option, which will be useful for new learners and professionals. It successfully provides long video and audio conversion, meaning the files will not lose their good quality after the conversion.
Some converting settings include frame rate, resolution output size and bitrate. In addendum, the user can adjust the output according to his requirement. Batch processing takes less time than single-disc processing, and the decryption function enables the direct processing of encrypted or copy-protected DVDs. Based on the features that it presents to its users, including the simpler and the more complex ones, it is clear that it will work well for every user.
2. HandBrake
Another widely used video transcoder tool is HandBrake, an open-source transcoder that is flexible and cost-free. It was not initially intended to be a DVD ripper, but many circuit-savvy persons use it today as a free DVD to MOV converter and, further, to other formats. Besides wide format support, the pixel shader tool described above provides users with several parameters to adjust, including encoding presets, bitrate, and subtitles. It will be useful for fine-tuning their media output for particular applications.
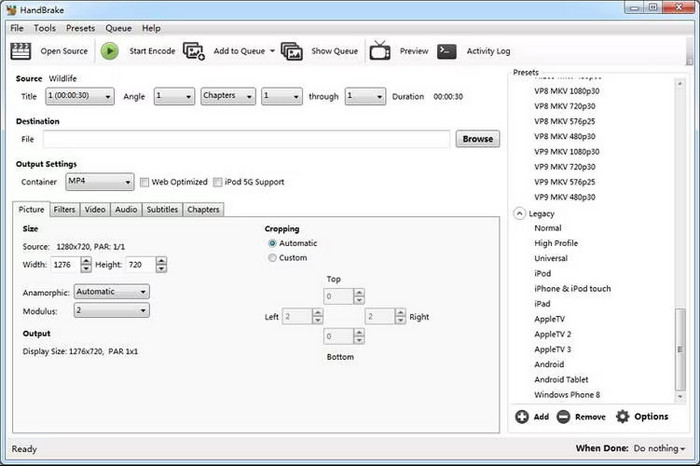
A major downside to HandBrake libdvdcss is its inability to decrypt DVDs, which is incapable of commercial use. Other software like libdvdcss must be installed to overcome this limitation.
3. MacX DVD Ripper Pro
MacX DVD Ripper Pro is an ideal and professional DVD-to-MOV ripping tool designed for Mac users who will enjoy fast DVD-to-MOV conversion with this program. The only feature that makes it distinct from its counterparts is its GPU acceleration, which reduces the time it takes to process data, even with high-definition content.
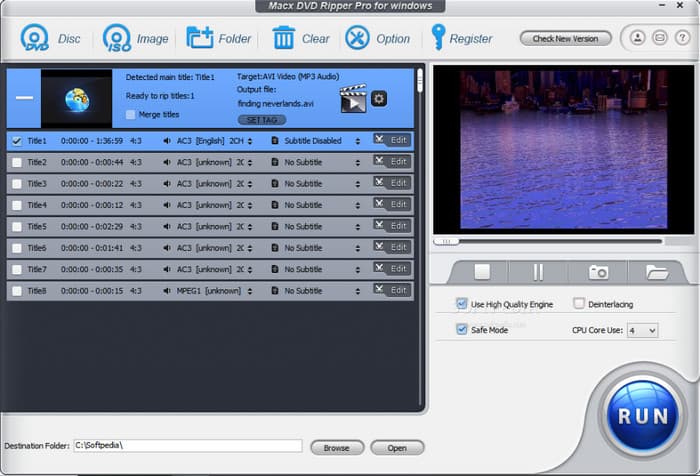
MacX DVD Ripper Pro does very well in ripping different copy protections such as DRM, region codes and CSS encryption. It is good for personal and commercial DVDs. This determines a simple interface and design that appeals to users who require simplicity when using a site but don’t wish to compromise on quality.
| Feature | Tipard DVD Ripper | HandBrake | MacX DVD Ripper Pro |
|---|---|---|---|
| Platform Supported | Windows and Mac | Windows and Mac | Mac and Windows |
| Output Format Supported | 500+ output formats, including the MOV | Limited format, including MOV | 350+ formats, including the MOV |
| Batch Processing | Supported | Supported | Supported |
| Handles Encrypted DVD | Yes | Yes, but with an extension | Yes |
| Conversion Speed | Extremely Fast | Moderate | Fast |
Part 2. How to Transform DVD to MP4 with the Best DVD Ripper on Windows & Mac
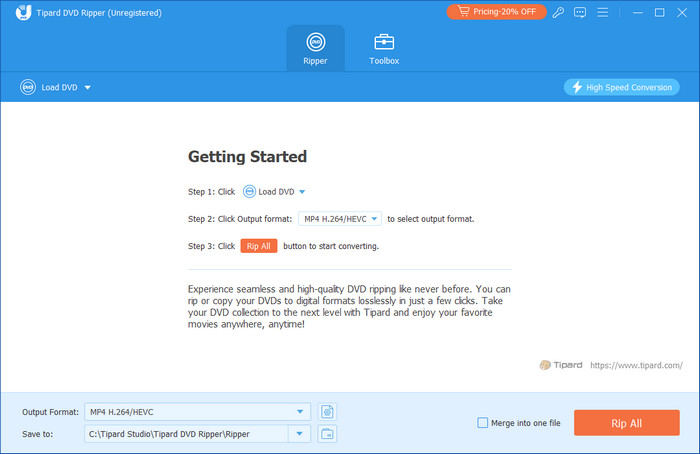
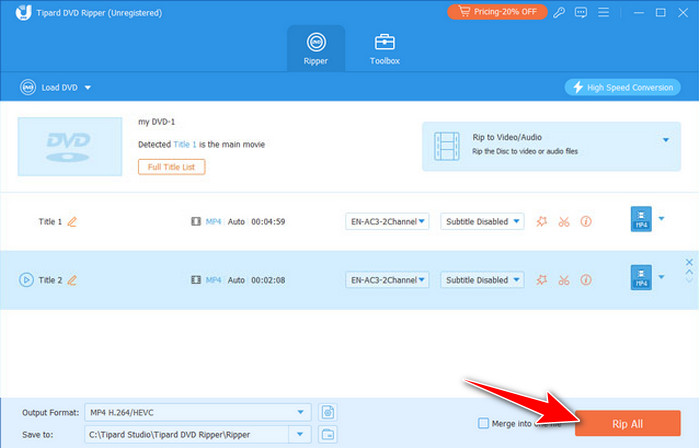
Follow the tutorial that we have below to turn your DVD to MOV; there is no need to worry because the tutorial is simple to follow:
Step 1 Tick the download button below to get the software. After downloading, open the installer and follow the setup instructions. Once installed, launch the app to begin.
Step 2 Insert your DVD and click the Load DVD button in the software. Select the DVD from your drive and click Open.

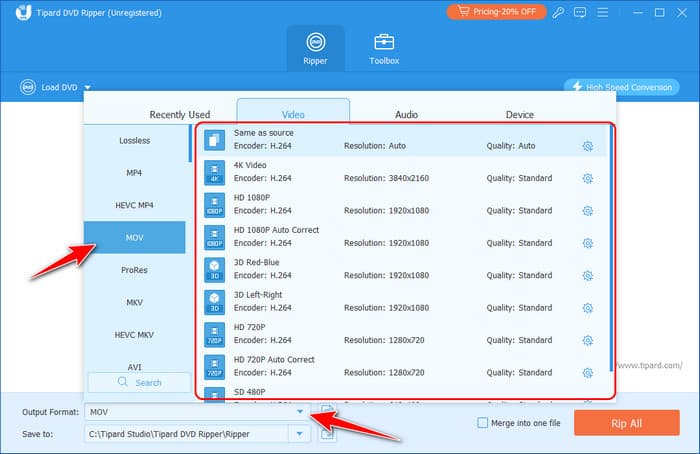
Step 3 Click the Output Format button and choose MOV. You can adjust settings like resolution if needed.
Step 4 Pick where to save the file, then click Rip All to begin the conversion. Once finished, your MOV file will be ready for your Apple ecosystem.
Part 3. Tips to Improve Output Quality During Ripping
When transcoding DVDs to MOV, it is important to fine-tune the output to get the best picture sorting. Here are key factors to consider to enhance the quality of your final video:
1. Adjust the Resolution
Several factors define video quality, which is categorized in comparison to other factors into two categories: fixed and variable; resolution is one of the key fixed factors. If you decide to convert your DVD to MOV format, this format will allow you to make your video sharper at the output and capture all essential details, using higher resolutions like 1080p or even 4K. Videos in lower resolution, say 480p, tend to become grainy or pixelated; this is especially true when viewed on big screens.
Tip: If your source is a standard DVD, selecting a resolution higher than 1080p will not enhance video quality but could increase the file size unnecessarily.
2. Set the Bitrate Correctly
When it comes to saving, or more specifically, the amount of data per second required to store the video, bitrate controls the quality of the video - or, more specifically, the amount of data required to create it. Increased bitrate usually leads to even better-sounding material but increases the file size. The trick is to find the right middle ground.
Tip: For MOV files, on average, the bitrate is fixed at about 1500-2500 kbps to achieve high video quality while at the same time avoiding the creation of very large files.
3. Choose the Right Audio Track
Choosing the right audio channel is critical for retaining the sound quality. CDs can contain several audio options, such as foreign language options, commentary, or surround sound encoding. Make sure that you have the best track to upload your video.
Tip: If you do not want your movie to contain two or more audio streams, leave it with only one track to save space. AAC or MP3 is recommended because it provides wider compatibility with iPads.
4. Add Subtitle
If the original DVD you burnt had subtitles and you wish to retain them with the MOV file, you must tick in the subtitle option. Most of these tools enable you to pick certain subtitle streams or even insert extraneous subtitle files.
Tip: To have a cleaner video, only use subtitling if required. However, when there are too many subtitle tracks, they get crowded within the file and thus decrease the playback efficiency of the video.
5. Choose Advanced Settings
Several DVD-ripping programs feature complex encoding settings that enable you to customize many factors, like the frame rate of an output video and the codec used. Changing this value will affect the fluidity of your video playback. A frame rate of 30 fps choice is normal for most videos, while 60 fps will be more appropriate for videos with more action.
Tip: Always use H.264 when compressing your videos for the best quality or size ratio.
Conclusion
Now that you have read this article, you can easily convert your DVDs to MOV format with the help of the instructions and tools suggested in the article. Regardless of whether you want to back up your favorite DVDs to prevent them from getting scratched or lost, Share DVD movies with the iPad, or Keep the DVDs within easy reach of the Apple ecosystem - This guide is just perfect.
More Reading
-
 DVD to AVI – Rip DVD Movies to AVI with Lossless Quality
by Kenny Kevin on 2020-04-02
-
 DVD to MKV - How to Rip DVD to MKV with the Best Quality
by Lily Stark on 2024-11-22
-
 Convert DVD to Digital Easily on Windows 11/10 and Mac
by Lily Stark on 2024-11-19
-
 Best Way to Convert DVD to Android for Accessible Playback
by Kenny Kevin on 2023-10-09