Are you searching for video filters that can improve the quality of your video? Adding filters gives your videos a trendy touch that can be used on social media or for any other purpose. This review post will demonstrate various filtering tools, from simple to professional software. So, let us see how you can get the most out of your video in just a few clicks!

Part 1. Exquisite Video Filters Offered by Tipard Video Converter Ultimate
Tipard Video Converter Ultimate has various video filters that enhance any video project. These filters enable users to modify color composition, brightness and contrast, as well as apply visual effects that lend an unusual aspect to videos. Such an appealing interface allows users to choose from several filter options to suit their preferences or get a professional look that elevates the project's visual appeal without the need for sophisticated editing techniques. It has a vast collection of video filters that maintain quality and specific styles for your videos. Some of the notable filters include:
• Warm: Infuses the videos with a warm feeling to create a cozy feel to the video.
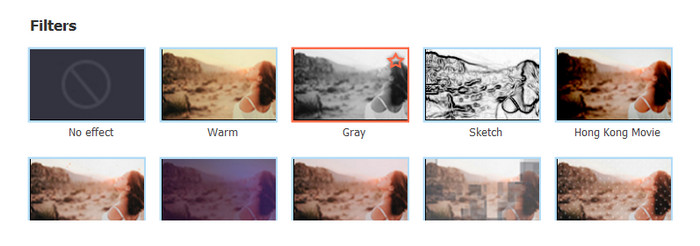
• Cool: A blue tint that is useful for creating relaxing scenes because it has a calm feeling.
• Gray: Gray-colored glasses are used to filter any video, thus giving it a standard black-and-white video.
• Pixelate: Ends with a pixelated look, which is more of an aesthetic look or is done for privacy purposes.
• Sketch: Paints the video scenes to be edited like the scenes were drawn.
• Whirl: Manipulates the visuals for a much different and abstract feeling.
• Negative: Reverses colors of the images on the end to have a very high and intense feeling.

• Vivid: Enhances the saturation of the colors in the video to make the presentation more lively.
Part 2. Add Filters to a Video
Tipard Video Converter Ultimate offers many video editing and conversion options and is an editor capable of completing various tasks. It brings many filter effects that can be applied on clothes to make the videos look professionally done and edited.
- Choose from Warm, Cool, Gray, and more filters for customization.
- Instantly see effects on video, allowing adjustments before saving.
- Adjust brightness, contrast, and saturation alongside applying filters.
- It simplifies the filter application and is accessible even for beginners in editing.

Procedure:
Step 1Download and Install
Commence by downloading and installing the latest version of the tool Tipard Video Converter Ultimate, then launch the program.
Step 2Upload Your Video
On the main screen, please locate and press the Add Files button. Find the intended video file from the computer and select it.
Step 3Access the Filters
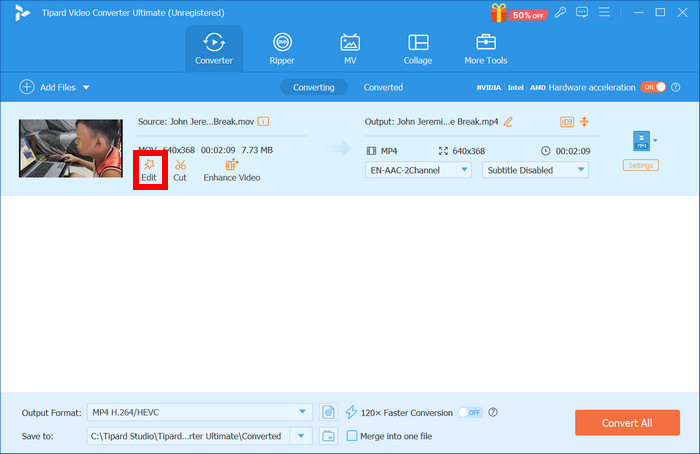
After loading the video, find and click the Edit button to enter the editing area. There, please select the Effect & Filter tab.
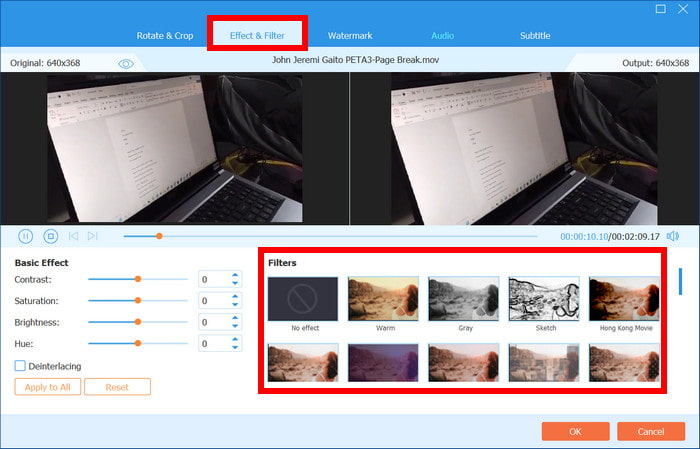
Step 4Select and Apply a Filter
You can opt for a filter from the Warm, Cool, Vivid, or other filters list. Change Brightness and Contrast for more added modifications using this free video editing software.
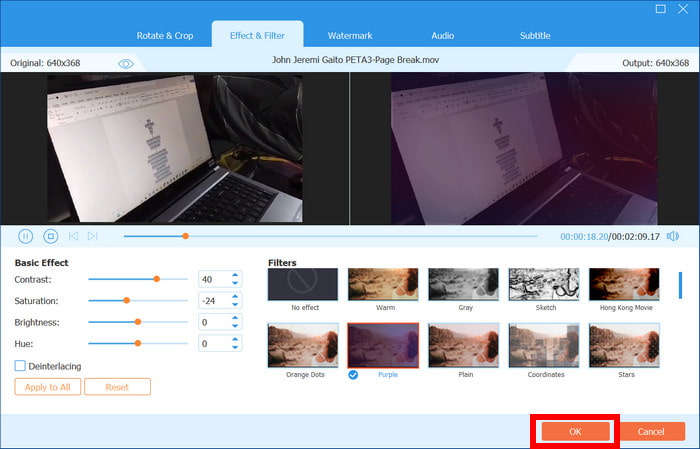
Step 5Preview and Save
Using the preview window, check how the edited video looks with the filter you applied. After that, press OK to accept the changes and then press Convert All to finish and save the edited video on the computer.
Part 3. Add Filter on Videos Online
Here are three popular online tools for adding filters to videos, each with unique features, benefits, and some limitations.
1. Clideo
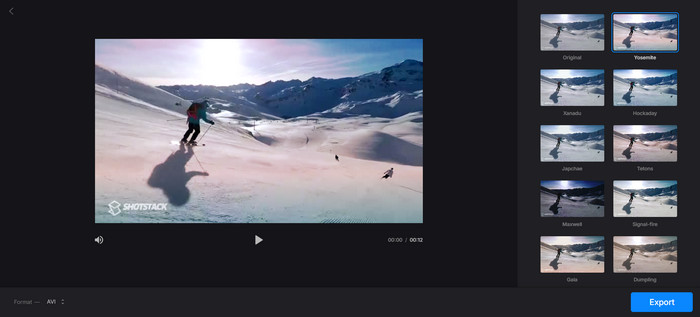
Clideo provides a very simple method for adding filters to videos online, which can be integrated into any video format. It is a web-based application allowing users to add filters and modify videos without installing programs.
- A safe and uncomplicated method to edit video with no installation required.
- Usable with multiple formats, including MP4, AVI, and WMV.
- Limitation on file size for the free version is restricted to 500MB.
Procedure:
Step 1To upload the video file you would like to edit, begin by uploading it from your computer. You can drag and drop it to the interface or use the Choose File button to browse to your computer or other online storage services like Google Drive or Dropbox.
Step 2Once the video finishes uploading, look through the filters menu on the left. In this case, the use of various presets is suggested.
Step 3Set the maximum filter level. If there is a control to adjust the filter, use it to make the desired effect. This allows for subtle or dramatic enhancements.
Step 4If you are happy with the changes made to the video, hit the Download button. This will download the video edited to your computer, ready to be shared or edited again.
2. Canva
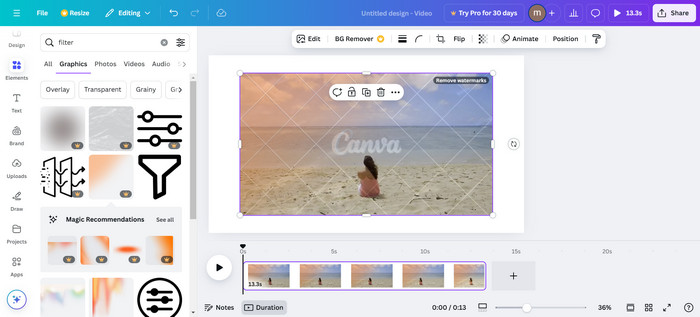
Canva has also integrated filters that provide moods, looks, and feelings, mostly used in marketing or social media videos. Applying filters or modifying them is simple, and more effects can be used for extra personalization. You can also edit video contrast for more precise adjustments.
- Has an easy filter slider for a stronger intensity.
- Allows different video formats as well as screen sizes.
- Some of the premium features can only be accessed under a paid plan.
Procedure:
Step 1Open Canva, create a new video project and browse the templates to find something that pleases you. After that, drag your video in or click on the Upload files button to upload it.
Step 2Click on the video you want to edit, then find the Filters section on the left screen and scroll to see more filters.
Step 3Click on the filter you want to use and use the slider to change the amount of the filter.
Step 4When ready, press Save or Download to save the video or instantly post it on your social media account.
3. VEED.IO
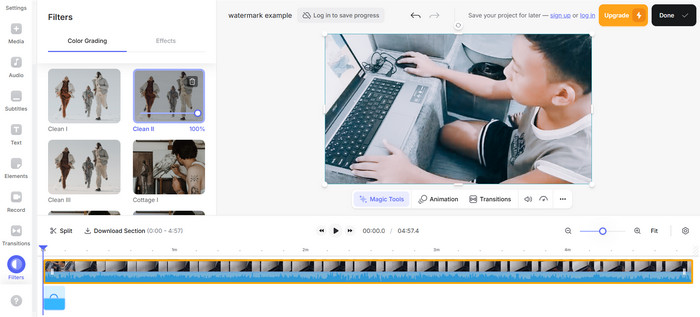
VEED.IO offers an impressive assortment of video filters, including advanced color grading and adding text and effects. The site is designed for novice and professional users with an emphasis on video production.
- Numerous filters, including VHS, glitch, sepia and others.
- Supports a wide range of file formats.
- Simple beginners may need help with some advanced tools.
Procedure:
Step 1Using your web browser, go to VEED.IO; upload your video first. Drag in the video you want to upload into the interface or click on the Upload files button to get it from your device.
Step 2Once the upload is complete, move on to the Filters section, which can be found on the left-hand menu. Look for a preset that can be added to enhance your video.
Step 3Select a particular filter and click on it to observe its effects on your video. Vary the strength of the filter, if necessary, to what is most attractive to you.
Step 4When pleased with the result, click the Export button to start processing your video. After exporting, you can directly download the video or post it online.
Part 4. Tips and Ideas on Adding Filters to Videos
There are many ways in which filters can be a great addition to a video. They add more to the atmosphere, pay attention to some focal points, and present their bad sides. Here are some useful tips and suggestions to help you apply filters and polish up your videos.
• Filters Fall within the Video Scene: It is very important to have appropriate filters, and such filters may include Warm for happy and Cool for more tense scenes.
• Adjust the Levels of Contrast and Brightness: When used correctly, adjusting these two features can help blend in any filters enabled.
• Test on Multiple Platforms: To maintain the same filter quality, checking your video on multiple devices is crucial.
• Highlight Important Scenes: Certain effects can be used in certain shots to get the audience's attention towards the shot you are trying to emphasize.
• Reduce Noise using Filters: Filters such as Gray or Pixelate can be helpful in concealing minor focus or lighting faults and can also aid in video noise reduction for smoother visuals.
Conclusion
To end this post, video filter tools are perhaps the finest tools that can help enhance your videos at little cost. Such tools can make your content attractive regardless of whether you are just starting or already a pro. Try the options discussed in this article and pick the most suitable one for your requirements!


