About | Privacy Policy | Terms of Use | Support | Contact Us
Copyright © 2025 Tipard Studio. All Rights Reserved.
User Guide
Step 1Select Screen Recorder
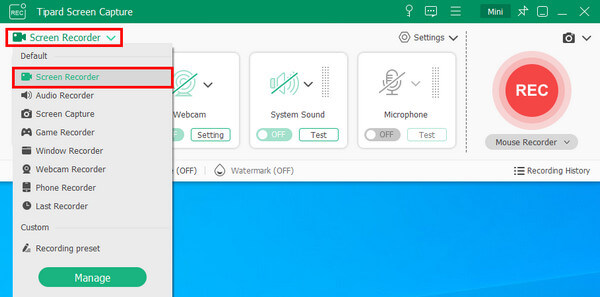
Open the program after installing it on your computer. Then select the Screen Recorder option under the Screen Recorder menu, if you want to capture your screen activities or record videos.
Step 2Choose the capture size of your screen
When your capture your screen, video, or some other video tutorials, you should determine the capture size first. You can choose Full screen or customize the size by yourself.

Step 3Adjust webcam and audio settings
After choosing the recording area size, you need to decide whether to enable the Webcam, System Sound, and Microphone settings according to your need. You can then click REC and start to capture.

Step 4Record your screen/video
While recording, you can add annotations and take screenshots as you like in real time. You can add shape, line, arrow, text, and more to the recording. If you want to capture the current scene on your screen, just click the Camera button to take snapshot.

Step 5Finish recording and preview
Once you complete the capturing process, click the red square to stop recording. And then you can preview the video automatically. You can even trim the video if you want to get rid of some unwanted parts. Then just click Save to save the video on your computer.

Step 1 Select Audio Recorder
Select the Audio Recorder option under the Screen Recorder menu if you want to grasp any sound from your computer or microphone.

Step 2Choose audio source
Choose the System Sound or Microphone as the recording audio source. Or you can select them both according to your needs. If you finish all settings, just click REC to capture your audio file.

Step 3Save recording and preview
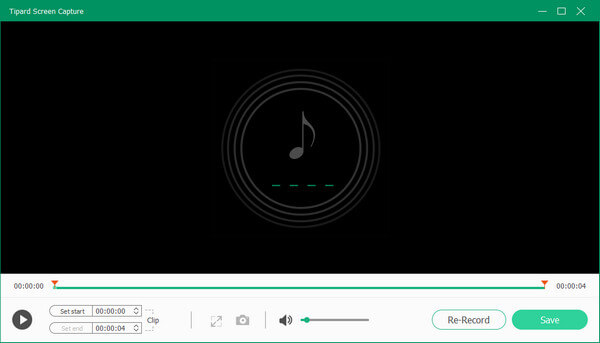
After recording, please click the Stop button. Then you can pre-listen the captured audio file. You can also clip the file as you like. Then click Save to save the audio on your computer.
Step 1Select Game Recorder
To record your highlight moments while playing game, you can use the Game Recorder of Tipard Screen Capture under the Screen Recorder menu.

Step 2Choose the game you are playing
When you enter the Game Recorder's interface, you need to select the game window that you want to record first. Then you can turn on the System Sound or Microphone if you want to capture them while recording your game. Click the REC button and start playing your game.

Step 3Preview the recorded game
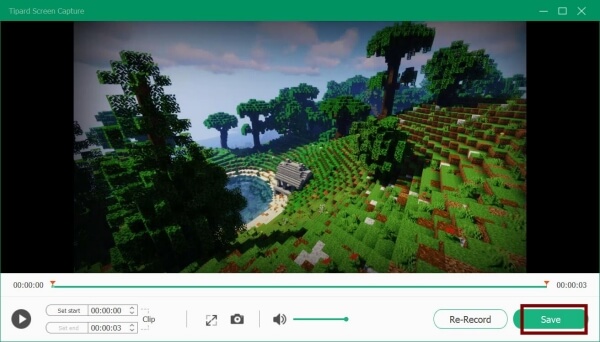
Once you finish the game, the recording will be automatically ended. Then a preview window will show up. You can check and edit the video if necessary. Click the Save button at the right bottom to save the gameplay to your computer.
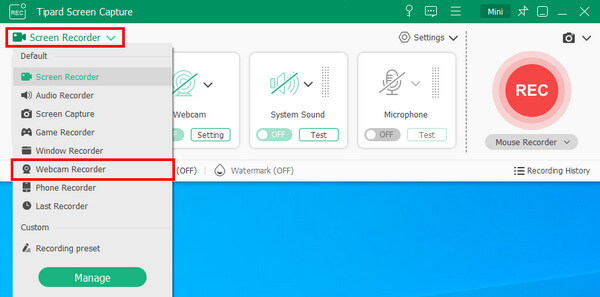
Step 1 Select Webcam Recorder
If you only want to record your webcam video, you can head to the Webcam Recorder by clicking the Screen Recorder menu in the top left corner.
Step 2 Adjust webcam recording settings
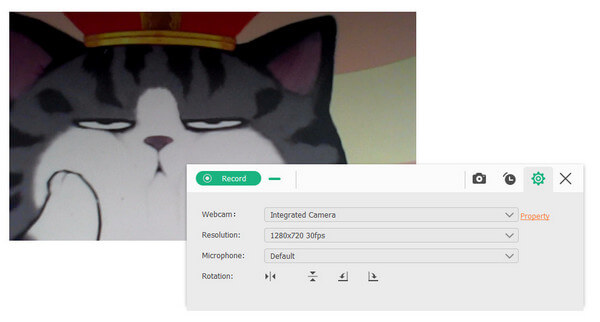
Before you start recording, you need to adjust the settings for this webcam recording process. You can change your camera device, output resolution, and microphone device easily. You can even rotate the webcam screen if needed. After setting, please hit on the Record button to start shooting.
Step 3 Capture your webcam video
You can end the recording by clicking the Stop button. Then the captured webcam video will be automatically saved to your computer. And at the same time, the Recoding History window will pop up directly. You can check, rename, and share your recording without any hassle.
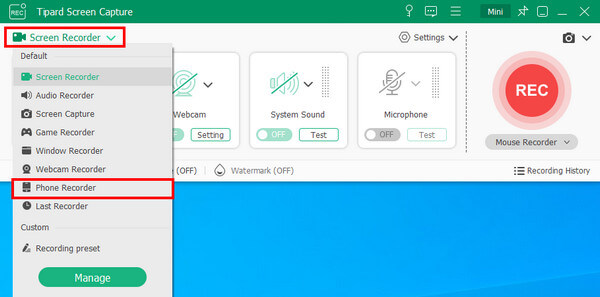
Step 1 Select Phone Recorder
After you open the screen recording tool on your computer, you can select Phone Recorder under the Screen Recorder menu to record your phone screen.
Step 2 Choose device type
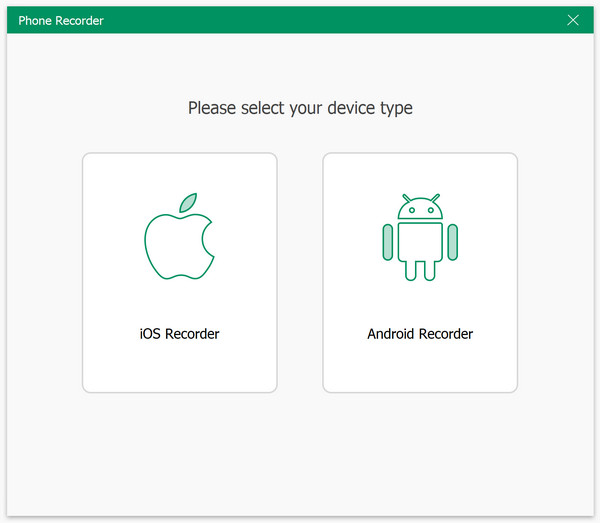
After that, you can choose to record iOS or Android device according to what your device is.
1. Record iPhone screen
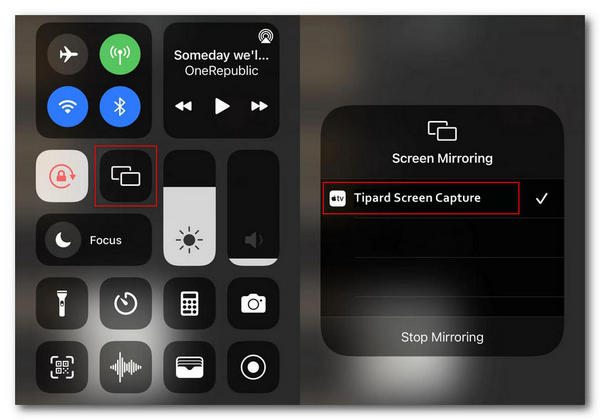
For example, if you want to record iPhone screen, you can choose iOS Recorder. Then you can start mirroring your iPhone screen to the computer. But to achieve that goal, you need to make sure that your device and the computer are under the same WLAN.
To mirror the iPhone screen, you can swipe down the Control Center from the top-right of your iPhone screen. Then select Screen Mirroring and find Tipard Screen Capture as the output end.
2. Record Android screen
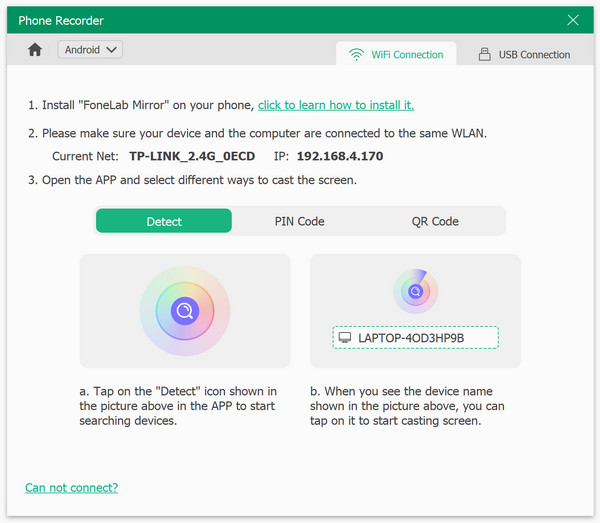
As for Android users, there are 2 connection options: WiFi Connections and USB Connection. And if you choose WiFi Connection, then you need to install the app called FoneLab Mirror on your Android device. Then you can connect your phone to computer through detection, PIN code, or QR code.
Step 3 Start phone recording
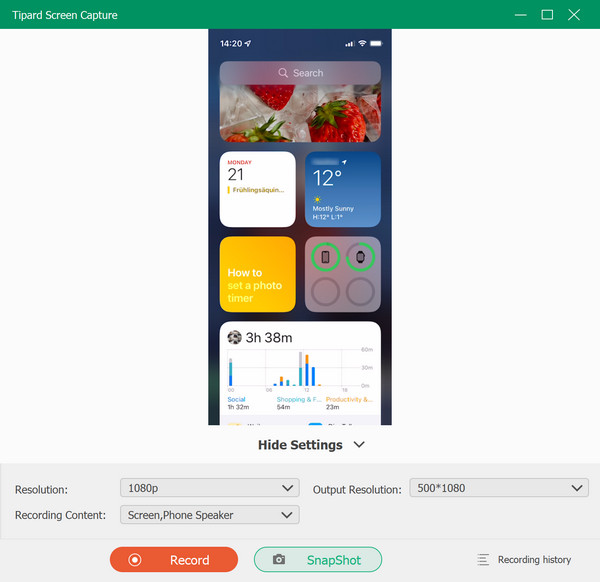
Once your phone is connected to the computer, you should see the screen image immediately. You can change the resolution and the recording content according to your need. Click Record to start the recording. During the process you can pause and stop at any time. You can even take screenshots if needed.
Step 4 Export phone recording
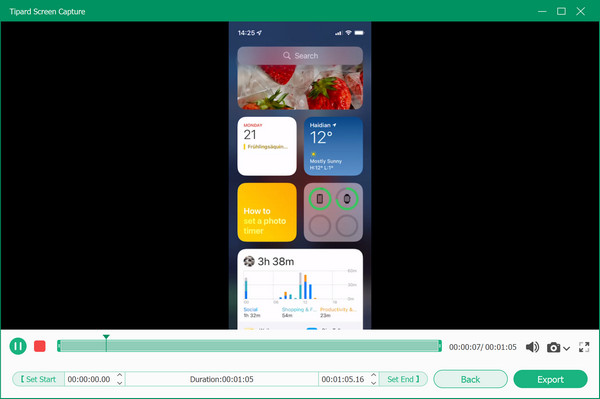
After recording, you can trim and get rid of the unnecessary parts from the recorded video. If you finish editing, please click the Export button to save the video on your computer.
Step 1 Select snapshot
Want to take a screenshot of your screen? You can select the Video Recorder button and click the Screen Capture button.

Step 2 Select capturing area
If you want to take screenshots on some part of your computer screen, you can select Screen Capture in the drop-down list.

After that, you can either click the window you want to capture, or drag to select the area you need. Once the screen is captured, you can preview the image immediately. You can also add shape, line, arrow, text, and more to the captured image. To save the screenshot, please click on the Save button.

If you want to capture the whole content of a page, you can select Scrolling Window in the drop-down list.

Then you can use your mouse to select the area or the page you want to take screenshots, and scroll your mouse or press the Space key to start capturing the whole page. Then press the ESC key and click the Save button to complete.
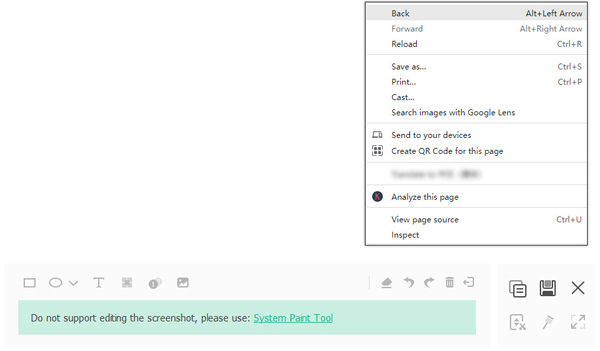
If you need to take screenshot on the popup menu only, you can select Popup Menu Capture in the drop-down list.

Next, you can directly make the menu show and press the ESC key to take screenshots. Finally, click the Save button to finish.
Step 1 Select Window Recorder
If you open multiple windows and would like to record a certain window singly, please select the Window Recorder option.

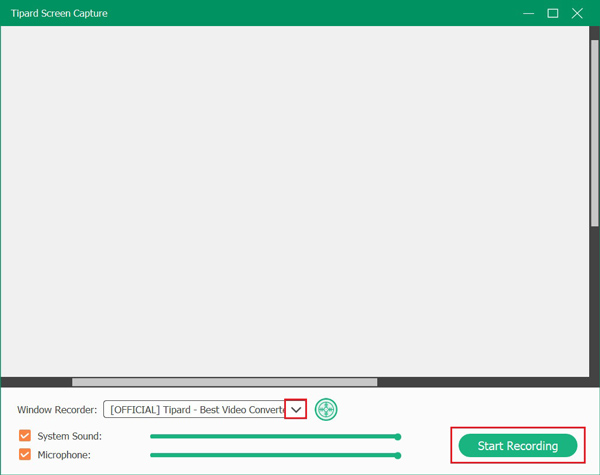
Step 2 Start recording
After that, you need to select the window you want to record by clicking the drop-down button. Next, click the Start Recording button to begin.
After recording video or audio, you can edit your recorded files using the following tools: Trimmer, Advanced Trimmer, Video Compressor, File Merger, Media Converter and Media Metadata Editor.
To begin with, please click the Recording History button in the bottom right corner to access your recorded files.

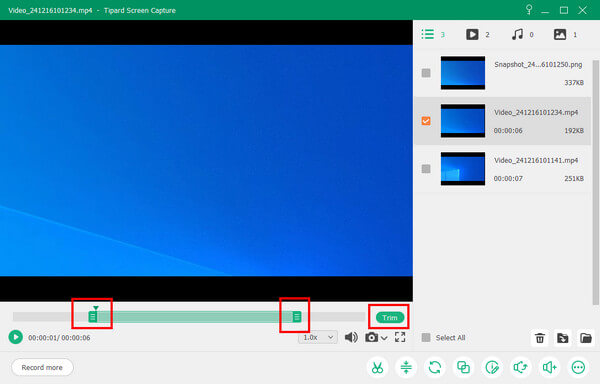
Step 1 Check your recorded files and go to the left page.
Step 2 Then, you can drag the two points of the timeline bar to cut the unwanted part out of your recorded video.
Step 3 Finally, click the Trim button to save your result.
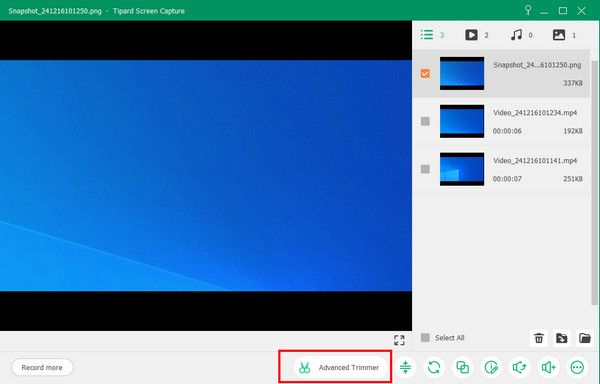
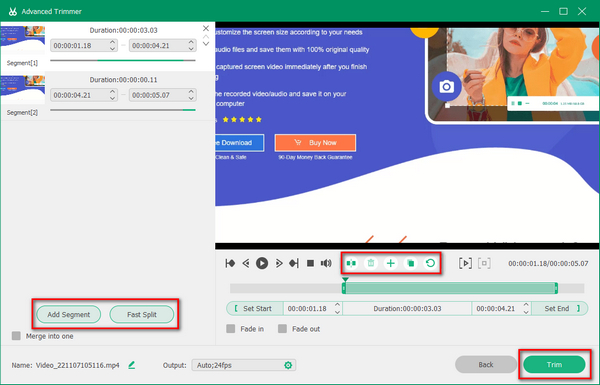
Step 1 Check your recorded files and select the Advanced Trimmer option.
Step 2 You can drag the two points of the timeline bar and click the Split button and the Add Segment button to split your file into two segments. You can also click the Fast Split button to split your file into several segments quickly.
Step 3 After that, you can click the Trim button if you are satisfied.
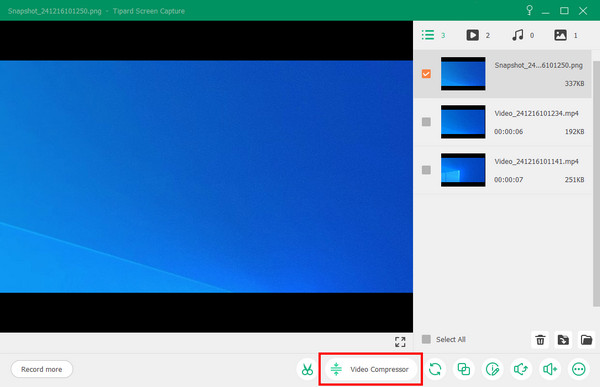
Step 1 Check your recorded files and select the Video Compressor option.
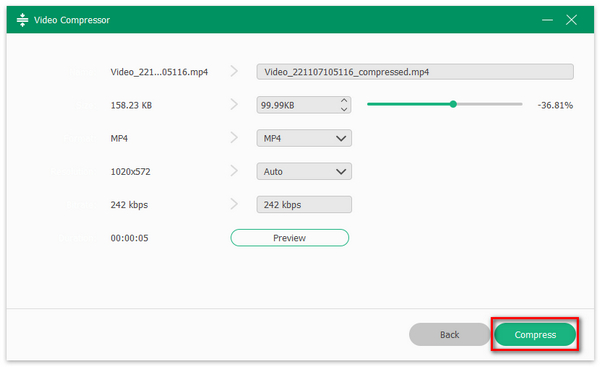
Step 2 Drag the point of the compressing bar to control the video size you want. If you are satisfied with the result, please click the Compress button.
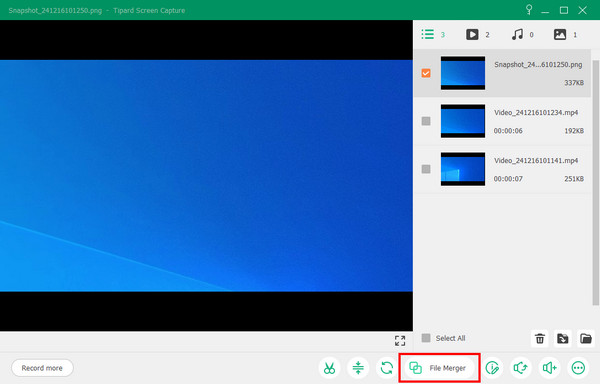
Step 1 Check your recorded files and select the File Merger option.
Step 2 You can click the Add button or the big plus sign to add more files here.
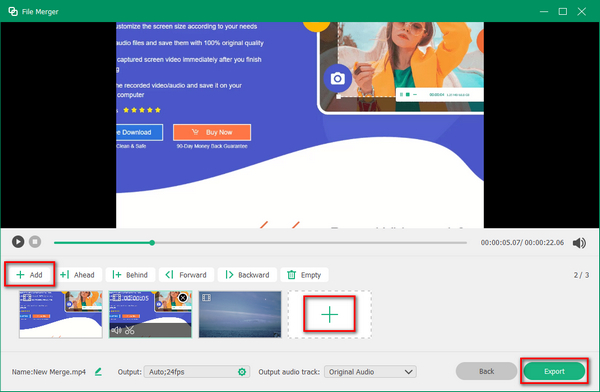
Step 3 If you want to combine your recorded files, you can select the recorded file and click the Add button to import it. If you want to merge your recorded and local files into one, you can click the Load Files button.
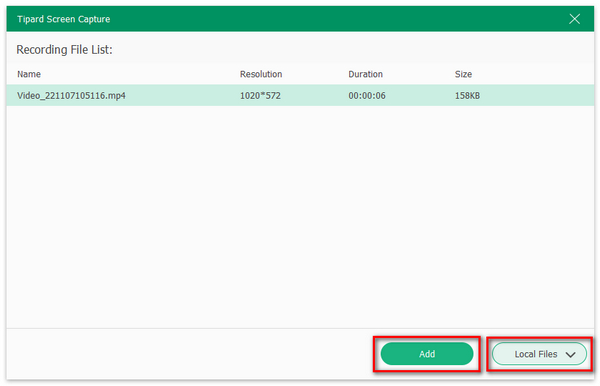
Step 4 Lastly, click the Export button to save.
Step 1 Check your recorded files and select the Media Merger option.
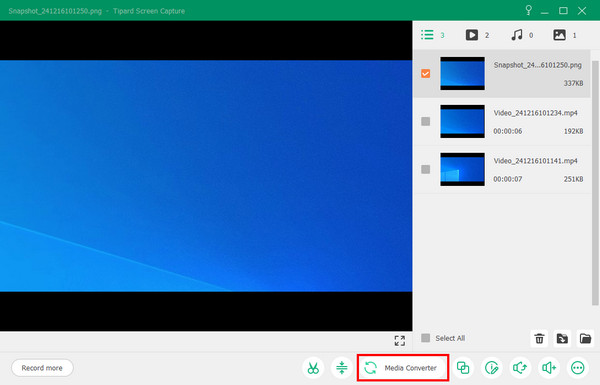
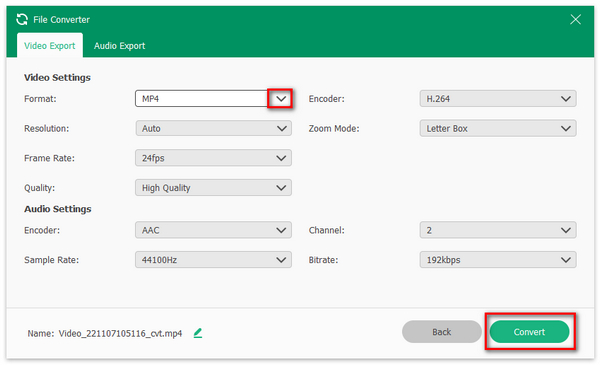
Step 2 You can operate your file in the Video Export window if you want to convert your recorded file to other video formats, like MP4, MOV, AMV, AVI, MKV, GIF, etc. You can operate your file in the Audio Export window to convert your recorded file to other audio formats, like MP3, AAC, AC3, WMV, WAV, etc.
Step 3 After selecting the format by clicking the drop-down button of Format and adjusting other settings, you can click the Convert button to finish.
Step 1Check your recorded files and select the Media Metadata Editor option.
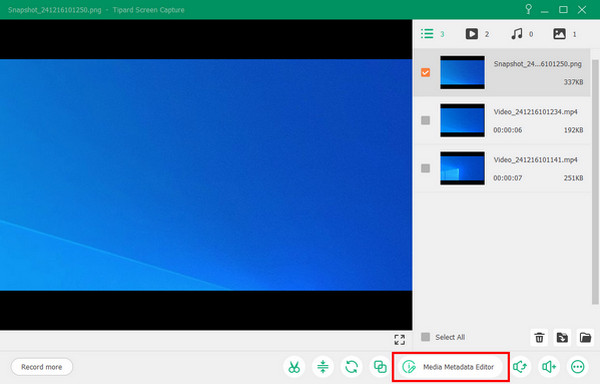
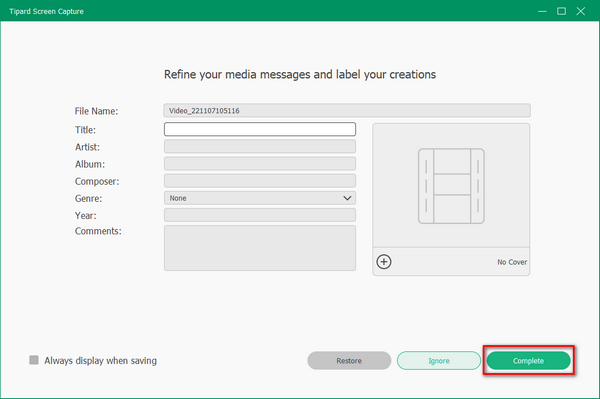
Step 2 Then, you can change your recorded file name and add title, artist, album, composer, genre, year, comments, and cover to your recorded file.
Step 3 Next, click the Complete button to finish.
When you use Screen Capture on your computer, you may fail to record your screen sometimes. If so, you can try the methods below or contact us immediately.
1. Sound card is occupied by other applications.
If you get the message saying "Failed to record, as your sound card is occupied by other applications." Please check your sound card and free it. If you don't know where to find it, you can also choose to reboot your computer."
2. Graphic card or sound card has been modified.
If you get the message saying "Recording failed, for some changes in your graphic driver or sound card driver." Please restart the program and try recording again.
3. Camera and Microphone access is disabled.
Please make sure that your Microphone and Camera access is enabled. To enable the access, you should click the Start button on your computer. Then select Settings, Privacy, and find Microphone/Camera. Now turn on the Allow apps to access your microphone/camera option.
4. The speaker is not plugged well.
Please make sure that you have plugged the audio jack into computer correctly.
5. Sound/graphic card drivers are outdated or not compatible.
In this situation, you need to uninstall the sound/graphic card drivers and install the proper drivers from your sound/graphic card manufacturer.
6. The running program is in Compatibility mode.
Please uncheck the Compatible mode and run the program as an administrator.
If your Windows Defender Firewall is turned on, you may encounter the issue of failing to record your iPhone screen. Because Windows Defender Firewall blocks your iPhone so you cannot connect it to the computer. In that case, you need to turn off Windows Defender Firewall on your computer. Here are 3 ways you can try.
Way 1: Through Control Panel
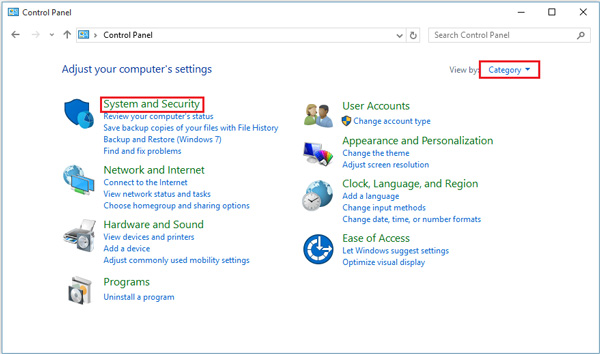
1. Open Control Panel on your computer. If you don't know where it is, just search it in the search box. Select System and Security.
2. Find Windows Defender Firewall after you enter the System and Security interface. Then look for the Turn Windows Defender Firewall on or off option on the left panel. Click the option.
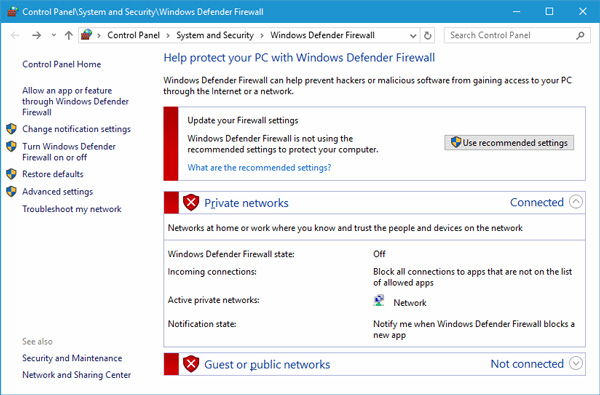
3. Please enable Turn off Windows Defender Firewall and click OK.
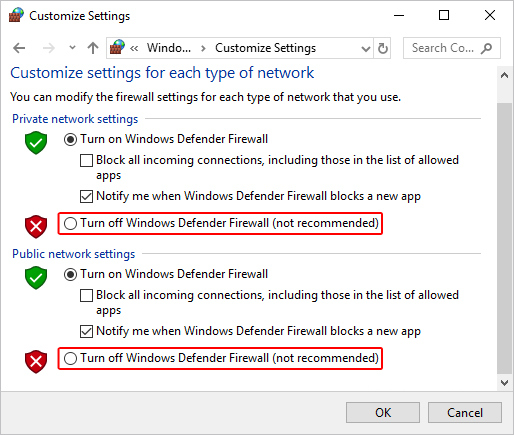
Way 2: Through Settings
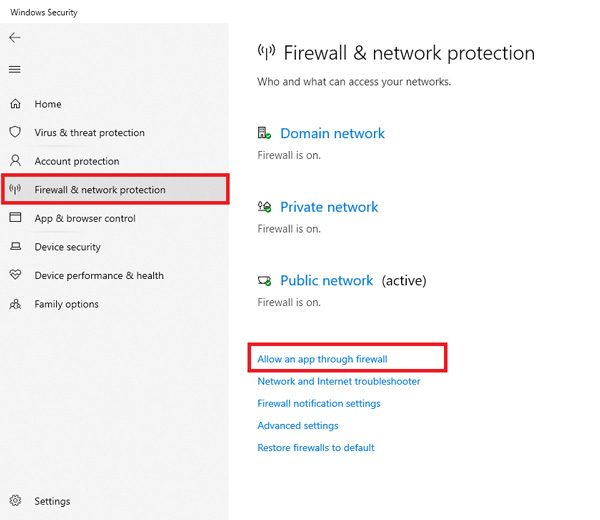
1. Go to Settings and locate the Firewall & network protection tab from the left panel. Then select Allow an app through firewall.
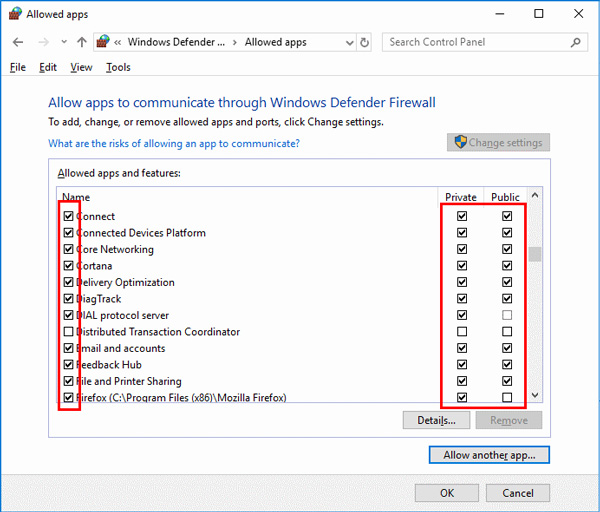
2. Check the box behind if you want to allow this app through firewall.
Way 3: Through Command Prompt
If you know how to use command prompt, you can enter the command: netsh advfirewall set allprofiles state off to disable your Windows Defender Firewall.
Usually, when you use Tipard Screen Capture, you are suggested to choose the Auto mode so that the software can provide the suitable Screen Capture Mode for you based on the performance of your device.
Besides, you can also choose Screen Capture Modes by yourself in the Preferences window.
They are:
Mode 1 (Common)
This mode ensures the compatibility and the quality of screen capturing, which is the default mode of Tipard Screen Capture.
Mode 2 (Windows 10 1903 and later) WinRT
If your computer system is Windows 10 1903 and later, you can select this mode to make the recording quality better. But there will be a yellow border after you choose this mode, and you can update your computer to Windows 11 for hiding this border.
Mode 3 (Common) DXGI
When you cannot use those modes above, you can choose the Mode 3 (Common) DXGI. However, this mode may lower the recording quality.
Tipard Screen Capture will adopt the DGI mode by itself as your device cannot support those modes above. The bad side is that the recording quality will be decreased while using this mode.
Step 1 Firstly, please prepare an aux cable to transmit your Android phone audio to the computer.
Step 2 If you are a desktop user, you should plug the aux cable into the line-in hole to connect your Android phone and the computer. If you are a laptop user, you should prepare an external sound card and connect it to the computer. Then, please plug the aux cable into the sound card and your Android phone.
Step 3 After finishing the steps above, you need to right-click on the Sound button at the bottom-right corner and choose the Open Volume Mixer option.
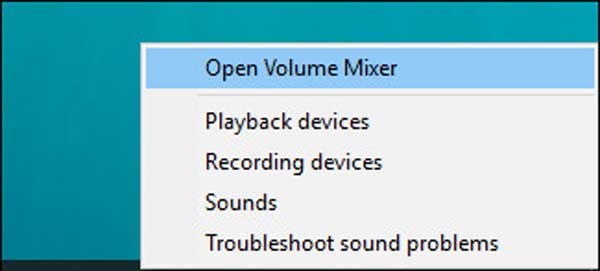
Step 4 Then, please click the System Sounds button.
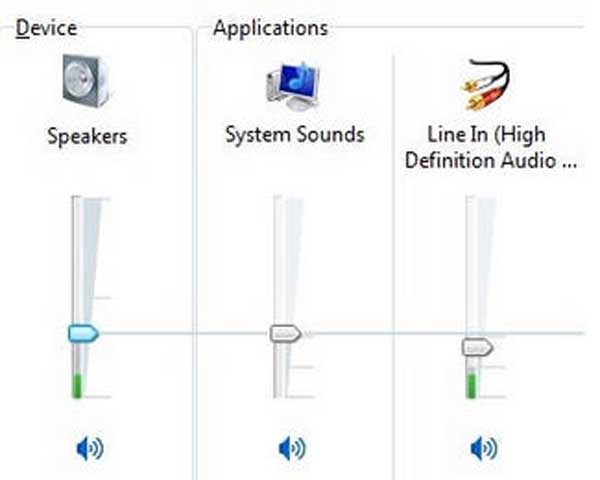
Step 5 Later, select the Recording tab, right-click Line In, and choose Enable.
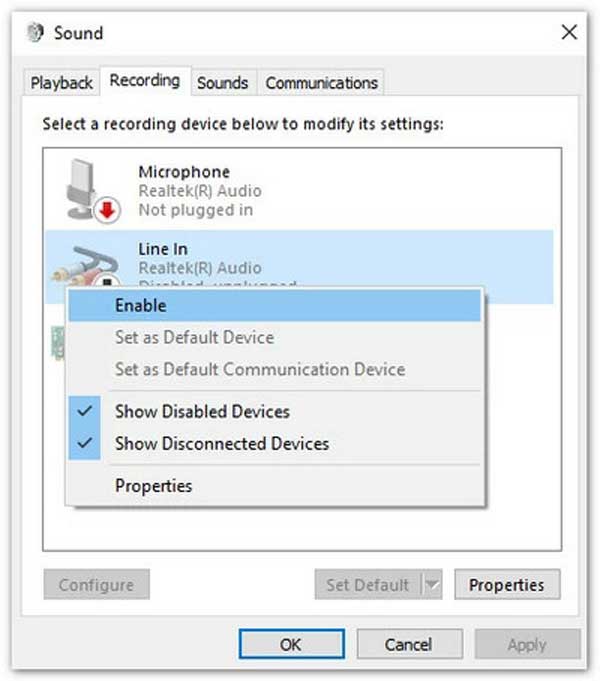
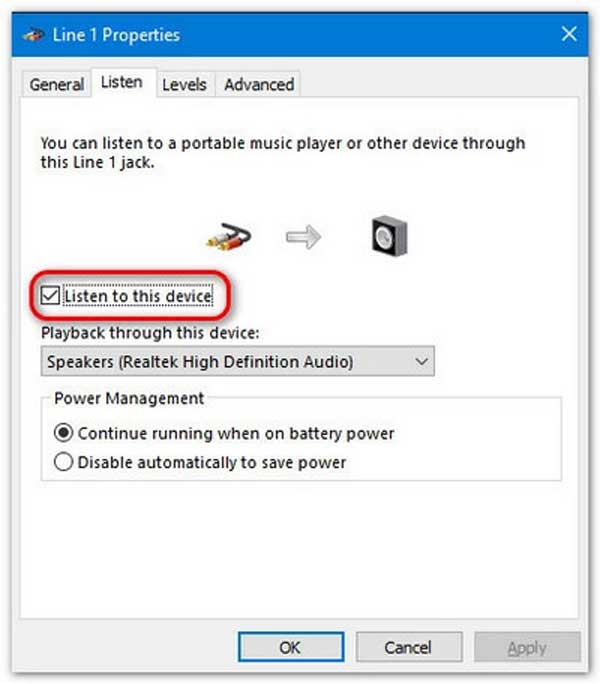
Step 6 And then, you should right-click Line In again and choose Properties. After that, choose the Listen tab and check the box of Listen to this device. Finally, you click the OK button, and you can record the Android phone internal audio on your computer.
Before updating the graphics driver, please check whether your graphics driver's version is the latest.
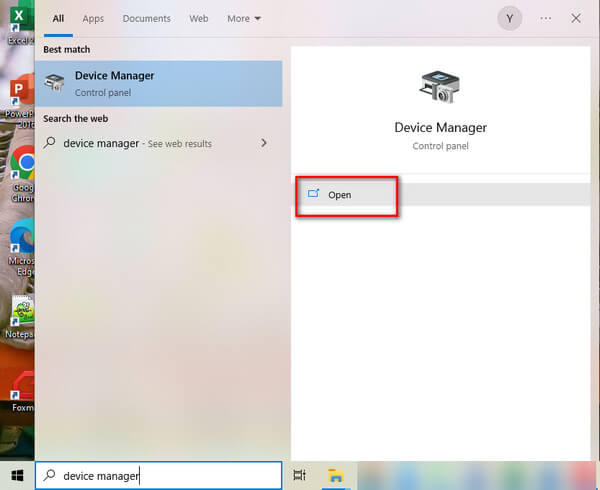
To view its information, enter Device Manager by typing its name in the search bar and clicking Open. After entering Device Manager, you should find and unfold Display adapters, right click on the graphics driver, select the Properties option and switch to the Driver tab to view Driver version.
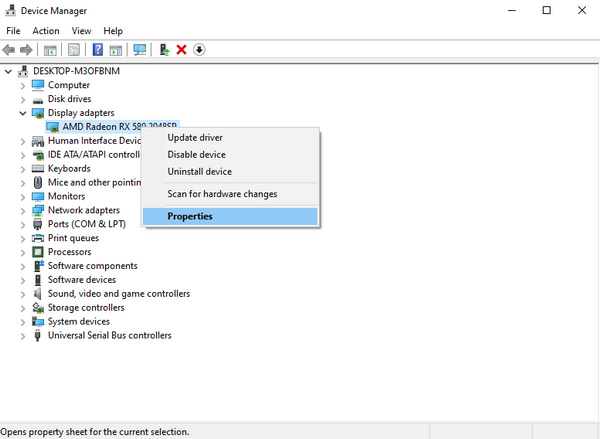
Next, you can go to the official website of your graphics driver's manufacturer to check the latest driver and compare if your current graphics driver matches. If it matches, your graphics driver is up to date. If it doesn't match, please follow the instructions below to update your graphics driver.
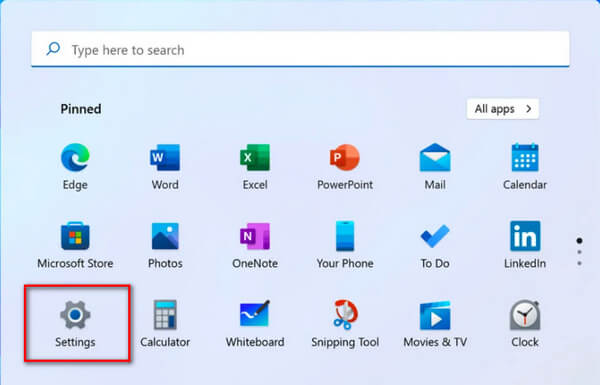
This tutorial will take updating graphics driver in Windows 11 as an example.
Step 1 Click the Windows logo on the Taskbar and select Settings to open.
Step 2 After entering Settings, please go to the Windows Update interface.
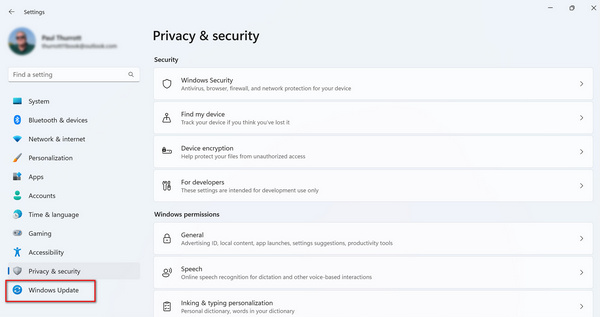
Step 3 Then click the Check for updates button to update any available drivers or software.

Step 1 To begin, you should input Device Manager into the search bar and click the Open button to enter it.
Step 2 After that, please find Display adapters and click on it. Then you need to right click on your graphics driver and go to the Properties window.

Step 3 Next, go to Driver and click the Update Driver button.
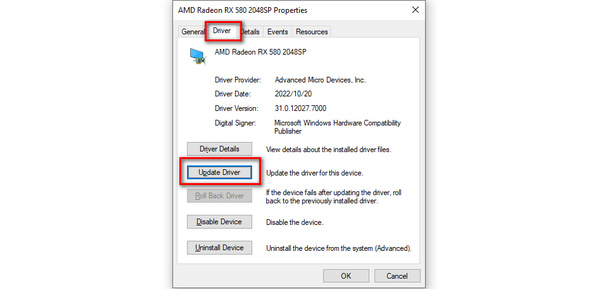
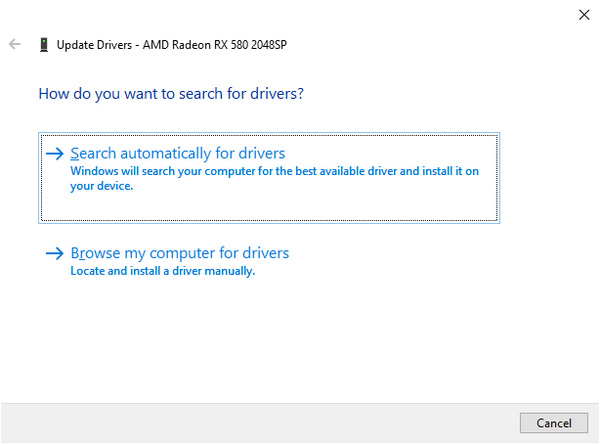
Step 4 When clicking Update Driver, a window will pop up, and you should select the Search automatically for drivers option. If there is the latest version of your graphics driver you can update to, just install it.
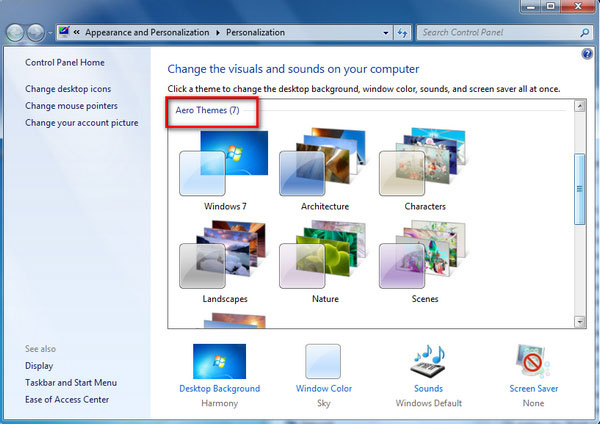
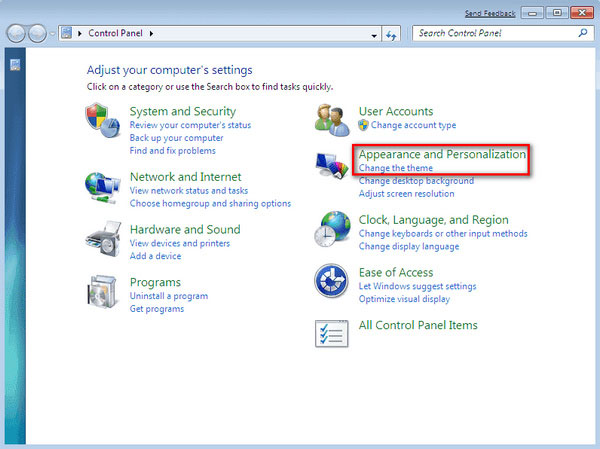
Step 1 Go to Start, open Control Panel, and select Change the theme in the Appearance and Personalization section.
Step 2 Then you will enter a window with Aero Themes, and you can select any one of them to enable Aero on your Windows 7 computer.
