Here, learn how to scroll capture on Windows, Mac, Chrome, and Edge to capture full web pages or long documents with little effort. It will provide you with tools and techniques to save scrolling content, edit it, and share it for multiple applications with clarity and ease.
Part 1. How to Take Scrolling Screenshots on Windows/Mac
Discover simple ways to take scrolling screenshots on Windows and Mac, allowing you to capture full web pages or lengthy documents with ease and precision for various purposes.
1. Tipard Screen Capture
One may find capturing scrolling content quite challenging, but Tipard Screen Capture has a smart solution thanks to its recording and editing features. This remote editing does the job by recording the screen and then scrolling around to make the necessary screenshots.
- Customize the recording area to match the width of your scrollable content.
- Preserve image clarity, ensuring no detail is lost during capture.
- Extract specific frames from your recording to create a scrolling screenshot.
- Edit and refine extracted frames with annotations and enhancements.

- Quality screen recording with adjustable dimensions for accurate captures.
- Inbuilt editing tools for annotations and enhancements of extracted frames.
- Time-consuming playback to extract frames after recording.
Step 1 Download the software from the official page and install it on your Windows or Mac system. When the software opens, select the Screen Recorder option.

Step 2 Then, choose Custom mode that will accommodate the characteristic width of the scrollable object. Drag it to set the recording box dimension over the area being scrolled.

Step 3 Next, click REC to start the screen recording action. While doing this, scroll through the content you want to cover slowly.

Step 4 When finished, stop the recording and then play back the footage. Once you are happy with the playback, you can use the capture tools to highlight some parts of the video and store them as pictures.
2. Preview App
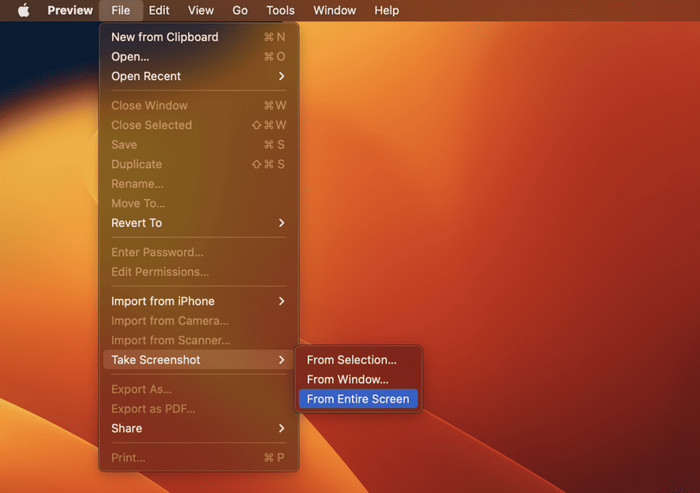
The Preview app can easily capture entire web pages or documents, making it convenient for shorter scrolling captures. It excels at quick screenshot Mac tasks but may only be ideal for a limited number of lengths, offering a straightforward solution without requiring additional software.
- It is an inbuilt app, so there is no need to download third-party software.
- It is easy to use and has simple editing options after capturing.
- Shorter content is not effective for extensive scrolling captures.
Step 1 Navigate to the webpage or document you want to capture.
Step 2 Press Command + Shift + 4 on your keyboard. This shortcut usually lets you select a screen area, but wait!
Step 3 Hover your mouse and notice the thumbnail preview in the corner of your screen.
Step 4 Click the thumbnail and choose the Take Screenshot > From Entire Screen option when it appears.
Step 5 Once in Preview, the entire capture opens, allowing you to edit or save the screenshot as needed.
3. ShareX
ShareX is a free, open-source video recorder tool with superb functionality for capturing scrolling screenshots of offline documents like PDFs or Word files. Here is how you can use ShareX to capture scrolling content seamlessly.
- Fully customizable settings for capturing long documents or web pages.
- Free and open-source, with no hidden costs or ads.
- The interface is overwhelming for beginners because it has too many options.
Step 1 Download ShareX from its official website or GitHub. Open the software and ensure your target document or application is maximized and active.
Step 2 In its main interface, click the Capture menu. From the dropdown, select Scrolling Capture.
Step 3 A window will appear, prompting you to select the application or document to capture. Click on the desired window, then follow the on-screen instructions to initiate the scrolling capture, usually by pressing a specific key or clicking inside the window.
Step 4 Modify settings such as scrolling speed, delay before capture starts, or the number of scrolls to suit the size and content.
Step 5 Once the capture is complete, it will open in the image editor. Edit, annotate, or directly save the screenshot to your desired location.
Part 2. Scroll Capture Screenshot on Chrome/Edge
Using Chrome and Edge, you can easily capture scrolling screenshots directly from your browser, allowing you to save or share entire web pages effortlessly.
1. Google Chrome
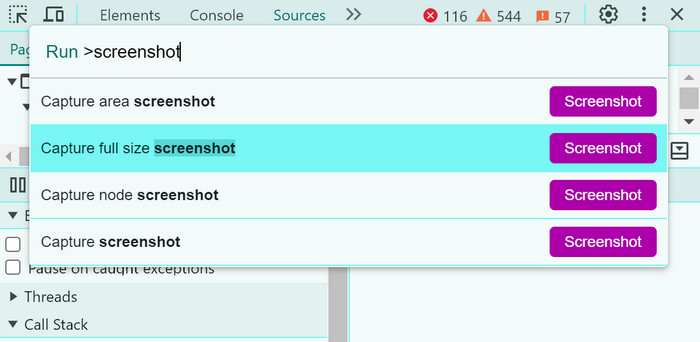
Google Chrome offers to take scrolling screenshots from within, which is great for doing full-page captures without requiring a third-party extension, software, or desktop recorder. Here is how to make the most of this browser feature:
- No need for downloading extra extensions or software.
- Automatically saves screenshots in the download folder.
- Accessible from Built-in Developer Tools.
- It requires navigating through the technical Developer Tools for new starters.
Step 1 Right-click anywhere on the webpage and select Inspect from the menu. Alternatively, use the shortcut Ctrl + Shift + I, or go to the three-dot menu, choose More Tools, and then select Developer Tools.
Step 2 With Developer Tools open, press Ctrl + Shift + P to access the Run Command Box.
Step 3 Type Screenshot in the command box. Select Capture a full-size screenshot to capture the entire webpage. The browser automatically saves the screenshot in your downloads folder.
Step 4 Access the screenshot via the Chrome Downloads icon or your download folder. Share it by right-clicking and selecting Show in Folder, then use the Send To option. Alternatively, upload it through email, Slack, Trello, or other apps.
2. Microsoft Edge
Microsoft Edge brings a very friendly-looking Web Capture tool that makes scrolling screenshots a breeze and enables saving or even annotating content with several clicks.

- Intuitive and beginner-friendly interface.
- It allows saving, copying, or direct sharing of screenshots.
- No further extension or software is required.
- Works only inside the browser, not with other applications.
- More control over the capture customizations needs to be given.
Step 1 Navigate to the web page you wish to capture.
Step 2 Right-click anywhere on the web page and select Screenshot from the context menu. Alternatively, press Ctrl + Shift + S, or click the three-dot menu icon and choose Screenshot from the dropdown list.
Step 3 When the Web Capture tool opens, choose Capture full page to take a scrolling screenshot of the entire page.
Step 4 View your screenshot directly in Edge. Use annotation tools like drawing or text to highlight specific parts if needed. Please save it to your device, copy it to your clipboard, or share it through its sharing options.
Part 3. Tips: Save Scrolling Screenshots of Webpage as Multiple PDFs
Learn how to save an efficiently scrolling webpage screenshot as several PDFs through splitting, cropping, and organizing content. These approaches ensure long web pages or documents are stored in an organized manner, making it easy to share or archive. Techniques to achieve this are shown below:
- Use Image Editors: Use reliable tools for image editing to fragment the full-scrolling shot into small parts. Divide carefully with proper logic so it will read well and have a continuous flow. For better organization, save them all as separate PDFs.
- Browser Extensions: Some advanced screenshot extensions, such as those for Chrome or Firefox, allow you to capture and save specific portions of a webpage directly as separate PDF files. This eliminates the need for post-capture editing, streamlining the process.
- Use Online PDF Tools: Upload your scrolling screenshot to trusted online PDF management tools. These services usually include splitting, cropping, and exporting parts of the image into multiple PDF files. This is great for users who need to be tech-savvy.
- ShareX Settings: Configure the settings in ShareX to capture scrolling content in manageable sections. Enable options for automatic splitting during scrolling and save each segment as an individual PDF. This method is especially useful for larger projects or professional documentation.
Comparison Table:
| Feature | Tipard Screen Capture | Preview App | ShareX | Google Chrome | Microsoft Edge |
|---|---|---|---|---|---|
| Scrolling Screenshot Capture | |||||
| Ability to Capture Entire Webpage | |||||
| Support for Offline Documents | |||||
| Customizable Scrolling Area | |||||
| Automatic Capture During Scrolling | |||||
| Post-Capture Editing (Text, Highlights) | |||||
| Exporting/Sharing Options | |||||
| Ease of Use |
Conclusion
Learning to capture a scrolling screenshot makes it incredibly easy to snap an entire web page or document for safekeeping. Whether using specialized tools or browser features, these methods greatly simplify capturing and distributing lengthy content. The following provides several options you can choose from based on your needs.


